Deployment
The topics in this section provide information regarding the deployment of applications built with CBFS Filter. The information in these topics should be reviewed carefully when designing a deployment strategy, because CBFS Filter's kernel mode drivers and other supplementary DLLs must be distributed along with the application for it to function correctly.
Topics
Driver Installation
At a high level, CBFS Filter consists of class-specific kernel mode drivers and user mode library libraries which work together in tandem to provide each class's functionality. Therefore, it is necessary to install a class's kernel mode driver when deploying an application built with its user mode library.
The functionality needed to install the class drivers is included in each one's user mode library, as well as in the standalone installer DLLs provided for each one.
Important: the signatures of the functions in the installer DLL differ from the signatures of the corresponding methods of the classes. Use the signatures provided in installer/{ClassName}Inst.h when using the installer DLL.
The drivers directory, located within the product's Python package (see notes below), contains the following files for each class*:
| {ClassName}.cab | Contains the class's drivers and the supplementary installation/uninstallation files. |
| installer/{ClassName}Inst.h | A header file for the installer DLL. The installer DLL may be used on the target system to install (or uninstall) the items within {ClassName}.cab. |
| installer/x64/{ClassName}Inst.dll | The C/C++ installer DLL for the x64 (AMD64) processor architecture. |
| installer/x86/{ClassName}Inst.dll | The C/C++ installer DLL for 32-bit x86 processor architecture. |
| installer/ARM/{ClassName}Inst.dll | The C/C++ installer DLL for 32-bit ARM processor architecture. |
| installer/ARM64/{ClassName}Inst.dll | The C/C++ installer DLL for 64-bit ARM processor architecture. |
Python Package Notes
In the Python edition, the drivers directory described above is included as part of the product's Python package, <install_dir>\cbfsfilter-24.0.xxxx.tar.gz. After installing the package with pip (see the User Mode Library topic), the drivers directory can be found within the product's package directory, which can be located by running pip show cbfsfilter.
Installation and Uninstallation via User Mode Library Methods
The class includes the following methods to install and uninstall the required files; please refer to their documentation for more information:
All of the links in this topic point to the CBFilter's copy of these methods, but they are available in all components.Important: uninstall must only be used when completely removing the driver. When updating the driver, this method must not be used as it may cause the OS to incorrectly remove the driver on reboot. Please refer to the "Updating the Driver" section, below, for more information.
Installation and Uninstallation via Installer DLL Functions
The installer DLL is a lightweight, stand-alone library that contains only the functionality required for installing and uninstalling the required files. It is available in both 32-bit and 64-bit versions (each of which is capable of installing both 32-bit and 64-bit drivers and helper DLLs); and may be used as desired in installation scripts, setup applications, or any other executable capable of loading dynamically-linked libraries (DLLs).
The functions exposed by the installer DLL mirror the class methods listed above. Each function is available in two forms: those with an *A suffix, which can be used with ANSI/UTF8 strings; and those with a *W suffix, which can be used with Unicode (UTF16) strings.
Windows 7/8/8.1 and Windows 2008R2/2012/2012R2 Server notes: to install the drivers, you need to have certificate-related updates installed on the target system. This includes KB3033929 that adds support for SHA2 certificates. Other notable updates are are KB976932 (Service Pack 1 of the mentioned systems) and KB4474419 (Security Update). Other updates, such as updates to known Root and CA certificates may be required as well. Without these updates, the drivers can be installed but may not be loaded by the OS.
Updating the Driver
To update the driver, call the install method. The new version of the driver will replace the older version. Please do not call the uninstall method when updating the driver.
Uninstalling the Driver
To uninstall the driver completely, call the uninstall method. If the driver cannot be immediately uninstalled, it will be marked for removal and uninstalled on the next reboot.
Use caution when calling uninstall ; if it gets called and the driver cannot be uninstalled immediately, and then install is subsequently called to install a new version, then upon reboot, the OS will end up uninstalling the newly-installed driver.
Important: The driver should only be uninstalled when the intent is to completely remove it from the system. Do not uninstall the driver to update it.
Reboot Requirements
Depending on the current state of the system, as well as the options chosen when installing or uninstalling the driver, the OS may need to reboot to complete the operation.
Always check the return value of the install and uninstall methods/functions; it will indicate whether a reboot is required .
Additional Notes
The OS treats major versions of the driver as separate products; they can operate in parallel and do not share any resources. Old major versions may optionally be removed from the system when calling install by passing the appropriate value for its Flags parameter.
For each major version of the product, only one copy of the driver can be installed at any time. When the driver is being installed, its version is checked, and one of the following three things occurs:
- If no driver with the same major version is currently installed, then the install procedure installs the driver as a new product.
- If a driver with the same major version and an older minor version is currently installed, then the install procedure updates the existing driver with the new one.
- If a driver with the same major version and a newer minor version is currently installed, then the install procedure leaves the existing driver unchanged.
When deploying files to a target system, the CAB file must remain present on the system. This file is required for uninstallation of the driver at a later time.
The product's installation code maintains a ProductGUID-based record of driver installations in the Windows Registry, creating a separate registry entry for each different ProductGUID. When the driver is "uninstalled", the corresponding registry entry is removed. The driver is only removed from the system if there are no entries left in the registry that reference the driver.
Required Permissions
By default, Windows only allows installation and uninstallation of the CBFS Filter system files (kernel mode drivers and helper DLLs) to be performed from a user account which is a member of the Administrators group.
On systems where UAC is enabled, the process responsible for installing or uninstalling the system files must run with elevated permissions. Detection of current privileges and elevation of permissions is not within the scope of the class itself.
Some examples of obtaining the required permissions for driver installation and uninstallation are below.
- Starting the application which uses the class with the "Run as administrator" option.
- Modifying the Load and unload device drivers setting in the Local Security Policy under the User Rights Assignment section.
- Including a manifest alongside the application indicating the requirement for elevated permissions. For instance, if a file MyApp.exe.manifest with the content below exists next to the application MyApp.exe, it will prompt for elevated permissions when started (if required).
<?xml version="1.0" encoding="UTF-8" standalone="yes"?>
<assembly xmlns="urn:schemas-microsoft-com:asm.v1" manifestVersion="1.0">
  <assemblyIdentity version="1.0.0.0" processorArchitecture="X86" name="ExeName" type="win32"/>
  <description>elevate execution level</description>
  <trustInfo xmlns="urn:schemas-microsoft-com:asm.v2">
    <security>
      <requestedPrivileges>
        <requestedExecutionLevel level="requireAdministrator" uiAccess="false"/>
      </requestedPrivileges>
    </security>
  </trustInfo>
</assembly>
User Mode Library
The user-mode library must be deployed to end-user systems along with the kernel-mode drivers; the version of the kernel-mode drivers on the end-user systems must be equal to or newer than the version of the user-mode library. Thus, when the user-mode library is installed or updated on end-user systems, it is required to ensure that the kernel-mode drivers already present in the system are updated to match the version of the installed user-mode library.
The user-mode library comes in two pieces, both of which must be deployed with the application:
- A Python module named cbfsfilter.py.
- A native dynamic library (unmanaged), named pycbfsfilter24.dll, available for both 32-bit (x86) and 64-bit (x64) processor architectures.
Both the module and the native library are included in the product's Python package, <install_dir>\cbfsfilter-24.0.xxxx.tar.gz, which should be installed using pip:
cd C:\path\to\install_dir
python -m pip install cbfsfilter-24.0.xxxx.tar.gz
Once the product's Python package has been installed, the module can be imported and used: from cbfsfilter import *. Nothing else is required to deploy the application.
As an alternative to installing the module using pip, you can utilize the built-in setuptools module to package the module for deployment or install it to the machine.
python setup.py build --build-lib=<app_dir>
The above setup command packages the module and native library for deployment. A folder is created in the app_dir directory with the module and the native library packaged inside.
Remember to deploy the drivers too, as they are an integral part of CBFS Filter.
General Information
The topics in this section provide general information about various aspects of the product's functionality.
Topics
- Thread Safety of the API
- CBFilter/CBMonitor Topics section
- CBRegistry Topics section
- Driver Altitudes
- Event Handling section
- File and Registry Filter Rules section
- Loading Drivers in Safe Mode
- Error Handling
- Troubleshooting
CBFilter/CBMonitor Topics
The topics in this section provide additional information specific to the CBFilter and CBMonitor classs.
Topics
- File Masks
- Contexts
- File Isolation
- Direct File operations
- Placeholders
- Virtual Files
- Reparse Points
- Avoiding Deadlocks
- Security Checks
- File Create/Open Events
- Filenames In Events
- Cached and Non-Cached Requests
- Monitoring Network Resources
File Masks
File masks are "templates" against which file and directory names are matched. A file mask may optionally begin with a path, either with or without a volume name (see the next section); and both the file name part and the path part may contain single-character wildcards (?) or multicharacter wildcards (*). Following are a few examples of file masks:
- 20??_Budget.xls
- *.doc
- *\Pictures\20??\*.jpg
- \temp\*.tmp
- C:\Reports\*
In general, file masks like C:\Reports\* will not match the C:\Reports\ directory itself, so any filter rule using this mask will therefore not match operations that target C:\Reports\ directly (such as an operation that enumerates its files and subdirectories). This behavior applies for all rules except reparse rules; a reparse rule with a source mask like C:\Reports\* will match any operation that targets the C:\Reports\ directory or any of its descendants.
Volume Names in Paths
If a file mask begins with a path, that path may optionally include a volume name. This allows applications to monitor only the volumes they are interested in. The following kinds of volume names are acceptable:
- A volume GUID, formatted like Volume{xxxxxxxx-xxxx-xxxx-xxxx-xxxxxxxxxxxx}\ (note the trailing backslash). A mask may start with the \\?\ prefix, such as "\\?\Volume{xxxxxxxx-xxxx-xxxx-xxxx-xxxxxxxxxxxx}".
- A hidden volume mounting point, formatted like \\.\mounting_point_name\.
- A DOS name, formatted like C:\.
- A network resource, formatted like \\server_name\share_name\ (please refer to the Monitoring Network Resources topic for more information).
- A volume NT-native name, formatted like \Device\HarddiskVolumeX\, where X is the number of the volume.
NOTE: To successfully add a rule with a file mask that includes a volume name, the specified volume must already be present on the system. Applications that wish to add rules for volumes that are not currently present can do one of the following things:
- Add rules without volume names and selectively skip volumes as desired by setting the on_before_filter_attach_to_volume event's SkipVolume parameter to True.
- Add and remove volume-specific rules "on-demand" using the on_after_filter_attach_to_volume and on_after_filter_detach_from_volume events.
Mask Modifiers
Inverted Masks
An inverted mask starts with two pipe characters ("||"), such as ||file_mask. It inverts (negates) the result of matching the name to the mask. This syntax is an alternative to using passthrough rules. It can be used to slightly speed up operations: an inverted mask requires one rule, whereas the use of passthrough rules introduces a secondary bypass rule to match.
Matching of Alternate Data Streams' Names
An alternate data stream (ADS) is a secondary file stream with its own name that follows the name of the file. An ADS full name looks like \path\to\filename.ext:streamname:$streamtype where the "streamname" part can be empty. Thus, to track events that happen specifically on ADS, you need to write the mask in the way that the ADS name matches it. A simple mask to track operations on all file's ADS is filename.ext:*. More complex use of wildcards in such a mask is possible as well.
Exclusion of Alternate Data Streams
Most "simple" masks match both the main name of the file and all of file's alternate data streams (named streams). To track operations that occur with a file but not its ADS, append ":|" to the file name in the mask (e.g., filename.ext:|).
NOTE: Such a mask covers operations on the specific ADS names that denote the main file or directory's content, that is, "::$DATA" (main data stream of a file), "::$INDEX_ALLOCATION", and ":$I30:$INDEX_ALLOCATION" (both identify a directory's content stream). If you want to exclude operations on these streams, use passthrough rules.
Per-Process Masks
Masks used by standard filter rules and access rules can be restricted so that they only match operations made by a specific process (or, made by all processes except a specific process). To do this, construct a mask in one of the following forms:
- process_name.exe|file_mask: Only matches operations requested by process_name.exe.
- ~process_name.exe|file_mask: Only matches operations not requested by process_name.exe.
- process_id|file_mask: Only matches operations requested by the process whose Id is process_id.
- ~process_id|file_mask: Only matches operations not requested by the process whose Id is process_id.
In all cases, file_mask can be any valid file mask as described above. The process_name.exe portion must be a valid process executable file name, and may optionally begin with a path. Wildcards are supported in any part of the process_name.exe portion. The process_id portion must be a numeric process Id (PID). When adding a PID-based rule, you need to be aware of the PID Reuse behavior of Windows.
Contexts
It is often necessary for an application to associate certain information with a given file/directory, file handle, or enumeration operation. To assist developers in doing so in a convenient and performant manner, the CBFilter class provides context parameters in a number of events.
A context carries an application-defined value that identifies or points to some application-defined data, and each file/directory, file handle, and enumeration operation has a separate context associated with it. The CBFilter class treats context values as opaque; it stores the context values passed to it by the application and ensures that the correct values are exposed again whenever some event fires for a particular file, handle, or enumeration; but otherwise, it does not attempt to use said values in any way.
NOTE: Contexts are not available in the CBMonitor class.
Context Lifetimes
Contexts in CBFilter can be grouped into a few categories, each of which is subject to a different lifetime:
- File contexts and directory contexts, which are associated with an open file or directory.
- Handle contexts, which are associated with a specific open file or directory handle.
- Event contexts, which are associated with a specific request sent by the OS.
- Enumeration contexts, which are associated with an ongoing enumeration.
File/directory contexts are created the first time a file or directory is opened, and they live until the last handle to that file or directory is closed (subject to an exception described below). Handle contexts, in contrast, are created every time a file or directory is opened, and they live only until the associated file handle is closed.
For example, consider the following sequence of operations:
| Operation on File X | Context Creations/Deletions | Active Contexts |
| 1. Opened by process A | File context FX and handle context HXA created | FX, HXA |
| 2. Opened by process B | Handle context HXB created | FX, HXA, HXB |
| 3. Closed by process B | Handle context HXB deleted | FX, HXA |
| 4. Opened by process C | Handle context HXC created | FX, HXA, HXC |
| 5. Closed by process A | Handle context HXA deleted | FX, HXC |
| 6. Closed by process C | File context FX and handle context HXC deleted |
NOTE: isolated files and virtual files due to their nature have individual file context for each create/open operation. I.e., the file context, while being separate from a handle context, is not shared between concurrent openings of an isolated or virtual file. This applies to the FileContext values set by an event handler which initiates isolation as well as any other file create/open operations initiated while an isolated file handle is opened. This means that if isolation using CBFilter is involved (either by your application or by another application that is using CBFilter in the same system), FileContext may not necessarily be shared across all open operations. It is possible that process A opens a file, your application assigns a file context to it, and then process B initiates file opening and the *OpenFile event handlers have FileContext set to an empty value again, even as process A still has the file opened. Thus, FileContext starts to behave much like HandleContext in terms of the lifetime.
File/directory contexts are available in all Control Events corresponding to operations performed on some open file or directory, and handle contexts have similar availability. Enumeration contexts are created anytime a new enumeration operation begins and live until the enumeration operation ends.
All contexts, when created, are created before their corresponding "first event" fires (e.g., on_after_open_file, on_after_enumerate_directory). When deleted, all contexts are deleted after their corresponding "last event" fires (e.g., on_after_close_file, on_after_close_enumeration). If, however, a context's "first event" fails, whether as expected (e.g., due to Security Checks) or otherwise (see Error Handling), then that context's value is immediately discarded because its corresponding "last event" will not ever fire. (Contexts are not available in the on_before_open_file or on_before_create_file events because it is unknown whether such requests will succeed.)
NOTE: The classes offer a special event, on_cleanup_context, which is the ultimate last event for the open file lifecycle. This event lets you dispose of the data, associated with file and handle contexts. It is recommended that contexts are deleted not in a on_after_close_file event, but in on_cleanup_context. This will guarantee that there is no race condition between file closing and reopening, in which case such race condition could lead to an invalid context value coming into play.
Event contexts can be set in Before* events and the set value will be passed to the handler of the corresponding After* event, after which the value is discarded. The on_cleanup_context event is not fired for event contexts - an application willing to free some data, associated with the context, may do so in the corresponding After* event. If a handler of a Before* event returns a non-zero event code or sets the ProcessRequest parameter to False, the value set in EventContext is discarded immediately (as the corresponding After* event will not be fired). Also, by default (when process_failed_requests is False), an After* event is not fired if the operation was not successful (a filesystem or some lower-level filter driver returned an error). This means that if your application allocates memory for data associated with the event context, and the operation fails, the application loses a chance to release the allocated memory. The solution is to set ProcessFailedRequests to True and free the memory in the After* event handler.
Context Use Cases
Contexts are most helpful when used to store information associated with a file/directory or file handle. Typically, contexts are initialized during their corresponding "first event", and then are used in subsequent events to speed up those operations.
Event contexts are used to pass information between event handlers of Before* events and the related handlers of the corresponding After* event fired during handling of the same OS request.
Applications are free to obtain and store whatever information they wish using contexts, as long as their event handlers comply with the restrictions described by the Avoiding Deadlocks and Recursive Calls topics.
NOTE: Although contexts usually come into play when the file is opened, the complex architecture of Windows filesystem filter stack makes it possible that some event, related to the opened file, fires ahead of the "first event" (i.e., before AfterCreateFile/AfterOpenFile/AfterEnumerateDirectory).
Using Contexts
Python does not have a completely safe way to store object references in contexts either directly or indirectly, which is why all context parameters are integers. To emulate such capabilities, the following approach is recommended:
- Create a global dictionary instance for the application (i.e., a singleton), with keys that are integers and values of whatever type is desired.
- When the application needs to create a context object in an event handler, a "key" can be created using the hash of the full file/directory name (including path), potentially mixed with additional information.
- For file contexts, a hash of the full file/directory name is sufficiently unique because the context is exposed in all events pertaining to that file/directory.
- For handle and enumeration contexts, additional information must be mixed in because multiple handle or enumeration contexts may be present at once for any given file/directory.
- Using the created key, add the object to the dictionary.
- Set the context parameter to the key used in the previous step.
- To access the object in a later event, use the key stored by the context to retrieve the object from the dictionary.
Notes:
- Applications must take care to enforce proper thread synchronization when accessing the dictionary because events are always fired using worker threads. Please refer to the Threading and Concurrency topic for more information.
- In 32-bit applications, contexts are stored in 32-bit variables internally, and thus, the higher 32 bits of 64-bit values are lost.
File Isolation
File Isolation allows different processes to view different content for the same file. For instance one process may see encrypted content, and another process may see plaintext content.
Requests for isolated files can be redirected to existing files on disk, or they can be handled through events. To enable isolation for a particular request, set the Isolate parameter within the on_before_create_file and on_before_open_file events. The BackendFileName parameter of these events should be set according to how the the isolated file will be handled.
If the application does not use isolation, you may disable the EnableIsolationSupport configuration setting to slightly speed up processing of filesystem events.
| BackendFileName Value | Description |
| FileName | By default BackendFileName is set to the same value as FileName and requests are directed to the original file. |
| Custom Path | Set BackendFileName to the full path of another file on disk to redirect requests to a different file. |
| "" (empty string) | When set to an empty string, file-related events must be handled to provide all information and content for the file. This mode is useful for providing modified content on-the-fly, such as returning decrypted content for specific processes. |
When requests are redirected to an existing file on disk a dedicated cache is created for the isolated file by the CBFilter driver. This cache ensures that the data it holds do not interfere with the data read from or written to the file when it is opened without isolation.
The following events are used to tell the class that a file is isolated or virtual:
and an application should set up the necessary rules using a call to the add_filter_rule method for the above events to fire.The following events must be handled to provide access to isolated files with no backend file specified and virtual files; thus, the events fire automatically (an application doesn't need to set up additional rules for them):
- on_before_query_file_info
- on_before_set_file_info (FileBasicInformation, FileRenameInformation(Ex), FileDispositionInformation(Ex), FileEndOfFileInformation, FileAllocationInformation classes)
- on_before_read_file
- on_before_write_file
- on_before_get_file_security
- on_before_set_file_security
The on_before_get_file_security and on_before_set_file_security may be optional in simpler scenarios, but certain applications fail to handle isolated and virtual files properly when security-related requests are not processed properly.
When handling these events, the application should perform required necessary action and set the ProcessRequest parameter of the event to False to tell the class that processing has been completed.
To ensure that isolation works properly, on Windows 11, the on_bypass_io_request event is fired when the OS makes a request to enable BypassIO on an isolated file, giving a way for the application to forbid BypassIO with an application-specific error code and explanation.
If BackendFileName stays empty, your event handler is responsible for ensuring that the process that creates or opens the file or directory have rights to do this. If the use case of isolation is to access some local file or directory in isolated mode, two options for checking file access are available:
- The event handler can call the get_originator_token method to obtain a security token of the initiator of the file opening, then use this token to call the AccessCheck Windows API function to verify access to the backend file being opened or the one to which requests will be routed;
- If the event handler uses the create_file_direct or create_file_direct_as_stream method to access the backend file, it can offload the security checks to the driver by enabling the CheckFileAccessInDirectIO configuration setting.
Example Use Case - Transformation of data
Isolation ensures that each application accessing the file can have its own personal view of the data, which may be different from other applications. For example one application may see decrypted plaintext content, while a backup tool would see only the encrypted file content.
In scenarios where the data has to be transformed dynamically by an application, the following strategy may be used.
- Handle the on_before_create_file and on_before_open_file events and specify that the file is isolated by setting the Isolate parameter to True.
- Open a direct handle to the file on the disk using the create_file_direct method (set the Synchronize parameter to False in the call to this method). The method should be called in either on_before_create_file/on_before_open_file or on_after_create_file/on_after_open_file.
- Handle the Before* events related to file reading, writing, change of size, and file information requests, listed above, and process the corresponding requests. Use the direct handle, obtained when the file was created or opened, to access the actual backend file where the data is stored. Set the ProcessRequest parameter of these events to False in order to tell the driver that it should not pass the requests to the filesystem. Note that at this point, the application is free in how it reads and writes the data from/to the backend, and the size of the data on the backend may differ from the size of the data presented to the process. So, it is important to take care of this size difference when handling various file size-related requests.
- In the on_before_close_file event, close the direct file handle that was obtained when the file was opened.
Example Use Case - Custom Backend
Isolation makes it possible to present custom data that is not stored on the local filesystem, as files that are a part of this filesystem. If the filesystem entry with the desired name does not exist, and the application needs to make the file observable during filesystem enumeration, use a virtual file. If a file (e.g., a placeholder or just some file) does exist on the filesystem, but the data should come from elsewhere or be written elsewhere, the following strategy may be used.
- Handle the on_before_create_file and on_before_open_file events and specify that the file is isolated by setting the Isolate parameter to True.
- In on_before_create_file/on_before_open_file or on_after_create_file/on_after_open_file, establish a channel to the backend data.
- Handle the Before* events related to file reading, writing, change of size, and file information requests, listed above, and process the corresponding requests. Use the channel, established when the file was created or opened, to access the actual backend file where the data is stored. Set the ProcessRequest parameter of these events to False in order to tell the driver that it should not pass the requests to the filesystem.
- In the on_before_close_file event, close the channel that was used to communicate with the backend storage.
Direct File operations
Direct file operations are the operations performed with a handle or a stream, created or opened using create_file_direct or create_file_direct_as_stream method.
These operations are called so because the requests go to the CBFilter driver, which then directs them either down the filter stack or right to the filesystem (depending on the SendViaStack parameter of these methods).
Direct file operations can create or open a file or a directory depending on the exact value of the CreateDisposition parameter (please refer to the description of the methods for the details).
Applications predominantly use direct file operations in the context of an event handler that is fired in response to a certain filesystem operation request. This means that special care must be taken when using direct file operations.
In the driver, direct file operations are handled in the context of different threads depending on the value of the Synchronize parameter of the above mentioned methods.
If Synchronize is True, this method and all operations with the resulting handle will be executed in the context of the external thread that originated the underlying filesystem request associated with the current event (which is important for on-the-fly file data modification such as encryption), and the following restrictions will apply:
- The method may be called from any event handlers with the exception of on_after_close_file and on_cleanup_context. NOTE: To be able to call the method from the on_before_create_file and on_before_open_file event handlers, set the AllowFileAccessInBeforeOpen configuration setting to True.
- The method should be called only for the file or directory that the event fired for.
- A file will be opened without buffering, which means that applications must comply with all restrictions imposed by the FILE_FLAG_NO_BUFFERING flag when reading and writing file data. Please refer to Microsoft's File Buffering article for more information.
- When writing to a file beyond the end of the file, first use set_file_size_direct to increase the file size, then perform writing.
- No writing should be done to a file from handlers of the on_before_read_file or on_after_read_file event fired for this file. Doing this will in most cases cause an immediate deadlock in the underlying file system. The reason is that when the reading is done, the file lock resource is locked for reading, and an attempt to acquire this resource for writing will block forever.
- Any synchronization primitives and mechanisms, if acquired by an event handler, should be released and unlocked before a direct file operation is performed. The locks may be re-acquired after the operation is completed. Keeping a resource blocked during the direct I/O call can in some scenarios lead to a deadlock that can be resolved only by terminating a process.
If Synchronize is False, this method and operations with the resulting handle are executed in the context of the thread in which the corresponding call is made, and the restrictions described above do not apply. This provides applications with greater flexibility because the returned file handle can be used in any event (as long as its handler complies with the general restrictions described by the Avoiding Deadlocks and Recursive Calls topics). However, this mode is not suitable for operations on a file, for which an event handler is called, due to the risk of a deadlock.
In both cases, the class must be active - that is, it must be started using a call to the start_filter method.
Access to Files
When accessing files using direct file operations, your application must pay attention to how it accesses placeholder files created by other filters. Please refer to the Handling Placeholders page for details.
Security Concerns
create_file_direct or create_file_direct_as_stream methods by default bypass some access checks of the OS. This means that if some process ("originator") initiates opening of a file, to which it doesn't have access, and your application uses one of these methods to open a file and provide its contents to the originator, there's a security problem. In this case, the event handler should use the get_originator_token to obtain the security token of the caller, and then use the AccessCheck Windows API function to verify access.
If your application uses direct file access from on_before_create_file or on_before_open_file event handlers which is a common case in file isolation scenarios, it can ask the class's driver to perform this check in the kernel, which is more efficient. To do this, enable the CheckFileAccessInDirectIO configuration setting.
Use of Handle
The returned handle can be used with the *Direct methods of CBFilter and with some of the Windows API functions that accept a file handle as a parameter. System support may vary depending on the internal implementation of each function. The following Windows API functions have been tested and proven to work:
- CloseHandle (only if the application obtained a handle using the create_file_direct and not create_file_direct_as_stream)
- GetFileInformationByHandleEx, or an application can use the query_file_information_direct method for the same. In both cases, the limitations listed below apply.
- GetFileSize
- GetFileType
- GetSecurityInfo (additional process privileges are required), or an application can use the query_file_security_direct method for the same without requiring extra privileges.
- ReadFile
- SetSecurityInfo (additional process privileges are required), or an application can use the set_file_security_direct method for the same without requiring extra privileges.
- WriteFile (if Synchronize is set to True and subject to restrictions, see the note about writing above)
NOTE: When calling the GetFileInformationByHandleEx function, only the following information classes are currently supported:
- FileAttributeTagInfo
- FileBasicInfo
- FileStandardInfo
- FileStreamInfo
- FileIdInfo
Creating Memory Mappings
An application may need to use a memory mapping in event handlers to access file data for reading and writing. A file handle returned by create_file_direct or create_file_direct_as_stream method cannot be used with CreateFileMapping/OpenFileMapping Windows API functions. Instead, the application should use the create_file_direct method and pass CFD_OPEN_MMF or a combination of CFD_OPEN_MMF+CFD_USE_EXISTING_FILE_OBJECT flags in the DirectFlags parameter as described in the table below to otain a handle to a memory mapping. When this is done, create_file_direct method would return the handle which can be passed to the MapViewOfFile Windows API function. This MMF handle must be closed using the CloseHandle Windows API function.If the event is fired for some file X and an application needs to access file Y from the event handler, the application may use create_file_direct with the Synchronize parameter set to False and use the CFD_OPEN_MMF flag (do not include CFD_USE_EXISTING_FILE_OBJECT as there is no file object available for file Y).
If the event is fired for some file X and an application needs to access this file X from the event handler, the following table describes, which flags and parameter settings may be used.
| Events | Flags | Comments |
| All Notify*File events | CFD_OPEN_MMF | The Synchronize parameter must be False as there is nothing to synchronize with. The CFD_USE_EXISTING_FILE_OBJECT flag has no effect. |
| on_before_create_file, on_before_open_file | CFD_OPEN_MMF | The Synchronize parameter must be True; CFD_USE_EXISTING_FILE_OBJECT cannot be used because there is no file object created yet. |
| on_after_create_file, on_after_open_file | CFD_OPEN_MMF or CFD_OPEN_MMF + CFD_USE_EXISTING_FILE_OBJECT | The Synchronize parameter must be True; inclusion of CFD_USE_EXISTING_FILE_OBJECT is recommended to prevent possible deadlocks. |
| on_before_read_file, on_before_write_file, on_after_read_file, on_after_write_file | CFD_OPEN_MMF + CFD_USE_EXISTING_FILE_OBJECT | The Synchronize parameter must be True, otherwise CFD_USE_EXISTING_FILE_OBJECT will be ignored, and the file will be opened for the second time (which will likely deadlock). |
| on_after_close_file | CFD_OPEN_MMF | The file object has been closed, and CFD_USE_EXISTING_FILE_OBJECT cannot be used |
| Other Before*File and After*File events | CFD_OPEN_MMF or CFD_OPEN_MMF + CFD_USE_EXISTING_FILE_OBJECT | If CFD_USE_EXISTING_FILE_OBJECT is set, the Synchronize parameter must be True, otherwise CFD_USE_EXISTING_FILE_OBJECT will be ignored, and the file will be opened for the second time. |
Placeholders
The CBFilter class makes it possible for applications to create so-called placeholders -- empty files, which are filled with information when these files are accessed. Windows CfApi and OneDrive work by utilizing this concept.
When an application creates such placeholders, Microsoft lists some requirements for filter drivers (both those that create placeholders and those that access it), listed on the Handling Placeholders page. In particular, "all virtualization implementations that use placeholders must set the FILE_ATTRIBUTE_RECALL_ON_DATA_ACCESS file attribute on these placeholders".
At the same times, other filter drivers (and your application if it uses the create_file_direct must pay attention to how they access placeholder files created by other filters. Please refer to the Handling Placeholders page for details.
Virtual Files
The CBFilter class allows applications to create virtual files that are not actually present in the filesystem. The following steps should be taken when working with virtual files:
- Call add_virtual_file to tell the class and the OS about the virtual file that will be visible in the filesystem.
- In on_before_create_file/on_before_open_file or on_after_create_file/on_after_open_file, establish a channel to the backend data.
- Handle Before*File events related to file reading, writing, and retrieving or updating file information (the list is provided below). These events provide the only opportunity to respond to requests. Handle these events by providing the requested data, file information, and so on.
- Handle the on_before_delete_file event to process the deletion of a virtual file. From the event handler, call the remove_virtual_file method so that the file gets removed from the list of virtual files. The class does not do this automatically so that applications have greater flexibility in handling deletion.
- In the on_before_close_file event, close the channel that was used to communicate with the backend storage.
When a virtual file is opened, the class will already know whether or not it is virtual. If it is, the *CreateFile/*OpenFile events' Attributes parameter will contain the FILE_ATTRIBUTE_VIRTUAL_FILE attribute. Also, the Isolate parameter of the on_before_open_file event will be set to True.
During the normal course of operations, stopping and starting filtering will update the driver's knowledge about virtual files. However, if the application has added virtual files to the list and then the process was terminated, ghost virtual files may remain in the driver and stay visible in the filesystem. Accessing them, however, will fail with an error.
Handling of virtual files is very similar to handling of isolated files (in fact, they work via the same mechanism), and each file object created when a virtual file is opened gets a dedicated cache. This lets an application provide different data to each process that opens a virtual file. However, in order for virtual files to be listed properly during a directory enumeration, the file size should (when possible) correspond to the size of the data that will be presented when the same process opens the file.
The following events are used to tell the class that a file is isolated or virtual:
and an application should set up the necessary rules using a call to the add_filter_rule method for the above events to fire.The following events must be handled to provide access to isolated files with no backend file specified and virtual files; thus, the events fire automatically (an application doesn't need to set up additional rules for them):
- on_before_query_file_info
- on_before_set_file_info (FileBasicInformation, FileRenameInformation(Ex), FileDispositionInformation(Ex), FileEndOfFileInformation, FileAllocationInformation classes)
- on_before_read_file
- on_before_write_file
- on_before_get_file_security
- on_before_set_file_security
The on_before_get_file_security and on_before_set_file_security may be optional in simpler scenarios, but certain applications fail to handle isolated and virtual files properly when security-related requests are not processed properly.
When handling these events, the application should perform required necessary action and set the ProcessRequest parameter of the event to False to tell the class that processing has been completed.
Reparse Points
For filesystems that support them, reparse points are essentially storage containers for some application-specific data associated with a file or directory. The format of the data held by a reparse point is determined by the application that stored it; data are treated as opaque by the OS, which in turn delegates the interpretation of it to some filesystem filter. The notable exceptions are symbolic links and NFS links, which are implemented using reparse points and handled by the OS and a filesystem.
To assist the OS in determining which filesystem filter to use, each reparse point includes a reparse tag that uniquely identifies the data's format. When the filesystem encounters a reparse point, it attempts to find the filesystem filter associated with the data format identified by this tag. If a matching filesystem filter is found, it is invoked to process the file/directory using the reparse point's data.
Some reparse tags are predefined by Microsoft, whereas others are defined by a third party (although still assigned by Microsoft, to ensure uniqueness). All Microsoft-defined tags are listed in this MSDN article; there is no central list of third-party tags.
A complete reparse point (e.g., tag, data) is always represented as either a REPARSE_GUID_DATA_BUFFER structure, or (for certain Microsoft-reserved tags) a REPARSE_DATA_BUFFER structure. That said, the class interacts with reparse points in a limited fashion, and its API exposes reparse point structures as nothing more than opaque blobs of data.
To learn more about reparse points, please refer to Microsoft's Reparse Point articles.
NOTE: Reparse points should not be confused with Reparse Rules and on_reparse_file_name event.
Dealing with Reparse Points in CBFS Filter
CBFS Filter, when the corresponding rules are added, fires the following events:
- on_reparse_with_tag event to let the application deal with the file operation in a designated way if the reparse tag is to be handled by the application
- The events related to reparse point operations, including:
- on_before_set_reparse_point
- on_after_set_reparse_point
- on_notify_set_reparse_point (CBFilter and CBMonitor classes)
- on_before_get_reparse_point
- on_after_get_reparse_point
- on_notify_get_reparse_point (CBFilter and CBMonitor classes)
- on_before_delete_reparse_point
- on_after_delete_reparse_point
- on_notify_delete_reparse_point (CBFilter and CBMonitor classes)
Please refer to each of the noted events' documentation for more information about how to properly handle each one.
Avoiding Deadlocks
As the Cached and Non-Cached Requests topic describes, it is common for the filesystem requests intercepted by a CBFilter/CBMonitor-based application to have been sent by the system cache manager rather than by an actual process. Consequently, it is critical to keep the following restrictions in mind when implementing the application's event handlers:
- Event handlers must not perform any operations, explicitly or implicitly, against files opened in buffered mode. Any file accessed from an event handler must be opened using the Windows API's FILE_FLAG_NO_BUFFERING flag.
- Event handlers must not perform any asynchronous procedure calls (APCs).
- User interface operations must be strongly restricted.
- The use of direct file operations should correspond to the rules outlined in the Direct File operations topic.
- Plus, all CBFilter/CBMonitor-specific restrictions discussed in the Recursive Calls topic.
Events handlers that violate any of the restrictions described here will cause a system-wide deadlock.
Security Checks
The CBFilter class offers flexible security handling. During Control Events, applications can use information obtained from security-related methods to determine whether a request should be allowed as-is, modified before continuing, or denied immediately.
CBFilter provides a number of methods that applications can use to implement security checks. The most notable of these methods are get_originator_process_name and get_originator_process_id, which return the name and process Id (PID) of the process that initiated the request; and get_originator_token, which returns the system-defined security token of the process that initiated the request.
The latter is particularly useful when used with various methods in the Windows API, such as the GetTokenInformation function, which can be used to obtain various pieces of information about the object the token is associated with.
Effective security enforcement does not require that all event handlers perform security checks. Applications are technically free to deny almost any file-related event because of a failed security check. It is not, however, meaningful to perform security checks in all event handlers in the first place, and unnecessary security checks will decrease an application's overall performance.
For example, it makes sense to validate access rights in the on_before_create_file, on_after_create_file, on_before_open_file, and on_after_open_file event handlers, but not in the on_after_read_file or on_before_write_file event handlers. If an application denies a file create/open request made by some process, then that process will not be able to make a subsequent read/write request. Therefore, applications can safely assume that all read/write requests come from processes whose access rights they have already verified. Similar logic can be applied for directories and directory enumerations.
NOTE: This is not an exhaustive set of use-cases; each application's needs will differ.
As stated earlier, applications are free to allow, modify, or deny any request based on security checks. However, they must not "selectively alter" filesystem information based on these checks; it is "all or nothing". Following are some examples to clarify implementation:
- A filesystem object cannot appear to exist to process A, but appear nonexistent to process B.
- A filesystem object cannot be reported as a file to process A, but as a directory to process B.
- A filesystem object's metadata, absent of actual changes, must be consistent between requests (e.g., if a file's size is reported as 1 KB to process A, then it must also be reported as 1 KB to process B).
- A file's contents, absent of actual changes, also must be consistent between requests (e.g., for a file whose size is reported as 1 KB, exactly 1024 bytes must be returned when the file is read, and those 1024 bytes must be exactly the same, including ordering, regardless of which process is doing the reading).
File Create/Open Events
The CBFilter class provides three pairs of events related to creating and opening files:
- on_before_create_file and on_before_open_file, which are Control Events fired when the request is made.
- on_after_create_file and on_after_open_file, which are Control Events fired after the request has been handled.
- on_notify_create_file and on_notify_open_file, which are Notification Events fired after the request has been handled.
NOTE: The Notification Events are also available in CBMonitor; please refer to the Event Types topic for more information.)
Files can be created or deleted at any time, so there is no way for the OS to know with complete certainty whether a particular file exists until an interested process actually attempts to access it. This is true even if the process checks whether the file exists beforehand, because that file could then be created/deleted in the time between when the check occurred and when the create/open call occurs.
For this reason, the same Windows API function, CreateFile, is used for both creating and opening files. Processes that call this function use its CreationDisposition parameter to specify what the OS and filesystem should do if the file exists/does not exist. The one and only CreationDisposition option that results in a "create file" request is CREATE_NEW; all other options result in an "open file" request, and the filesystem then uses the CreationDisposition for guidance.
Because the class's only source of information is the requests themselves, it also has no way of knowing whether a particular file exists (or not) at any given time. Thus, the class acts in the following manner:
- If the request's CreationDisposition is CREATE_NEW, then the *CreateFile events are used.
- If the request's CreationDisposition is FILE_SUPERSEDE (an NT-native flag used in the kernel), then the *OpenFile events are used, followed by the corresponding *CreateFile events.
- In all other cases, the *OpenFile events are used.
Filenames In Events
The CBMonitor and CBFilter classs provide a filename, to which an event is related, to event handlers.
A filename includes the complete path, which may come in the DOS format (with a drive letter, default behavior) or in the NT-native format. The applicatiom may choose to use the NT-native format by setting the ResolveNtDeviceToDriveLetter configuration setting.
When a file is opened by ID rather than by the filename, the passed filename value will have a form ID|XXXXXXXX, where XXXXXXXX is a hexadecimal presentation of the file ID.
To improve speed a bit, an application may enable the OmitEventFilenames configuration setting. In this case, filenames will not be passed, and to obtain them, the application can call the get_event_file_name method.
The driver may know more than one name of the file. For example, when a hard link is created, and the driver registers this operation, it remembers the link name and can use it for filtering. When a file is renamed, the previous name of the file is also remembered. If the application needs all the names, it should enable the PassAllFilenames configuration setting.
If the application needs the driver to know all the names of the file that is being opened, the application should enable the RetrieveLinkNamesOnOpen configuration setting. It is reasonable to track all hard links if the application filters access to files based on their names or paths, and a hard link can be used to bypass such a filtering. Note that collecting all names slows down processing.
The driver knows current names of the file (different hard links) and can know previous names that it registered; all such names are used for matching filtering rules.
When multiple filenames are passed to an event or are returned by the get_event_file_name method, they class presents them as a list of full file paths. Individual elements of the list are separated with the LF character (numeric code 10).
Current names come first in the list with the previous names separated from the current names with an empty element. The list may include an ID in the format described above if the file was opened via an ID. The sample list:
c:\path\to\filename1.txt
ID|12345678
c:\path\to\filename2.txt

c:\previous\path\to\name1.txt
c:\previous\path\to\name2.txt
Cached and Non-Cached Requests
Windows has an extremely robust file caching system that it makes extensive use of to provide optimal file I/O performance at all times. To accomplish this, file read/write requests are routed to the cache manager by default, and the cache manager attempts to service said requests with as few actual filesystem calls as possible. These behaviors result in a file I/O model that has three separate "paths" for file data to flow over:
- From an application (or system component) to the system file cache.
- From the system file cache to the filesystem.
- From an application to the filesystem (bypassing the system file cache).
By default, the CBFilter and CBMonitor classs track file read/write requests only on paths (2) and (3); such operations are referred to as noncached requests (or, noncached operations). To include requests on path (1) (referred to as cached requests/operations), the process_cached_io_requests property must be enabled. This property is disabled by default, because in most cases, it is not necessary to intercept cached requests.
To distinguish between cached and noncached file read/write requests, applications can check the Direction parameter provided in the following events:
- on_before_read_file
- on_before_write_file
- on_after_read_file
- on_after_write_file
- on_notify_read_file
- on_notify_write_file
NOTE: All API members discussed in this topic are available in both CBFilter and CBMonitor, except for the Control Events, which are available only in CBFilter.)
An application should not make assumptions regarding the size of the buffer or the amount of data being read or written in any specific type of request. Although the cache manager usually reads and writes data in blocks of size equal or multiple of a memory page size (4096 bytes on most common systems) and aligned to the page boundary, non-cached requests may be made for a smaller amount of data; in the latter case, the buffer size and position may not be aligned to the page size.
Monitoring Network Resources
In certain cases, it may be desirable for a CBFilter/CBMonitor-based application to be able to track filesystem operations performed on a remote system, such as a file server. It is important to understand the limitations of Windows' filesystem filtering mechanisms to maintain reasonable expectations when developing for such use-cases.
The CBFS Filter system drivers must be installed on a machine for an application built with CBFilter or CBMonitor to be able to track filesystem requests on it; and, similarly, the CBFilter and CBMonitor classs can only track filesystem requests that are made against a local filesystem.
For example, imagine an environment with a file server S, and two client machines C1 and C2. If C1 and C2 have both mounted the filesystem shared by S as a network drive, then two options are available for tracking all requests directed at that filesystem:
- Install the application on S and track filesystem operations on the shared drive.
- Install the application on both C1 and C2 and track filesystem operations on the mounted network drive.
Request Modification
Modification of file read/write requests will only work correctly for local filesystems due to how Windows actually transfers the data internally. Attempting to modify the file data carried by a read/write request made against a locally mounted network drive will always fail.
CBRegistry Topics
The topics in this section provide additional information specific to the CBRegistry class.
Topics
Registry Key Masks
Registry key masks are "templates" against which registry key names are matched. A registry key mask may begin with a "registry key path" or may simply be a standalone key name; and both the key name part and the path part may contain single-character wildcards (?) or multicharacter wildcards (*). Following are a few examples of registry key masks:
- \REGISTRY\MACHINE\Software\*
- HKEY_LOCAL_MACHINE\Software\*
- *Microsoft*
NOTE: Some registry keys are reparse points, and the driver cannot match masks that contain the names of such reparse points. For example, "HKEY_LOCAL_MACHINE\System\CurrentControlSet" is a reparse point; thus, the rule to track operations on its subkeys must refer to targets and not to the reparse point. As a result, the following sample rule will work: "HKEY_LOCAL_MACHINE\System\*ControlSet*\Enum" (here, asterisks are wildcard marks to let the rule cover various "ControlSetNN" keys).
Per-Process Masks
Masks used by standard filter rules and access rules can be restricted so that they only match operations made by a specific process (or, made by all processes except a specific process). To do this, construct a mask in one of the following forms:
- process_name.exe|key_mask: Only matches operations requested by process_name.exe.
- ~process_name.exe|key_mask: Only matches operations not requested by process_name.exe.
- process_id|key_mask: Only matches operations requested by the process whose Id is process_id.
- ~process_id|key_mask: Only matches operations not requested by the process whose Id is process_id.
In all cases, key_mask can be any valid registry key mask as described above. The process_name.exe portion must be a valid process executable file name, and may optionally begin with a path. Wildcards are supported in any part of the process_name.exe portion. The process_id portion must be a numeric process Id (PID). When adding a PID-based rule, you need to be aware of the PID Reuse behavior of Windows.
Contexts
It is often necessary for an application to associate certain information with a given registry key. To assist developers in doing so in a convenient and performant manner, the CBRegistry class provides context parameters in a number of events.
A context carries an application-defined value that identifies or points to some application-defined data, and a registry key has a separate context associated with it. The CBRegistry class treats context values as opaque. It stores the context values passed to it by the application and ensures that the correct values are exposed again whenever some event fires for a particular registry key; but otherwise, it does not attempt to use said values in any way.
Context Lifetimes
Key contexts in CBRegistry are available in all events that correspond to registry key operations. They are created before the on_before_create_key or on_before_open_key event fires, and they are deleted after the on_after_close_key event fires (or, more accurately, after the on_cleanup_key_context event fires).
Context Use Cases
Key contexts are most helpful when used to store information associated with a registry key that can be used to speed up later events. For example, the only time the CBRegistry class exposes the name of a registry key is during the on_before_create_key and on_before_open_key events. Applications that wish to use the key name in later events can store it in the key context and then access it in the desired events later. A similar strategy can also be applied for events related to registry key values.
More generally, applications are free to obtain and store whatever information they wish using contexts, as long as their event handlers comply with the restrictions described by the Recursive Calls topic.
Using Contexts
Python does not have a completely safe way to store object references in contexts either directly or indirectly, which is why all context parameters are integers. To emulate such capabilities, the following approach is recommended:
- Create a global dictionary instance for the application (i.e., a singleton), with keys that are integers and values of whatever type is desired.
- When the application needs to create a context object in an event handler, a "key" can be created using the hash of the full file/directory name (including path), potentially mixed with additional information.
- For file contexts, a hash of the full file/directory name is sufficiently unique because the context is exposed in all events pertaining to that file/directory.
- For handle and enumeration contexts, additional information must be mixed in because multiple handle or enumeration contexts may be present at once for any given file/directory.
- Using the created key, add the object to the dictionary.
- Set the context parameter to the key used in the previous step.
- To access the object in a later event, use the key stored by the context to retrieve the object from the dictionary.
Notes:
- Applications must take care to enforce proper thread synchronization when accessing the dictionary because events are always fired using worker threads. Please refer to the Threading and Concurrency topic for more information.
- In 32-bit applications, contexts are stored in 32-bit variables internally, and thus, the higher 32 bits of 64-bit values are lost.
Security Checks
The CBRegistry class offers flexible security handling. During events, applications can use information obtained from security-related methods to determine whether a request should be allowed as-is, modified before continuing, or denied immediately.
CBRegistry provides three security-related methods that applications can use to help implement security checks. They are get_originator_process_name and get_originator_process_id, which return the name and process Id (PID) of the process that initiated the request; and get_originator_token, which returns the system-defined security token of the process that initiated the request.
The latter is particularly useful when used with various methods in the Windows API, such as the GetTokenInformation function, which can be used to obtain various pieces of information about the object the token is associated with.
Event Handling
The topics in this section provide information about event handling.
Topics
Event Types
The events provided by the CBFS Filter classs generally fall into two categories: Control Events, which are synchronous; and Notification Events, which are asynchronous.
Control Events allow an application to control the execution of an operation. They are fired before a request reaches the applicable system component. For certain operations, they also are fired after the request is handled (i.e., as its response comes back).
Control Events have names like BeforeOperation and AfterOperation (except for CBProcess, whose events do not have a prefix). In the CBProces class all events are Control Events that occur before the operation is completed.
Notification Events, which have names like NotifyOperation, inform an application that an operation has been performed. They are fired as a response comes back (specifically, after the applicable AfterOperation event fires, if such an event exists).
To get a better idea of the general event flow for an operation, please refer to this diagram:
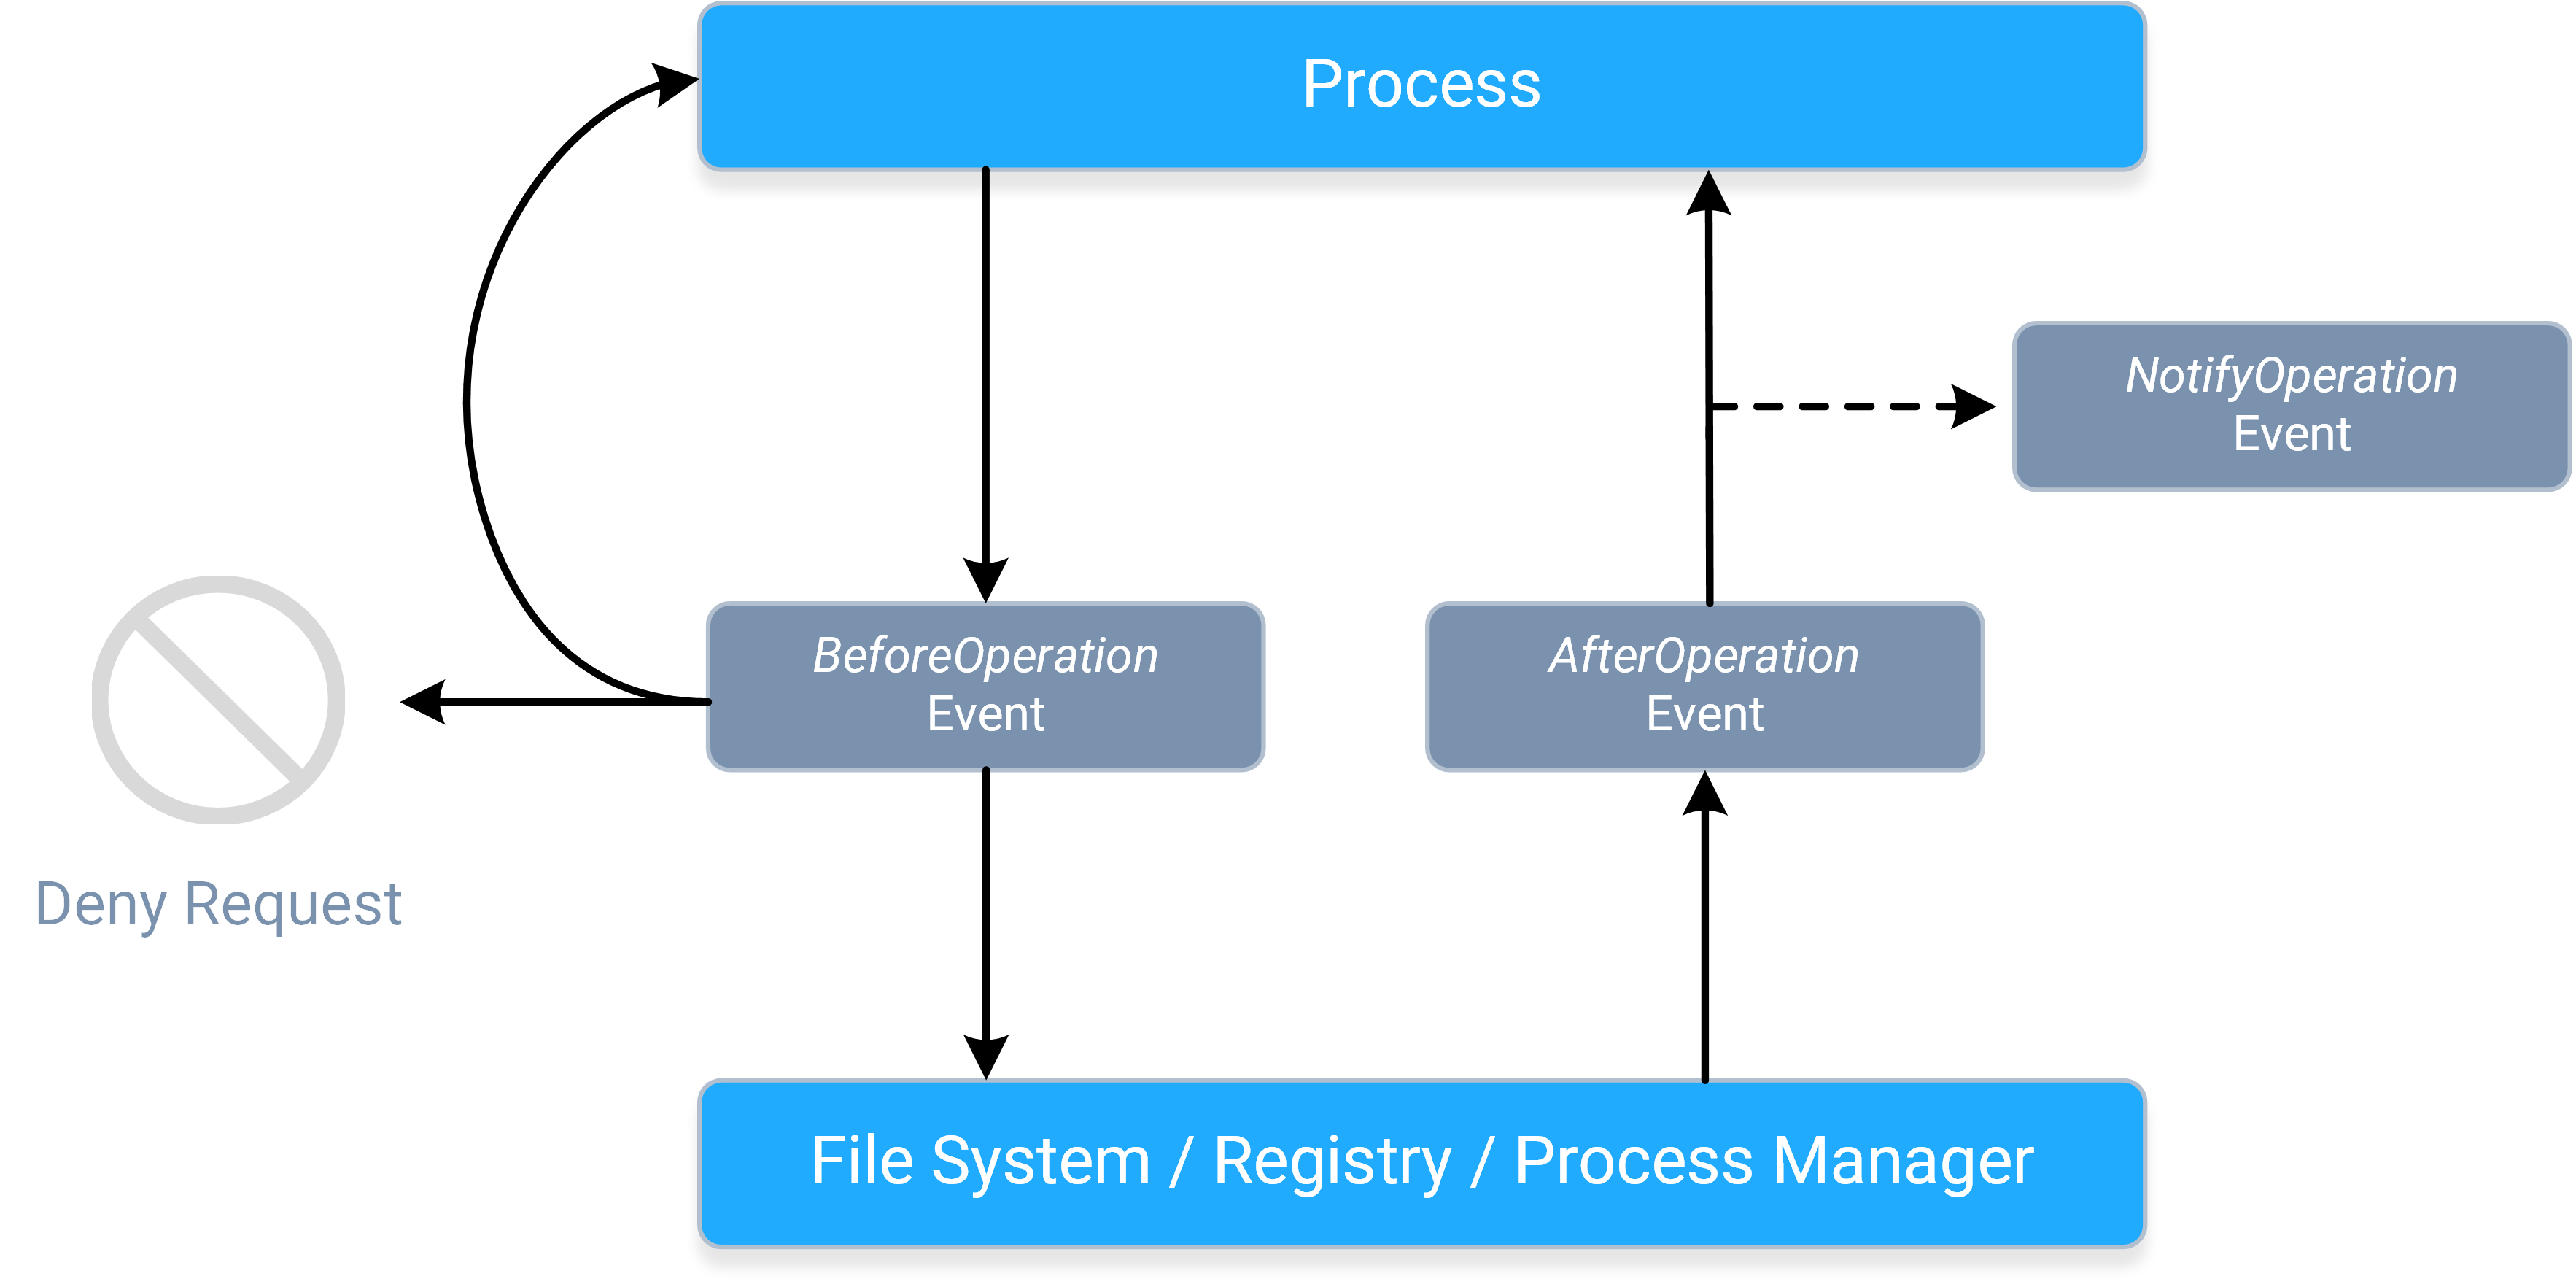
- A process sends a request, causing the corresponding BeforeOperation event to fire synchronously. The BeforeOperation events allow an application to do the following things:
- Allow the request to continue, potentially after modifying its parameters/data.
- Handle the request itself.
- Deny the request entirely.
- Store information about the request in the event's contexts, so that it can be used later during the AfterOperation event.
- Once the request gets to the applicable system component, the requested operation will occur, and a response will be sent back to the process, causing the corresponding
AfterOperation event to fire synchronously. The AfterOperation events allow applications to do the following things:
- Perform an action based on whether the operation succeeded or failed.
- Modify the response (if the operation supports doing so).
- Do something earlier with the information stored in the event's contexts during the BeforeOperation event.
- The response continues onward toward the process, causing the corresponding NotifyOperation event to fire asynchronously. The NotifyOperation events cannot
be used to modify responses, nor do they include event contexts; they are best-suited for doing things like audit logging and change journaling.
- More specifically, notification events are queued for delivery, and fired on a "best-effort" basis.
- The notification event queue's size is not artificially limited; it will continue to grow (if necessary) so long as the system has sufficient resources available.
NOTE: The system can have multiple filter drivers loaded simultaneously, and any filter driver that a request or response "reaches" can do any of the things described above. Please refer to the Driver Altitudes topic for more information.
Each of the CBFS Filter classs provide a different set of events for each operation, so the event flow for a particular operation may be simpler than the one shown here depending on which class is being used. Following is a quick summary of which events each class offers:
- The CBFilter class offers BeforeOperation, AfterOperation, and NotifyOperation events for almost all operations.
- The CBProcess class only offers BeforeOperation events (though for simplicity, their names do not use the "Before" prefix).
- The CBRegistry class offers BeforeOperation and AfterOperation events.
- The CBMonitor class, a "monitoring-only" subset of CBFilter, offers the same NotifyOperation events, plus the on_before_filter_attach_to_volume, on_after_filter_attach_to_volume, and on_after_filter_detach_from_volume control events.
For more information about how to use event contexts in CBFilter, please refer to this topic; and for more information about how to use them in CBRegistry, please refer to this topic.
Buffer Parameters
Some events include one or more parameters intended for use as a binary data buffer. Depending on the event, these parameters may contain data when the event is fired, or it may be expected that the application populates them with the desired amount of data during the event handler. Some events combine both paradigms and then expect the application to modify the data already present when the event is fired.
The documentation for such events will describe which of these cases applies to each buffer parameter. In all cases, buffer parameters point to a preallocated block of unmanaged memory, the size of which is specified by the parameter immediately following the buffer parameter. In cases in which data are to be written, be sure to write it directly to the pointed-to memory, do not change the value of the buffer parameter itself. Buffer parameters are always of the ctypes.c_void_p type; use the ctypes.memmove() method to read and write data from and to the unmanaged memory region. To obtain a pointer to a Python buffer suitable for use with ctypes.memmove(), call ctypes.c_void_p.from_buffer() and pass it a byte array or some other type that implements Python's buffer interface.
Recursive Calls
To ensure stable operation, it is critical that applications avoid recursive access to the system component associated with each class. Essentially, this means that event handlers must comply with the following restrictions, which vary by class:
-
CBFilter and CBMonitor: Event handlers must not attempt to perform any operations that involve the file or directory for which the event was fired.
- Plus, they must comply with all restrictions discussed in the Avoiding Deadlocks topic (which is specific to CBFilter and CBMonitor).
- There is one exception for CBFilter-based applications: During the on_after_create_file and on_after_open_file events, the create_file_direct method may be used to open the file that the event fired for. If the AllowFileAccessInBeforeOpen configuration setting is enabled, create_file_direct can also be used for the same purpose during the on_before_create_file and on_before_open_file events.
- CBProcess: Event handlers must not perform any operations that cause a process or thread to be created or terminated.
- CBRegistry: Event handlers must not perform any operations that cause registry access (either directly or indirectly).
NOTE: Many system operations in Windows will perform registry access as part of their normal execution, and this side-effect is rarely documented (if ever).
Event handlers that violate any of these restrictions are likely to cause a system deadlock.
Additional information about third-party filters: Even when a file or registry operation seems to be generally safe, some third-party filter drivers may be not prepared for such recursive operations and will deadlock. Such filters must be dealt with on a case-by-case basis (usually by disabling them).
Threading and Concurrency
Through the use of multithreading, CBFS Filter provides powerful concurrency features to help applications maximize their performance. Each class provides the following API members to allow applications to specify the extent to which events should be fired concurrently:
- The serialize_events property controls whether events should be serialized on a single worker thread or fired in parallel on several. By default, this property is disabled and events are allowed to fire in parallel.
- The MinWorkerThreadCount and MaxWorkerThreadCount configuration settings control the minimum and maximum number of worker threads the classs can use for firing events. By default, both are set to 0, which indicates that a class's system driver should automatically choose appropriate values based on how many CPU cores the system has.
- These settings are applicable only when serialize_events is disabled.
NOTE: Even when configured for minimal concurrency, the classs always fire events in the context of a worker thread, not in the thread the class was originally created on. Therefore, applications must be sure to synchronize operations between event handlers and other threads as necessary (including, but not limited to, calls to the class instance, unless a method is explicitly documented as callable within events).
Timeouts
(This topic references methods of the CBFilter class; the same methods exist in CBProcess and CBRegistry classes as well.)
Because the CBFS Filter classes' Control Events are tied directly to the underlying operations' requests and responses, it is critical that their event handlers complete quickly to prevent the system from being blocked. To help prevent such blocking, the classes' system drivers can enforce event timeouts.
To enable event timeouts, pass a nonzero value for the Timeout parameter when calling the start_filter method. Passing 0 will disable event timeouts, in which case, events may take as long as necessary to execute.
It is strongly recommended to have timeouts enabled in production. Disabling the timeouts is handy during development so that you can debug the code of your event handlers; as a safety mechanism that helps prevent various deadlocks, timeouts should be enabled in production.
When timeout enforcement is in effect, and an event executes long enough for its timeout to expire, the driver either "releases" the underlying request (passing it onward unchanged), or cancels it by reporting an error; whichever is most appropriate for the event in question and according to the DenyExpiredEvents. The tardy event still runs to completion, but any results it returns once finished are ignored because the underlying request has already passed through the filter driver.
If an event handler knows it will require additional time to complete an operation, it can call the reset_timeout method before the current timeout expires to restart its timeout timer.
Applications should always strive to ensure that all event handlers complete quickly, even if request timeouts are disabled. Do not perform time-consuming work within event handlers; offload such work to background threads.
NOTE: This information is less relevant for Notification Events, which, because they fire asynchronously, cannot block the system. The CBMonitor class, therefore, does not expose a Timeout parameter in start_filter, or a method for resetting event timeouts; it operates without event timeout enforcement.
File and Registry Filter Rules
In their default state, the CBFS Filter classs ignore all operations; applications must explicitly specify which operations they are interested in by adding one or more filter rules. This "opt-in" approach prevents applications from being overwhelmed by the constant flood of operations occurring on a system at all times.
At a high level, there are two basic categories of filter rules: standard filter rules, which the classs use to determine which operations they should (or should not) fire events for; and special filter rules, which alter or augment the class's behavior in a variety of ways. The following sections discuss each category of filter rules in more detail, and provide class-specific information, where applicable.
Order of rules
An event is fired for file or directory if the name matches one or more standard filter rules and when it does not match any passthrough rule or inverted standard filter rule. The order in which the rules are added is not important: the rules are internally stored not in the list, so the order cannot be kept.
Standard Filter Rules
Standard filter rules are typically an integral part of a CBFS Filter-based application's design. Thousands of operations may be occurring on a system at any given moment, and rarely are applications interested in more than a small subset of them. To start receiving events for those "interesting" operations, applications must add one or more standard filter rules so that the CBFS Filter driver knows which operations it needs to monitor.
For the CBFilter, CBMonitor, and CBRegistry classs, standard filter rules always contain two key pieces of information:
- A mask that determines which files or registry keys the filter matches (or "covers"). The CBFilter and CBMonitor classes use File Masks, while the CBRegistry class uses Registry Key Masks.
- A set of flags that specifies what kinds of filesystem/registry operations the class should fire events for.
Together, this pair of parameters gives applications great flexibility, allowing them to create filter rules that are as broad or as narrow in scope as desired. For example, one application might wish to monitor any and all operations performed on files or registry keys whose name contains a specific word, whereas another application might only care about read operations performed on audio files in a specific directory, or on values of a specific registry key.
The CBFilter, CBMonitor, and CBRegistry classs provide the following methods for managing standard filter rules:
- add_filter_rule
- add_filter_rule_ex (CBFilter and CBMonitor only)
- delete_filter_rule
- delete_all_filter_rules
For the CBProcess class, whose design is far less complex than the other class's design, standard filter rules are much simpler. Applications specify which processes they wish to monitor and ignore by name and/or PID using the following methods:
- add_filtered_process_by_name and remove_filtered_process_by_name
- add_filtered_process_by_id and remove_filtered_process_by_id
- add_ignored_process_by_name and remove_ignored_process_by_name
- add_ignored_process_by_id and remove_ignored_process_by_id
For all classs, standard filter rules are deactivated and deleted when the application exits.
Special Filter Rules
In addition to standard filter rules, the CBFilter, CBMonitor, and CBRegistry classs also support special filter rules. Unlike standard filter rules, special filter rules determine when a class should do something other than fire its events. There are multiple types of special filter rules, each of which alters (or augments) a class's behavior in a different way.
The following table provides links to topics with more information about each type of special filter rule, as well as information about which types are supported by each class.
NOTE: The CBProcess class does not support any special filter rules.
| Special Filter Rule Type | Supported Classs |
| Access Rules | CBFilter and CBRegistry |
| Default Rules | CBFilter and CBRegistry |
| Passthrough Rules | CBFilter, CBMonitor, and CBRegistry |
| Reparse Rules | CBFilter |
Rulesets
All rules, regardless of their type, are stored in some sort of ruleset; and within a ruleset, rules are uniquely identified by their masks. Adding multiple rules with the same mask to a particular ruleset will result in a single aggregate rule. Knowledge of this behavior is helpful for understanding how to use the methods that add and delete rules.
The number of rulesets each class has depends on its complexity. The most complex class, CBFilter, has four rulesets:
- One for standard filter rules and access rules (please refer to the Access Rules topic for more information on how this works).
- One for default rules.
- One for passthrough rules.
- One for reparse rules.
Access Rules
Access rules are a type of special filter rule supported by the CBFilter and CBRegistry classes. Access rules instruct the class's system driver to automatically process certain requests automatically in a certain manner, without involving the class itself.
Like standard filter rules, access rules use either a file mask or a registry key mask to determine which operations should be handled automatically. For CBFilter, access rules also can include additional qualifiers, such as file size and attributes; however, as with standard filter rules, the mask always takes precedence.
By adding a matching access rule, applications can effectively make one or more files or registry keys read-only, write-only, inaccessible, or protected from deletion. Because the desired access restrictions are enforced by the class's system driver, the application will not have to handle any events, which increases their overall performance and efficiency (especially if the application's sole purpose is access control).
If file creation and opening is covered by one or several rules in a way that both access flags and callback or notify flags should be in effect, access flags are ignored to let the process receive events for operations, specified using those callback and notify flags.
The methods that the CBFilter and CBRegistry classs provide for managing standard filter rules also are used to manage access rules:
Access rules are stored in the same ruleset as the standard filter rules. As the File and Registry Filter Rules topic describes, each rule in a ruleset must have a unique mask; therefore, access rules and standard filter rules with the same mask are aggregated into a single rule. Knowledge of this behavior is helpful for understanding how these methods work.Access rules are deactivated and deleted when the application exits. For use cases in which this is undesirable, applications may wish to use default rules instead; they provide the same functionality, but are managed by the class's system driver, and thus are enforced any time it is loaded, regardless of whether the application itself is open.
Default Rules
Default rules are a type of special filter rule supported by the CBFilter and CBRegistry classes. Default rules work the same way that access rules do, with one notable exception: they are managed by a class's system driver rather than by the class itself. As a result, they become active as soon as the class's system driver loads at boot time, and then they continue to be enforced at all times, regardless of whether the application that originally added them is open.
NOTE: Default rules have lower priority that all other filter rules. This means that if or when the application opens and begins to add other kinds of filter rules, any rules that "overlap" a default rule (i.e., those whose masks match one or more of the files or registry keys covered by a default rule) will take precedence, overriding the applicable default rule. When such a rule is removed (either directly or because of the application closing), the default rule that it was overriding will become active again.
The CBFilter and CBRegistry classs provide the following methods for managing default rules:
- add_default_rule
- delete_default_rule
- suspend_default_rules
- create_default_rules_snapshot
- close_default_rules_snapshot
The class's system driver stores information about default rules in the registry under the HKEY_LOCAL_MACHINE\System\CurrentControlSet\Services key, which has restricted accessibility. Applications must therefore be running with Administrator or System Service rights (or their equivalent) to successfully add or remove default rules. (Running the application from an account that belongs to the administrator's group is not sufficient.)
NOTE: Default rules only work when a class's system driver is loaded. This means that default rules will not be available, for example, if the system boots in safe mode. Please refer to the Loading Drivers in Safe Mode topic for more information.
Passthrough Rules
Passthrough rules are a type of special filter rule supported by the CBFilter, CBMonitor, and CBRegistry classs. Passthrough rules instruct the class's system driver to explicitly exclude certain requests from processing, thus counteracting any standard filter rules or access rules that they otherwise would match.
Like standard filter rules, passthrough rules use either a file mask or a registry key mask to determine which files/directories or registry keys match. For CBFilter and CBMonitor, passthrough rules can also include additional qualifiers like file size and attributes; however, as with standard filter rules, the mask always takes precedence.
When adding a passthrough rule, applications can specify one or both of the following things:
- Which specific filesystem/registry operations the class should not fire events for (to counteract standard filter rules).
- Which specific access restrictions the class's system driver should not apply (to counteract access rules).
The CBFilter, CBMonitor, and CBRegistry classs provide the following methods for managing passthrough rules:
- add_passthrough_rule
- add_passthrough_rule_ex (CBFilter and CBMonitor only)
- delete_passthrough_rule
- delete_all_passthrough_rules
Passthrough rules are deactivated and deleted when the application exits.
Reparse Rules
Reparse rules are a type of special filter rule supported by the CBFilter class. Reparse rules are used to redirect file or directory access to another location based on two file masks: a source mask used for matching (in the same way as described for standard filter rules); and a destination mask to specify the location to redirect to.
For each wildcard (* or ?) present in the source mask, there must be a corresponding wildcard (of the same type) in the destination mask; and the wildcards in the destination mask must appear in the same order as they do in the source mask. For example, if the source mask is 20??_Budget.*, then 20??_Budget_Report.* would be a legal destination mask; however, 20??_Budget_Report.xls would not be a legal destination mask, nor would 20*_Budget_Report.*.
To use reparse rules effectively, it is important to understand two things about how they behave:
- Reparse rules have priority over all other types of rules. So, if a file or directory matches a reparse rule, then it will always be redirected, even if it matches other types of rules as well.
- The rule-matching procedure "restarts" every time a redirection occurs. So, if the newly redirected file or directory matches another reparse rule, then it is redirected again (and the matching procedure restarts again); otherwise, the matching procedure proceeds to consider other types of rules, as usual.
The second behavior is especially notable because it means that multiple reparse rules can "chain" together and be applied in succession. This is a powerful feature, but it must be used carefully; if a cycle of reparse rules is allowed to form, triggering it will send the system driver into an infinite loop, causing a system-wide deadlock.
The CBFilter class provides the following methods for managing reparse rules:
- add_reparse_rule
- delete_reparse_rule
- delete_all_reparse_rules
- create_reparse_rules_snapshot
- close_reparse_rules_snapshot
- get_reparse_rule_by_mask
Reparse rules are managed by the class's system driver rather than by the class. As a result, they will remain active until they are explicitly removed or the system reboots (whichever occurs first), regardless of whether the application that originally added them remains open.
Applications that require more advanced redirection logic can add a standard filter rule that includes the FS_CE_REPARSE_FILENAME control event flag, and then can use the on_reparse_file_name event to implement it.
NOTE: Neither this event, nor the on_reparse_with_tag event, are directly related to the reparse rules.
Thread Safety of the API
The properties and methods provided by CBFS Filter's APIs fall into one of the following categories when it comes to thread safety:
- Properties and methods that are intended to be accessed from event handlers (i.e., those documented as such) are thread-safe, since event handlers always execute in the context of worker threads.
- Methods related to installation, uninstallation, and status retrieval are not thread-safe, since they are expected to be used during the application installation process. (Methods in this category are those which are documented as being "available in both the class API and the Installer DLL".)
- Any helper methods documented in the class's API (i.e., those used to convert error codes, or provide similar supplementary functionality) don't use any explicit thread synchronization, but also don't access any other class properties or methods, and thus are inherently thread-safe.
- All other properties and methods are not thread-safe, so applications must employ proper thread synchronization techniques when using them on multiple threads (including, but not limited to, during event handlers).
Driver Altitudes
A key benefit of filter drivers in general is that any number of them can be active at the same time. To keep things organized, Windows maintains a separate stack of filter drivers for each applicable system component (filesystem, registry, and process manager) and ensures that each stack is sorted consistently based on the drivers' altitudes.
These altitudes, which are expressed in a string notation as numbers with an optional fractional part (e.g., "12345.768"), essentially define each driver's absolute position in the stack. Drivers with higher altitudes are attached toward the top of the stack, closer to user mode, whereas drivers with lower altitudes are attached toward the bottom of the stack, closer to the applicable system component. Please refer to Microsoft's Load Order Groups and Altitudes for Minifilter Drivers article for more information about altitudes (much of the content is specific to filesystem filter drivers, but the general concepts apply to all filter drivers).
When an operation is requested, that request "enters" the top of the filter driver stack and moves downward, toward the applicable system component. Once the request has been handled (either by the system component or by one of the filter drivers in the stack), a response travels back up the stack. So the process of choosing a suitable altitude depends primarily on the intended functionality of the filter application being developed. That said, some factors are specific to each type of filter driver; please refer to the sections below for more information.
Filesystem Minifilter Drivers
Of the three kinds of filter drivers mentioned above, filesystem filter drivers are by far the most complex, which is why much of Microsoft's altitude documentation is presented from a filesystem-centric context. To prevent collisions, Microsoft also manages all filesystem minifilter altitude assignments.
When developing an application that uses CBFilter and/or CBMonitor, an altitude must be requested from Microsoft. Use the instructions described in their Minifilter Altitude Request article; and be sure to specify "FileSystem" (or "Both") for the "Filter type:" field when composing the request.
Once Microsoft has assigned an altitude for the application, it should be specified using the altitude property or the Altitude parameter of the install method, which are available in both CBFilter and CBMonitor.
Registry Filter Drivers
Registry filter drivers are not required to have an altitude (in which case they will be attached near the top of the driver stack), but it is recommended that one be requested anyway. Please refer to Microsoft's Supporting Layered Registry Filtering Drivers article for more information.
Although not explicitly stated in the aforementioned article, registry filter driver altitudes can be requested from Microsoft in the same manner as they are for filesystem minifilter driver altitudes. Use the instructions described in their Minifilter Altitude Request article; and be sure to specify "Registry" (or "Both") for the "Filter type:" field when composing the request.
Once Microsoft has assigned an altitude for the application, it should be specified using CBRegistry's altitude property.
Process Manager Filter Drivers
Microsoft is fairly vague about altitudes for process manager filter drivers; there is essentially no information about them beyond confirmation of their existence, as the documentation for the OB_CALLBACK_REGISTRATION structure shows. Notably, it is unclear whether there is a standard way to request an altitude for a process manager filter driver as there is for the other two kinds of filter drivers.
With that in mind, applications are free to set CBProcess's altitude property as desired. CBProcess also provides an extra property, strict_altitude, which specifies how the class should behave if the chosen altitude is already in use.
Loading Drivers in Safe Mode
When booting in Safe Mode, Windows loads only a limited set of drivers. If circumstances require that one or more of the CBFS Filter drivers be loaded in Safe Mode, this can be accomplished by adding the file names of the applicable drivers to the following registry key:
HKEY_LOCAL_MACHINE\SYSTEM\CurrentControlSet\Control\SafeBoot.
Warning: Attempting to load the CBFS Filter drivers in Safe Mode can render the system unbootable if the driver fails or (for the CBFilter and CBRegistry classs' drivers in particular) if the Default Rules added using the CBFilter or CBRegistry class prevent the system from accessing any of the files or registry keys it needs to boot.
PID Reuse
When using various rules that are based on process IDs (PID), you need to be aware that Windows tends to reuse PID numbers. Once the process with a certain PID is finished in any way, Windows can re-use this PID for another process being started. And it does reuse PIDs quite frequently for the purpose of keeping PID numbers low.
Such reuse can cause unexpected and sometimes unpleasant consequence for your application. To counteract it, you can take one or both actions:
- Open a handle to the process with the needed PID and not close it as long as your rule exists. Windows documentation states that as long as there exists an open handle to a process, its PID is not reused.
- Track completion of the process with the given PID (either by monitoring the state of the process by its handle or using CBProcess component of the CBFS Filter product) and once the process is finished, delete the corresponding rule.
Error Handling
Error Codes
The CBFS Filter communicates errors using the Win32 error codes defined in WinError.h, which is part of the Windows Platform SDK. The CBFS Filter system drivers, however, use NT native error codes, which do not have one-to-one mappings with Win32 error codes. The class includes logic for converting between the two as necessary, and that logic can be updated if any codes are not covered.
Additionally, CBFS Filter uses use certain error codes in a special manner. For more information about such error codes, please refer to the Error Codes page (available for each class) .
Reporting Errors to the Class from Event Handlers
If an event has a ResultCode parameter, an event handler can use it to return the result code of the operation to the class. The ResultCode parameter is set to 0 by default, which indicates the operation was successful.
If an unhandled exception occurs in the event handler, it will be caught by the class, which will fire the OnError event.
In some events, the OS does not expect the error code to be returned and either the class or the OS ignores the returned error code. Please refer to the description of a particular event for more information.
How to Handle Errors Reported by the Class
If an error occurs, the class will throw an exception. The code property of the exception object will contain an error code, and the message property will contain an error message (if available).
Extended Logging in Windows
Some class methods in CBFS Filter are capable of writing extended information about reported errors to the Windows event logs, which can be viewed using the system's eventvwr.exe tool. The user mode part of the class writes to the "Windows Logs \ Application" or to "CBFS \ {class}" folder, while the kernel mode part (where applicable) writes to the "Windows Logs \ System" folder.
The information written in the extended logs is meaningful to the Callback Technologies development team, but not to end-users, so extended logging is disabled by default. Important: These logs are not trace logs; do not enable them expecting to see detailed logging of the operations. The logs are used solely for troubleshooting.
If issues occur during the installation of the CBFS Filter system drivers, or while using the class, please do the following:
- Enable extended logging (see below).
- Replicate the issue.
- Using Event Viewer (eventvwr.exe), export the event log entries from the locations mentioned above in native format (please restrict the scope of the export to just those entries related to CBFS Filter).
- Submit an issue report that includes the exported file.
There are two ways to toggle extended logging for a class:
- By toggling the class's LoggingEnabled configuration setting (available in all classs).
- By adding a DWORD-typed value named Enabled to the HKEY_LOCAL_MACHINE\SOFTWARE\Callback Technologies\{ClassName}\EventLog registry key and setting it to 0 (disabled) or 1 (enabled).
- Replace the {ClassName} part of the registry key path with the name of the applicable class (use CBFilter for both CBFilter and CBMonitor).
- If this registry key, one of its parents, or the actual value does not exist, please create it manually.
NOTE: If your code runs in emulated mode (x86 mode on x64 or ARM64 architecture), you need to add the value to the HKEY_LOCAL_MACHINE\SOFTWARE\WOW6432Node\Callback Technologies\{ClassName}\EventLog registry key in addition to the "main" registry key.
If modification of the flag is done via the registry, the system must be rebooted anytime extended logging is enabled or disabled to make the changes take effect.
Troubleshooting
CBFS Filter is a complex product that operates in both user mode and kernel mode simultaneously; so when a serious issue occurs, it's critical that we are able to obtain sufficient information about the circumstances of the failure.
In order to help us assist you in a more expedient manner, please collect the information described in the instructions below when reporting a serious issue (i.e., one that causes the system to crash or hang). Our development team cannot effectively diagnose such issues without this information.
Also, please note that these sorts of issues commonly involve environmental differences and other factors that are either unforeseen or otherwise out of our control. It is also not unheard-of for a crash to appear attributable to one thing while in fact being caused by something completely different. Rest assured that we are committed to assisting you as best we can, and we thank you ahead-of-time for your patience and understanding throughout the support process.
System Crashes (BSODs)
If you encounter a consistently-reproducible system crash (BSOD) that you suspect may be due to CBFS Filter, please obtain a crash dump and include it when reporting the issue to us. Our development team is unable to diagnose system crashes without the information these dumps contain.
Ensure that your system is set up to generate crash dumps, and to not restart automatically after a crash, by following the steps found in Microsoft's Enabling a Kernel-Mode Dump File article. The options available in the memory dump dropdown vary depending on your version of Windows; please choose the first one from the following list that is present in yours:
- Complete
- Full
- Automatic
- Kernel
Once your system is set up to generate crash dumps, perform the same action that caused the BSOD originally to trigger the crash again. When it occurs, be sure to copy the information on the BSOD screen exactly so that it can be included in your submission (a picture of the screen in which all of the information is legible is also acceptable). Here are some examples of the specific information we're looking for:
Recent versions of Windows:
What failed: cb***24.sys
Stop Code: FILE_SYSTEM
Older versions of Windows:
STOP: 0x00000022 (0x00240076, 0xF7A07AA8, 0xF7A077A8, 0xF7800C82)
cb***24.sys - Address F7800C82 base at F77CD000, DateStamp 447d6975
After you've copied this information, reboot and check that the memory dump file was created at %SYSTEMROOT%\MEMORY.DMP (typically this is C:\Windows\MEMORY.DMP; if you changed the dump file location in the crash dump settings, check the location you specified instead). It will be a very large file that is too big to attach to an email, so please upload it to a file sharing site of your choice and generate a sharing link that our development team can use to download it.
Finally, submit a support issue to us that includes the link to your dump file, all of the information from the BSOD screen (if you took a picture, attach it or provide another sharing link), a description of how the BSOD was triggered, and any other information that you feel is relevant.
System Hangs
If you encounter a consistently-reproducible system hang that you suspect may be due to CBFS Filter, you'll need to collect the same information as described above. But in order to obtain a crash dump, you'll first need to configure your system so that you can trigger a crash from the keyboard once it hangs. To make this possible, follow these steps (adapted from Microsoft's Forcing a System Crash from the Keyboard article):
- First, using the instructions provided in the section above, configure your system to generate crash dumps, and to not restart automatically after a crash.
- Next, you must enable keyboard-initiated crashes in the registry by creating a new value named CrashOnCtrlScroll, and setting it equal to a REG_DWORD value of 0x01, in all of the following registry keys:
- HKEY_LOCAL_MACHINE\System\CurrentControlSet\Services\i8042prt\Parameters
- HKEY_LOCAL_MACHINE\System\CurrentControlSet\Services\kbdhid\Parameters
- HKEY_LOCAL_MACHINE\System\CurrentControlSet\Services\hyperkbd\Parameters
- Finally, you must restart the system in order for these settings to take effect.
After these steps are complete, you'll be able to trigger a keyboard-initiated crash by using the following hotkey sequence: hold down the Right CTRL key, and press the SCROLL LOCK key twice.
At this point, you can perform the same action that caused the system to hang originally to trigger the hang again. Once the system hangs, use the hotkey sequence to force it to crash, and then follow the rest of the instructions from the section above to collect and submit the necessary information.
Method Never Returns
If your application makes a call to some CBFS Filter method and that method never returns, there's a high chance that the driver deadlock has occurred. This can be caused by various factors; to determine the reason and possible solutions, we need a memory dump, as described above. If your system remains functional, you may also use easier ways to initiate a crash:
- Use the NotMyFault tool by SysInternals to initiate a system crash. This is the preferred way because it generates Complete memory dumps. This tool has a self-explanatory GUI.
- Use the LiveKD tool by SysInternals to create a live memory dump without crashing a system. The disadvantage of this method is that it creates Kernel dumps that are missing user-mode information. To use LiveKD on 32-bit systems, use this command: "livekd.exe -ml -o memory.dmp". On 64-bit systems, the command line would be "livekd64.exe -ml -k .\kd64.exe -o memory.dmp".
Application Crashes
Sometimes, an application crashes while the OS continues to operate, and the name of one of the modules of CBFS Filter is present in the crash information. A crashing application can be the one that uses CBFS Filter or some third-party process. If the crash occurs repeatedly, it is possible to make use of a User-Mode Crash Dump to locate or narrow down the source of the crash. Generation of crash dumps is disabled by default. Before you reproduce the crash, you need to Enable Collecting User-Mode Crash Dumps.
After you enable the crash dump, you don't need to reboot, you can proceed to reproduction of the crash immediately. After the crash re-occurs, you can pick the dump file from its location. The default locations of user-mode dump files are:
- For regular applications: %LOCALAPPDATA%\CrashDumps
- For System services: %WINDIR%\System32\Config\SystemProfile
- For Network and Local services: %WINDIR%\ServiceProfiles
A crash dump can be a large file (depending on the settings) that is too big to attach to an email, so please upload it to a file sharing site of your choice and generate a sharing link that our development team can use to download it.
Finally, submit a support issue to us that includes the link to your dump file, a description of how the BSOD or a manual crash was triggered, and any other information that you feel is relevant.