Introduction
CBFS Shell is a software library that allows .NET developers to easily write Windows Shell Namespace Extensions.
Advantages of the Shell Namespace Extension
A custom Namespace Extension can tightly integrate with Windows. Following are some good reasons to use a custom Namespace Extension:
- Expose any data or information set to end users, while simultaneously providing them with tons of features provided by the Windows Shell (e.g., navigation, search, copy, paste, links).
- The Windows Shell/Explorer is known well by many end-users. This considerably reduces the need for costly end-user change management or training for project adoption.
- Shell Extensions are incredibly versatile. Folders and items can be fully virtual you can use them to represent anything you want.
- Item content can be created on demand. The content doesn't really exist on disk but is created on-the-fly when the user selects them in explorer.
Working with the Windows Shell
Our library relies on technology inside Windows. For example, the Windows UI provides users with access to a wide variety of objects for running applications or managing the operating system. The Windows Shell is a filesystem-like hierarchy that organizes these objects into a namespace and provides users and applications with a consistent way to access and manage objects.
Additionally, File Explorer is a crucial component of any Windows installation. File Explorer is the out-of-the-box host program, over the Windows Shell, that provides a graphical and hierarchical representation of many Windows objects, such as the desktop, the user's documents, physical folders and files, or their content (like .zip files).
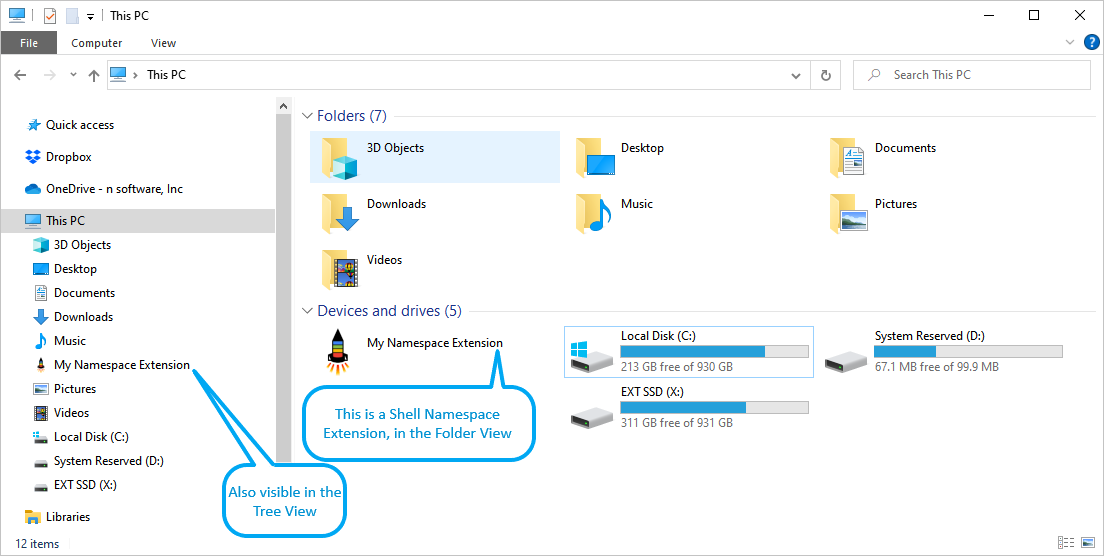
A Shell Namespace Extension is a virtual folder in the Shell Namespace among other Shell folders. This is helpful in creating a new data source for applications on the system. See CBFS Shell Architecture for more detail. When a user browses a virtual folder, the data are presented as a tree-structured hierarchy of folders and files, much like the rest of the Shell Namespace:
In summary, the extension provides items and subfolders (folders are just a type of item) and their columns or properties for a given junction point in the Shell Namespace. A folder can be seen somewhat like a table, with each item being a row, each property being a column, and each property value being a cell.
Note: Shell Namespace Extensions sometimes are referred to as Shell Data Source Objects.
The Shell Namespace and Extensions
The Shell Namespace is a tree-structured hierarchy that contains the objects that make up the system. It is a larger and more inclusive version of the filesystem. Extensions to the Shell Namespace allow users and applications to interact with the contents of a virtual folder in much the same way as with any other Namespace object.
In fact, even a standard Windows installation contains lots of out-of-the-box Namespace Extensions:
- Zip folders
- FTP folders
- Library folders
- Search folders
- "God Mode" folder and other well-known folders: Windows 7 GodMode and Other Folder Shortcuts
The Shell's Namespace graphical representation also includes other visual information, such as the following:
- Details Views, List Views, Icon Views
- Thumbnails and Tooltips
- Property Pages
- Toolbars and Ribbons
- Notification Banners
Depending on the Windows version, the Shell also comes with many standard end-user tools and actions. These tools can act on items and folders in a hierarchy, as follows:
- Context Menus, with standard or specific items, added by other shell extensions
- Copy, Paste, Cut, Delete, Link, Drag and Drop
- Go To, Backward, Forward, Level Up, Level Down
- Grouping and Filtering
- Searching
Without a Shell Namespace Extension
Without a Shell Namespace Extension, you cannot do any of the following:
- Have multiple items with the same name in a given Shell folder. It's impossible to have two or more filesystem entries with the same name.
- Open a composite file (such as an archive file) like it is a virtual folder. Explorer does this when an end user clicks on a .zip file. It shows the content of the .zip file as a subtree hierarchy that is naturally integrated visually in the Shell.
- Have items in a shell folder with names containing reserved characters, such as '?' or ':'.
- Have fully virtual items, items without a physical presence on the disk as files or folders (e.g., database items), or files on a remote server or in the cloud.
- Have these items support shortcuts, drag & drop, copy/paste, and modifications just like they were regular files and folders.
- Present a data source (whatever the data are) as folders and files to an end user.
- Present fully virtual files (without any physical presence), created on-demand, to an end user.
- Deeply customize the Shell view UI over your custom folders.
lib\callback.CBFSShell.dll is designed for use in .NET Framework 4.0 and up. This is the default library which maintains a familiar API in line with previous versions of the product.
| CBShellBoost | The CBShellBoost component is a "gateway" to using the core functionality of CBFS Shell. With CBShellBoost, you can install and uninstall the native proxy DLL to or from the system as well as initialize it before using the core classes. |
Additional Information
You will always find the latest information about CBFS Shell at our web site: www.callback.com. We offer free, fully-functional 30-day trials for all of our products, and our technical support staff are happy to answer any questions you may have during your evaluation.
Please direct all technical questions to support@callback.com. To help support technicians assist you as quickly as possible, please provide an detailed and accurate description of your problem, the results you expected, and the results that you received while using our product. For questions about licensing and pricing, and all other general inquiries, please contact sales@callback.com.
Thank You!
Thank you for choosing CBFS Shell for your development needs. We realize that you have a choice among development tools, and that by choosing us you are counting on us to be a key component in your business. We work around the clock to provide you with ongoing enhancements, support, and innovative products; and we will always do our best to exceed your expectations!
Requirements
CBFS Shell supports Windows 7 and later, including Windows 11, on x86, x64, and ARM64 processor architectures. CBFS Shell offers applications the functionality that is supported by the host OS version. CBFS Shell .NET assemblies support both 32-bit and 64-bit operating systems natively.
.NET Requirements
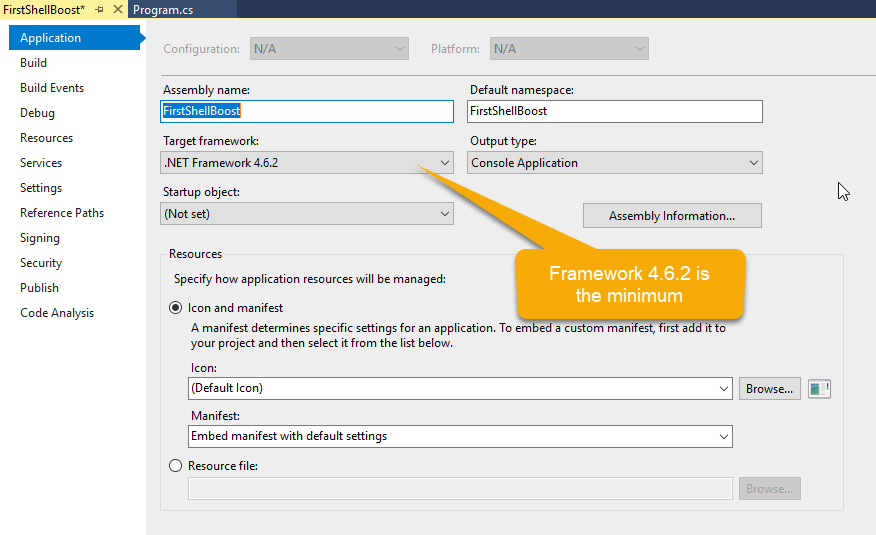
- The .NET CBFS Shell libraries are built with .NET Framework 4.6.2. Projects using the library must target .NET 4.6.2 or higher.
- The .NET CBFS Shell library supports .NET Core 3, .NET 5, and later.
.NET Core 3 or .NET 5 and 6
- To successfully run CBFS Shell with .NET Core 3 or .NET 5/6, the project must explicitly reference Microsoft.Windows.Compatibility and enable WinForms support for .NET 5.
Common Terms
Column:A folder provides a certain number of columns. A Shell column, since Windows Vista, is equivalent to a property from the Windows Property System.
Explorer: Explorer is implemented by \%windir%\System32\explorer.exe.
Common Dialog: The Windows Common Dialog Box library contains a set of dialog boxes usable by any custom application to perform common application tasks, such as opening files, choosing color values, and printing documents. Some of these Common Dialog boxes (Open, Save As, Folder Picker) host the Windows Shell Namespace. Therefore, unlike explorer.exe, they possibly can host Shell Namespace Extensions, in the custom application process.
Junction Point: The root of a Namespace Extension is normally displayed by Explorer as a folder in both tree and folder views. Where the root folder is located in the Shell Namespace hierarchy is called the junction point. This junction point should not be confused with an NTFS feature with the same name.
PIDL or IDL: For convenience, the term PIDL (a Pointer to an Item Identifier List) generally refers to the list itself rather than the pointer to it. It represents a Shell item in the Shell Namespace. PIDL is similar to a filesystem path for a file or folder.
Property or Property Key: A property is an individual piece of metadata associated with a Shell item. A property, since Windows Vista, is used to represent a folder's column. A Property Key is a special binary value composed of a GUID and a 32-bit integer. A property key is the unique identifier of a property. A property also often has a canonical name that represents it uniquely. For example, System.ItemNameDisplay is the canonical name, and its property key is {b725f130-47ef-101a-a5f1-02608c9eebac} 10. All Shell folder columns use a property to define them. Most properties must be registered to Windows before they can be used. CBFS Shell also supports dynamic (unregistered) properties for columns of a folder view.
Proxy or Native Proxy: The native DLL, written in C++, provides cross-process communication between Explorer or other applications that host Common Dialogs or call the Shell API and your Shell Namespace Extension implementation (server).
Windows Shell or Shell: The Windows GUI Shell that is implemented by \Windows\System32\shell32.dll normally is hosted by Explorer processes. This DLL also may be loaded in other processes' address space. Many such host processes can run concurrently in a live Windows session.
Shell Item or Item: This is an item in the Shell's hierarchy. Note that an item can be a folder. The CBFS Shell core represents an item by the ShellItem class. Quite logically, because a folder is an item, ShellFolder derives from ShellItem. ShellItem has no technical relation to the native Windows IShellItem interface but does represent the same object.
Shell Folder or Folder: A folder is an item in the Shell hierarchy that can contain other items. The CBFS Shell core represents a folder by the ShellFolder class. ShellFolder has no technical relation to the native Windows IShellFolder interface, but they do represent the same object.
Virtual Shell Item: This ShellItem is not backed by a physical file (or folder). Such an item has its FileSystemPath property set to null.
Physical Shell Item: This ShellItem is backed by a physical file (or folder). Such an item has its FileSystemPath property set to an absolute physical file (or folder) path. This path does not necessarily correspond to an existing file (or folder).
Windows Property System: This extensible read/write system of data definitions provides a uniform way to express metadata about Shell items. The Windows Property System in Windows Vista later enables you to store and retrieve metadata for Shell items.
CBFS Shell Architecture
CBFS Shell architecture provides two components:
- The CBFS Shell Native Proxy DLL. This DLL is provided as several binary files, one for each supported processor architecture. It has names like CBFSShell.<id>.x86.dll, CBFSShell.<id>.x64.dll, and CBFSShell.<id>.ARM64.dll. With the <Id> part of the name unique to each Namespace Extension project. If you create two Shell Namespace Extensions with CBFS Shell, you will have to use two separate native proxy DLLs.
- The CBFS Shell Core Assembly. This is a .NET assembly. Because it is compiled as "Any CPU", the same binary supports x86, x64, and ARM64 processes. It's common to all CBFS Shell-based projects.

<Your Code>.exe from the example above is a .NET binary that will "serve" items and folders to the Shell. All types of .NET applications are supported: Console, Winforms, WPF, or Windows Service. It can be an .exe or a .dll hosted by another .exe, including native applications, provided they can host a .NET .dll.
CBFS Shell Native Proxy DLL
This DLL is the only block of code that will run in-process with Explorer. It also will run in-process with other programs that use any Shell functions, which may load directly or indirectly Shell Namespace Extensions. For example, if you use Windows Notepad and choose the File / Open menu item, it is possible that the CBFS Shell native DLL will be loaded into the notepad.exe process. The native proxy DLL is written in C++ and is not dependent on any binaries other than the standard Windows binary (notably, it has no dependency on the C++ runtime redistributable files like MSVCRTxxx). This ensures maximum compatibility with various Windows configurations in any language.
All proxy DLLs loaded into explorer.exe processes or any other process, as a Shell Namespace Extension, are the "clients" in the CBFS Shell RPC communication protocol. These clients will try to communicate with a "server". The server must be hosted by your own code, and when requested by the "clients", will "serve" items, folders, and properties representing your Shell Namespace Extension. The server, written by you using .NET, hosts the CBFS Shell Core Assembly, which will load the native proxy DLL in a "server" mode. The same server process will serve all client processes.
Important: The described architecture means that one proxy DLL may be used in one project because it will attempt to reach one server process using the RPC communication protocol.
RPC Protocol
As a Shell Namespace Extension .NET developer, you don't have to worry about the RPC communications between the CBFS Shell proxy and the .NET host process. When you use the CBFS Shell .NET API, the RPC communication is transparent.
Internally, the local RPC channel is used. Unlike other protocols (such as TCP/IP), the local RPC is super fast and does not suffer from any timeout during connection or disconnection, and does not even have communication issues.
If the native DLL on the Windows Shell side cannot communicate with the corresponding .NET server, it may display an error message, like the following screenshot (the text of the button and label are configurable using CBFS Shell API). If the server comes to life again, pressing "Refresh" should display the items in that folder:

Example
Following is an example of a CBFS Shell Namespace Extension AmalgaDrive.
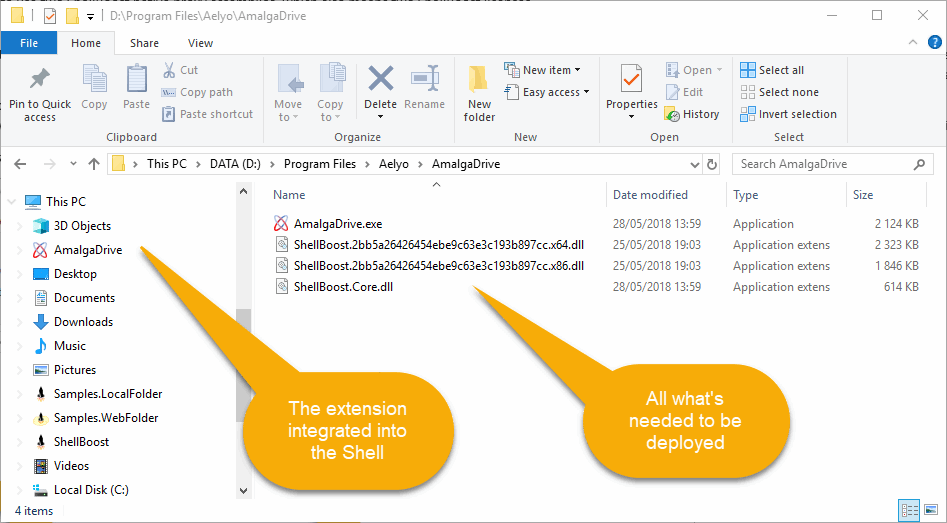
As you can see, only four files are needed to support this extension. Even if the native proxy is loaded in-process by explorer.exe and by the server process AmalgaDrive.exe, the file is located in the same place. Therefore, it does not need to be deployed to multiple directories.
Physical vs Virtual Items
ShellItem Class
An instance of the ShellItem class represents an item in the folder view. A Shell item also can represent a folder. The CBFS Shell's ShellFolder class derives from the ShellItem class and is used to represent folders in the Shell.
In most CBFS Shell projects, you will have to create subclasses of ShellItem and ShellFolder classes to represent your custom items and folders.
From a functional and technical perspective, CBFS Shell supports two fundamental types of ShellItem (or ShellFolder because a ShellFolder is a ShellItem) instances:
Physical ShellItem
A ShellItem associated with a physical filesystem path (file or folder). In this case:
- The FileSystemPath property must be set to a non-null value.
- Many properties can be automatically computed from the associated physical file.
- Item content can be modified in-place by applications.
Virtual ShellItem
A ShellItem not associated with any physical path and the item is completely virtual. In this case:
- The FileSystemPath property must set to a null value.
- All properties must be provided.
- Item content cannot be modified in-place by applications.
Additional Information
When choosing virtual or physical Shell items, remember the following key points:
- A Shell folder may contain any combination of virtual and physical Shell items.
- Even if you choose a physical Shell item, you still will be able to change many of its properties. How the end user will view and use such an item will be controlled by your extension to a certain point. For example, you may hide physical shell items from your extension.
- A physical Shell item benefits from a better automatic Shell integration, in general. For example, many third-party context menu handlers will add menu items to Shell items that are backed by a physical file.
- A physical Shell item has much better support for custom applications (e.g., Office applications, Notepad).
- CBFS Shell does not support in-place modification of virtual Shell items content. The end user will be able to open a virtual Excel file, for example, but will not be able to save it to the same shell location.
- Because virtual Shell items don't need to have a corresponding physical file nor directory, they can support custom file names with characters usually forbidden for standard physical files (e.g., < > :). This can be important when displaying items from an external source.
For example, you may show the same virtual PDF file with the exact same name to all users, and the content of the file will differ each time the user opens it with Explorer.
Writing Shell Extensions
CBFS Shell is a collection of software components that simplifies the process of writing Windows Shell Namespace Extensions.
Technically, a Windows Shell Namespace Extension is an in-process extension. This .dll file is also a COM (Component Object Model) Server that is configured in the Registry, which enables Explorer to find it and load it in its own address space. Other extensions to the Shell can be written as out-of-process extensions, like preview handlers or context menus, but a Shell Namespace Extension always runs in-process.
A primary reason CBFS Shell exists is to address Microsoft's recommendation against writing in-process extensions using .NET. Microsoft does not support such a scenario and clearly states this in the Guidance for Implementing In-Process Extensions article, which is partially quoted here:
In-process extensions are loaded into any processes that trigger them. For example, a Shell Namespace Extension can be loaded into any process which accesses the Shell namespace either directly or indirectly. The Shell namespace is used by many Shell operations, such as the display of a common file dialog, the launch of a document through its associated application, or the obtaining of the icon used to represent a file. Because in-process extensions can be loaded into arbitrary processes, care must be taken that they do not negatively impact the host application or other in-process extensions.
One runtime of particular note is the common language runtime (CLR), also known as managed code or simply .NET. Microsoft recommends against writing managed in-process extensions to Explorer or Windows Internet Explorer and does not consider them a supported scenario.
Writing a Shell In-Process Extension Is Challenging
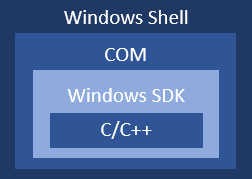
Writing this type of extension requires you to write in-process extensions with another language, which is often C or C++. Although C++ is one of the most widely used programming languages in the world, the language is still more difficult to grasp for a majority of programmers than C# or VB.NET. Productivity is a key issue. And this issue is not only the language itself but also all of the important technologies, some of which are rather low-level, that one must master:
- Windows programming: You'll have to be a good C++ programmer to know your way around the Windows SDK, headers, and macros, which are mandatory to use.
- COM programming: On top of Windows programming, you'll also need to understand how to write low-level COM objects (again, without .NET).
- Shell programming: The Shell is a whole other world. Lots of COM interfaces need to be implemented, many of which are not fully documented. It may take a long time to understand the relationships among the various components of the system.
Writing a Shell In-Process Extension Is Tedious
Writing an in-process extension to the Shell presents some specific problems:
- Supporting 32- and 64-bit operating systems: Because Windows ships in 32- or 64-bit versions, Explorer may need one version or another. There is a good chance that you will need to provide two binaries for your extension (or three binaries if you also deploy your solution to ARM64 systems). CBFS Shell eliminates that issue. Instead, you only have to write one .NET executable file that can be compiled as "Any CPU".
- Restarting Explorer: You will have to restart the Explorer process (or processes) and all processes that load your extension in-process (all processes that use the Common Dialogs, Open, Save, and others) all the time, especially when you want to compile a new version (otherwise the .dll binary will remain locked by the system). With CBFS Shell and its unique out-of-process architecture, you can start and stop your server processes. As soon as the server becomes available, Explorer and other processes don't have to be restarted, because RPC cross-process communication will resume automatically without any timeout.
- Restarting all Common Dialog client apps: You will have to restart Explorer processes, but for the same reasons, you also will have to restart all processes that have used the Common Dialog (e.g., Notepad, Office apps) and that have loaded your extension in their process. This can be very painful during development times.
- Deployment is difficult: In-process Shell Namespace Extensions are loaded in explorer.exe processes but also in all Common Dialog client apps processes, which means nearly all applications using files on a machine. When you want to update your binaries, you probably will have to restart the machine. With the CBFS Shell architecture, you only have to stop and restart your updated .NET application.
Writing a Shell In-Process Extension Is Risky
As the name implies, an in-process extension is loaded in-process with explorer.exe processes and all Common Dialog client apps processes. It is not rare that a bug, in such a crucial binary, crashes its host process. The CBFS Shell out-of-process architecture prevents bugs in your code from crashing end user's vital applications.
You Need an Extension but Don't Want to Invest Much in That Technology
Writing a Shell Namespace Extension is a complex and involved procedure. Investing the time and resources required to create one may not make sense from a business perspective.
.
Binaries Setup
Native Proxy DLLs and IDs
Each proxy DLL embeds some ID values, which are used for RPC communication and to register the Shell Namespace Extension in the Shell Namespace. The name of the native proxy DLL also includes a unique ID.
Trial Versions
The proxy DLLs of the trial version of CBFS Shell include the word "TRIAL" in their names; these DLLs may not be distributed. If a trial DLL is used with multiple projects or software titles, such use will result in conflicts between projects and improper operation of CBFS Shell.
Full Versions
After purchasing a license for CBFS Shell, you download and install a full version of the product. During the installation, setup copies your individual native proxy DLLs to your machine. The provided DLLs include unique ID values in their names, specific to your license. Only these individually-named proxy DLLs are suitable for distribution.
The native proxy DLLs are named CBFSShell.<id>.x64.dll, CBFSShell.<id>.x86.dll, and CBFSShell.<id>.ARM64.dll. The <id> value is unique to each license key.
Writing Your First Extension
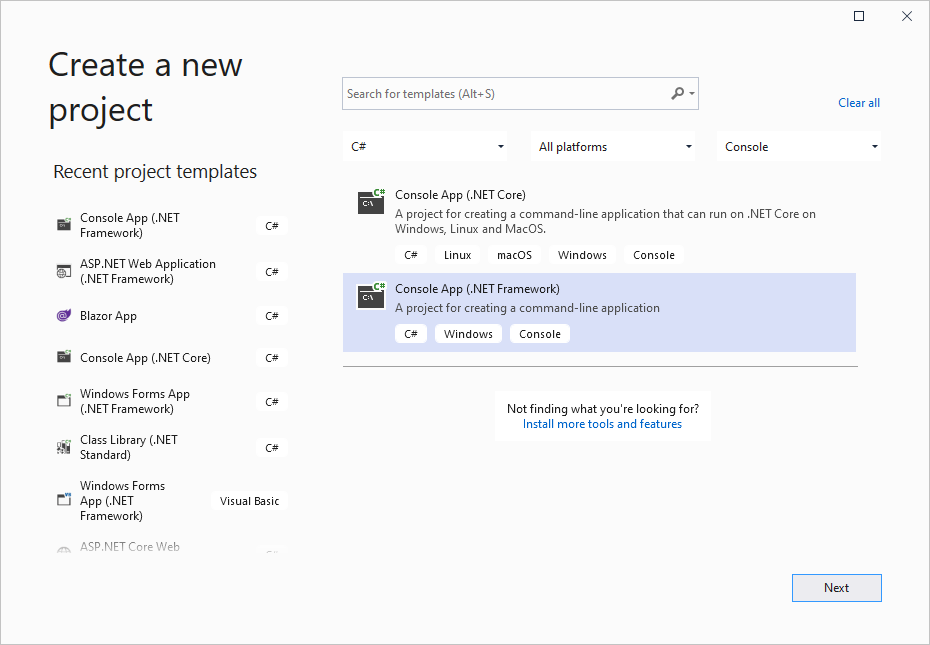
We'll start by writing a simple C# console application using Visual Studio.
To begin, open Visual Studio; choose File, New, Project menu items; and then pick a .NET Framework console project. Because Shell Namespace Extensions are supported only on Windows, there's no point in choosing another framework, like .NET Core. Technically, however, you can use CBFS Shell in a .NET Core or .NET 5/6 application.
We recommend that you configure your project to build in "Any CPU" mode and uncheck the "Prefer 32-bit" setting. This will ensure that your .exe will run as a 32-bit process on a 32-bit machine and as a 64-bit process on a 64-bit machine.

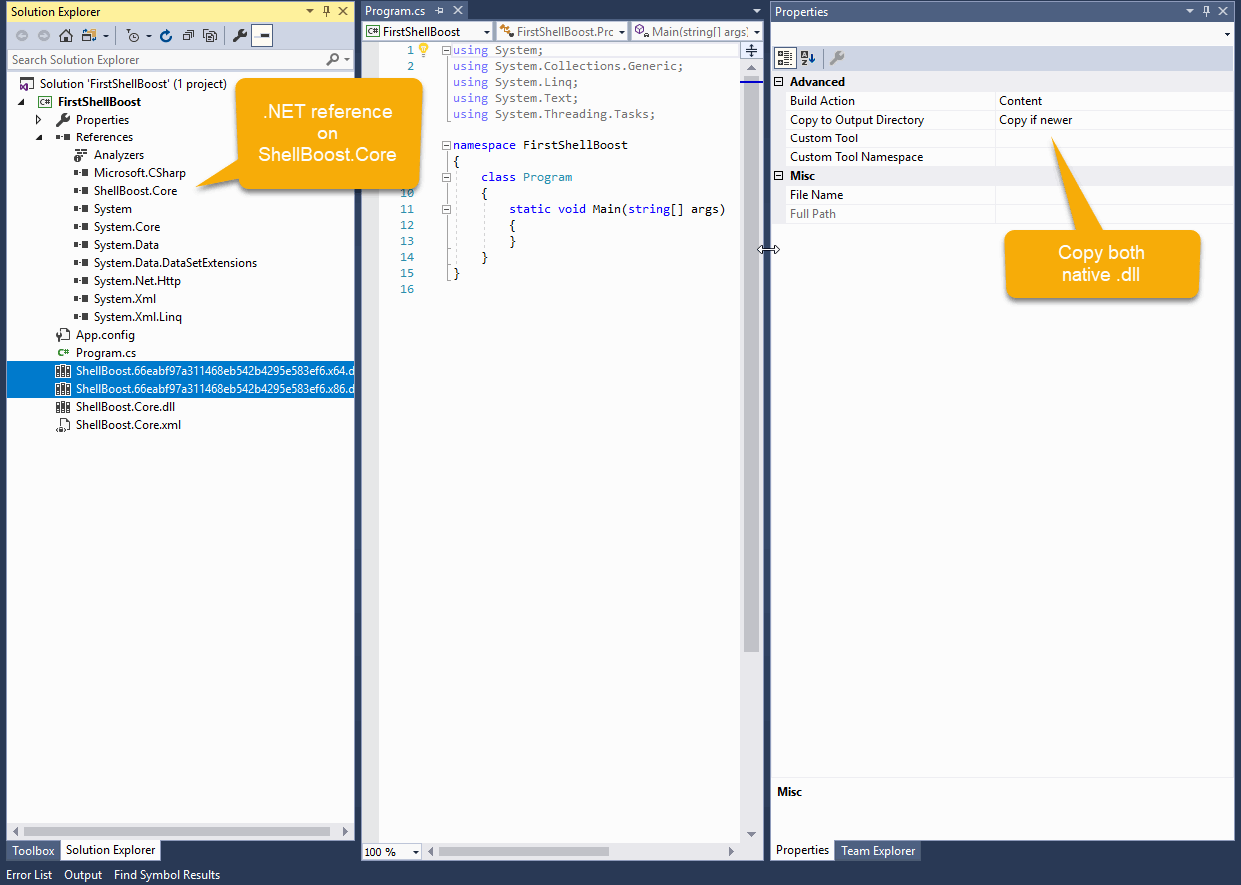
- Copy the following CBFS Shell files under your project's root:
- CBFSShell.<id>.x86.dll (CBFS Shell native proxy DLL, x86 processor architecture)
- CBFSShell.<id>.x64.dll (CBFS Shell native proxy DLL, x64 processor architecture)
- (optional) CBFSShell.<id>.ARM64.dll (CBFS Shell native proxy DLL, ARM64 processor architecture)
- callback.CBFSShell.dll (CBFS Shell .NET)
- callback.CBFSShell.xml (for CBFS Shell API help autocompletion)
- Reference callback.CBFSShell.dll as a .NET reference.
Installation and Initialization of the DLL
A proxy DLL should be registered in the system before it is used. To register the proxy DLL, use the special CBShellBoost component and its Install method. Installation should be done at least once before using the library on a new system, but may be done several times (e.g., to update the information).
Shell Folder Server
The heart of any CBFS Shell program (console or other) is a
running instance of a CBFS Shell ShellFolderServer .NET class. As the
name implies, this class will serve folders (and items) to the Windows Shell.
First, we need to create the implementation class that derives from that class, as follows:
public class MyShellFolderServer : ShellFolderServer // this base class is located in callback.ShellBoost.Core
{
}
Note: This does not compile, because we must override the GetRootFolder() method. First, however, we need to define what our root folder will be.
Root Folder
The root folder is located at the top of the folders and items hierarchy for your Namespace Extension. It is represented by a class that must derive from the CBFS Shell RootShellFolder class:
public class MyRootFolder : RootShellFolder  // this base class is located in callback.ShellBoost.Core
{
    // we want to keep a reference on our custom ShellFolderServer
    public MyRootFolder(MyShellFolderServer server, ShellItemIdList idList)
        : base(idList)
    {
        Server = server;
    }

    public MyShellFolderServer Server { get; }
}
Next, we can override the GetRootFolder() method of
our Shell Folder Server, as follows:
public class MyShellFolderServer : ShellFolderServer
{
    private MyRootFolder _root;

    // only the Shell knows our root folder PIDL
    protected override RootShellFolder GetRootFolder(ShellItemIdList idl)
    {
        if (_root == null)
        {
            _root = new MyRootFolder(this, idl);
        }
        return _root;
    }
}
The root folder
class can derive from the base ShellFolder class instead of the
specialized RootShellFolder class. In this case, the code is similar:
public class MyRootFolder : ShellFolder  // this base class is located in callback.ShellBoost.Core
{
    // reference to the ShellFolderServer is now available as the FolderServer instance property
    public MyRootFolder(ShellItemIdList idList)
        : base(idList)
    {
    }
}
Then, we can override the GetFolderAsRoot() method of our Shell Folder Server, as follows:
public class MyShellFolderServer : ShellFolderServer
{
    private MyRootFolder _root;

    // only the Shell knows our root folder PIDL
    protected override ShellFolder GetFolderAsRoot(ShellItemIdList idl)
    {
        if (_root == null)
        {
            _root = new MyRootFolder(idl);
        }
        return _root;
    }
}
That completes the process to create the Shell folder server and the root folder. Next we must write code to register and start the Shell folder server.
Program Startup
For a console application, program startup is simple. You just need to register and start the Shell Folder Server custom class that you already created and then let it run "forever". In our sample, we can terminate the program when the user presses the ESC key on the keyboard.
To register (and unregister) a Shell Namespace Extension, CBFS Shell provides utility methods that are located in the CBShellBoost component.
Consult the Deployment chapter for more information.
...
Init.Install();
...
Init.Uninstall();
...
The PerUserRegistration property can be true or false. If you choose true, registration will take place in the HKEY_CURRENT_USER registry hive. If you choose false, registration will take place in the HKEY_LOCAL_MACHINE registry hive. We recommend avoiding Machine registration because it requires elevated permissions for the process that runs this code.
Starting the server is accomplished using the following code:
Init.Initialize();

using (var server = new MyShellFolderServer())
{
    var config = new ShellFolderConfiguration();   // this class is located in callback.ShellBoost.Core
    server.Start(config); // start the server
    Console.WriteLine("Started. Press ESC to stop.");
    while (Console.ReadKey(true).Key != ConsoleKey.Escape)
    {
    }
    Console.WriteLine("Stopped"); // end of program
}
As you can see, starting the server is quite simple. Note: The ShellFolderServer class is disposable; hence, the using code block.
Following is the complete code in program.cs:
using System;
using System.Collections.Generic;
using callback.CBFSShell;
using callback.ShellBoost.Core;
using callback.ShellBoost.Core.WindowsShell;

namespace FirstShellBoost
{
    class Program
    {
	    static callback.CBFSShell.CBShellBoost Initializer;

        static void Main(string[] args)
        {
		    // Register the extension
		    Initializer = new callback.CBFSShell.CBShellBoost();
            SFGAO DefaultAttributes = SFGAO.SFGAO_FOLDER
                    | SFGAO.SFGAO_DROPTARGET
                    | SFGAO.SFGAO_HASSUBFOLDER
                    | SFGAO.SFGAO_STORAGEANCESTOR
                    | SFGAO.SFGAO_STORAGE
                    | SFGAO.SFGAO_STREAM;
		    Initializer.Install("{0D0C11AE-0005-0000-0000-0000AE110C0D}", true, "My CBFS Shell project", "MyComputer", "", (long) DefaultAttributes);

            Console.WriteLine("Registered");

            Initializer.Initialize("{0D0C11AE-0005-0000-0000-0000AE110C0D}");
            using (var server = new MyShellFolderServer())
            {
                var config = new ShellFolderConfiguration();   // this class is located in callback.ShellBoost.Core
                server.Start(config); // start the server
                Console.WriteLine("Started. Press ESC to stop.");

                while (Console.ReadKey(true).Key != ConsoleKey.Escape)
                {
                }
               Console.WriteLine("Stopped"); // end of program
            }

           // uncomment these lines to unregister the namespace extension

           //Initializer.Uninstall("{0D0C11AE-0005-0000-0000-0000AE110C0D}", true);
           //Console.WriteLine("Unregistered");
        }
    }

    public class MyShellFolderServer : ShellFolderServer // this base class is located in callback.ShellBoost.Core
    {
        private MyRootFolder _root;

        // only the Shell knows our root folder PIDL
        protected override RootShellFolder GetRootFolder(ShellItemIdList idl)
        {
            if (_root == null)
            {
                _root = new MyRootFolder(this, idl);
            }
            return _root;
        }
    }

    public class MyRootFolder : RootShellFolder  // this base class is located in callback.ShellBoost.Core
    {
        // we want to keep a reference on our custom ShellFolderServer
        public MyRootFolder(MyShellFolderServer server, ShellItemIdList idList)
            : base(idList)
        {
            Server = server;
        }

        public MyShellFolderServer Server { get; }
    }
}
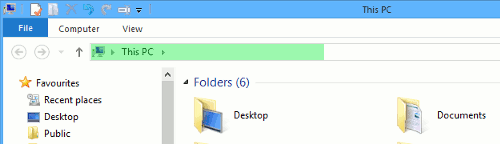
If you build and run the code, open Explorer, and select "This PC", you should see the following:
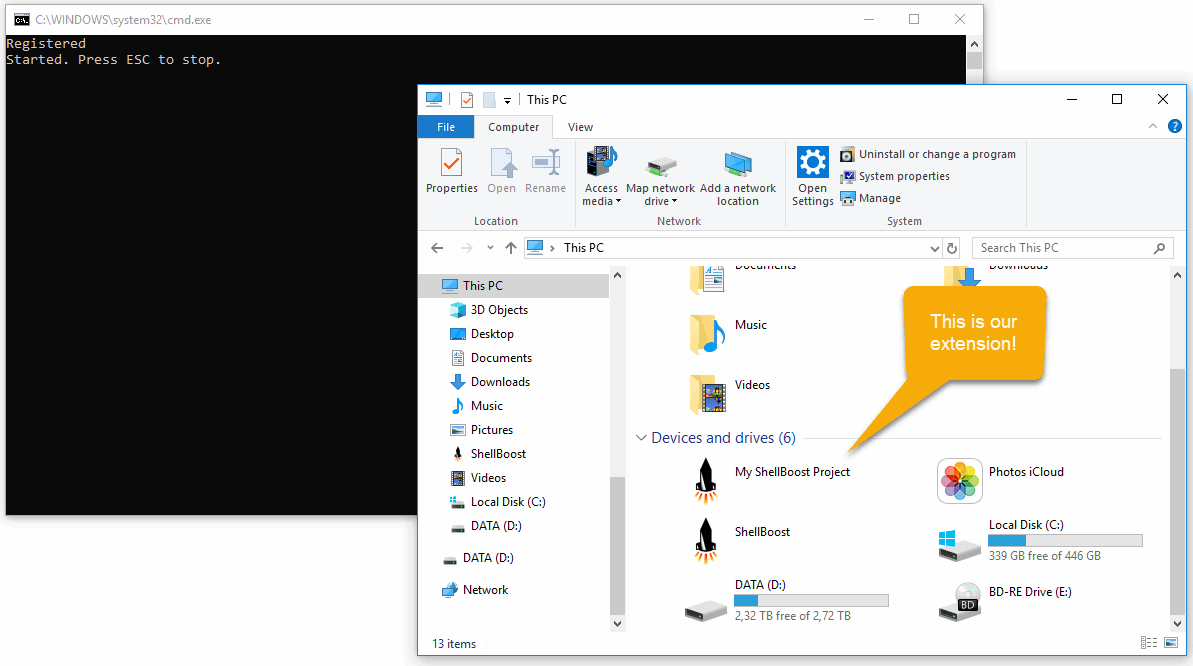
If you open "My CBFS Shell Project", you should see an empty
directory. This is expected: we don't provide any content yet. Next add two shell items to our root folder's code.
Press ESC in the console application to stop serving files (Explorer windows may stay opened) and add the following lines:
public override IEnumerable<ShellItem> EnumItems(SHCONTF options)
{
    // note: by default, CBFS Shell uses the key/ID value as the display name if it's not explicitly defined
    yield return new ShellFolder(this, new StringKeyShellItemId("My First Folder"));
    yield return new ShellItem(this, new StringKeyShellItemId("My First Item"));
}
You can rebuild and run the application again. Switch to Explorer and press Refresh (F5 key), after which you should see something similar to the following screenshot:
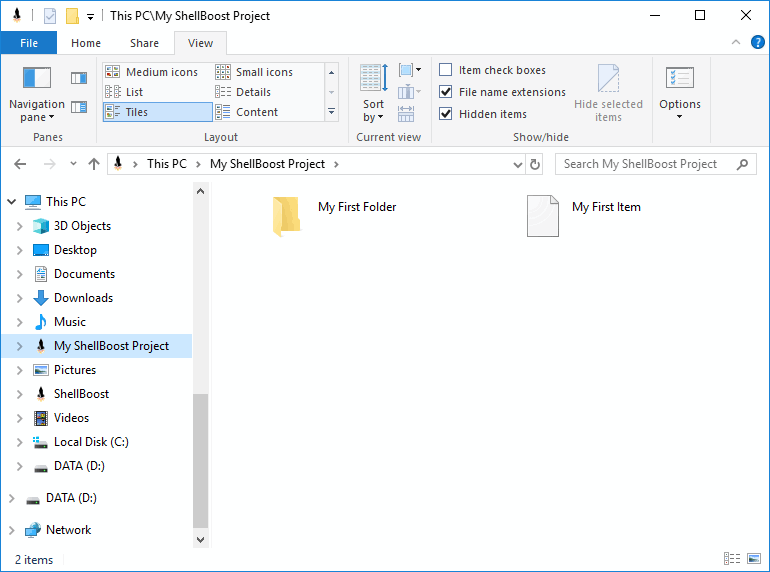
You've just created a Shell Namespace Extension that has fully virtual items (not related to physical files).
Item Identification (PIDLs)
A PIDL (or an IDL) is a fundamental Windows Shell concept. At a high level, it's pretty simple, as it's just a "value" that represents a Shell item in the Shell Namespace. It's a bit like a full filesystem path for a physical file or folder, except that it's a binary object and not a string.
Note: The names "PIDL" and "IDL" can be used interchangeably. The leading P stands for pointer, but, for convenience, PIDL generally refers to the IDL itself rather than the pointer to it, especially in .NET in which we rarely use pointers. To delve deeper into that subject, Microsoft gives more details here Identifying Namespace Objects.
Just like a full filesystem path is a list of strings separated by the \ (backslash) character, a PIDL is a list (L is for list) of IDs (identifiers) separated by a special PIDL separator (two consecutive zero bytes).
A very important requirement for PIDLs is that they must be serializable (i.e., marshaled as a byte array somehow), so that they can be persisted and sent to other machines. They also should be suitable for storing in Shell shortcut files (.lnk) and for sharing by end users using the usual user interface tools in Windows.
That Seems Complicated!
As a CBFS Shell developer, you generally don't need to know how PIDLs or IDs are made, allocated, or destroyed, because CBFS Shell provides two .NET classes that mask that complexity:
- ShellItemId : represents an ID, a segment in the list
- ShellItemIdList : represents a PIDL or IDL, which is a list of ShellItemId instances.
With CBFS Shell, all Shell items (including folders) are
represented by instances of the ShellItem class. To match the Windows Shell
Namespace organization, every ShellItem instance has an ID, which is an
instance of the ShellItemId class. In fact, this identifier instance
must be specified in the ShellItem class constructor. Following is the most
basic constructor of the ShellItem class:
public ShellItem(ShellFolder parent, ShellItemId id)
As you can see, the constructor needs the parent folder, the folder that contains the new Shell item, and an ID that uniquely represents the item in the folder.
How to Create a ShellItemId
The ShellItemId class has only one constructor:
protected ShellItemId(byte[] data)
As you can see, this item protected, and it takes whatever data you want, represented as a byte array. Fortunately, you probably will never need to create a new class from ShellItemId because CBFS Shell provides a list of ready-made classes for the most well-known data types:
- KeyShellItemId: supports a GUID, sbyte, byte, short, ushort, int, uint, long, ulong, string, IntPtr, and byte[] types for the ID data, but you can use the specialized classes:
- GuidKeyShellItemId: uses a GUID value as the ID
- SByteKeyShellItemId: uses an sbyte value as the ID
- ByteKeyShellItemId: uses a byte value as the ID
- Int16KeyShellItemId: uses a short value as the ID
- UInt16KeyShellItemId: uses a ushort value as the ID
- Int32KeyShellItemId: uses an int value as the ID
- UInt32KeyShellItemId: uses a uint value as the ID
- Int64KeyShellItemId: uses a long value as the ID
- UInt64KeyShellItemId: uses a ulong value as the ID
- StringKeyShellItemId: uses a non-null string value as the ID
- IntPtrKeyShellItemId: uses an IntPtr value as the ID
For example, if shell items in a CBFS Shell folder come from rows of a table in a relational database and the primary key of that table is a GUID value, you could use the GuidKeyShellItemId class to represent the IDs of the Shell items.
Good Practice
A ShellItemId (or ID) is always relative to a parent folder. In fact, it is valid only in the context of the Shell folder that has created it.
A ShellItemIdList (or IDList or PIDL) is often absolute but also can be relative just like a file path (\mypath1\mypath2\myfile.ext is absolute while mypath2\myfile.ext is relative). An ID is a segment and an IDList is a concatenation of segments.
Note: A PIDL relative to the desktop is the same as an absolute PIDL, because the Desktop folder is the absolute root of the Shell Namespace.
Because an item's (ShellItem or ShellFolder instance) relative ShellItemId is concatenated with the owning parent's ShellItemIdList to form the item's absolute ShellItemIdList, a ShellItemId for a given item should contain only a unique key in the parent folder, not a full absolute representation of the item. The latter variant is technically possible but very inefficient. Remember that PIDLs are serialized and deserialized all the time, especially in the CBFS Shell cross-process architecture context.
For example, the following sample code is inefficient:
public class MyShellItem : ShellItem
{
    // where someFullPath (relative or absolute) would contain a full hierarchy string
    // like "myRoot.myPath1.myPath2.myName"
    public MyShellItem(MyShellFolder parent, string someFullPath)
        : base(parent, new StringKeyShellItemId(someFullPath))
    {
    }
    ...
}
Compare the inefficient sample code with the following sample code, which is preferable:
public class MyShellItem : ShellItem
{
    // where name would only contain a name instead the parent folder
    public MyShellItem(MyShellFolder parent, string name)
        : base(parent, new StringKeyShellItemId(name))
    {
    }
    ...
}
Items Enumeration
The first method that the Windows Shell will call in your CBFS Shell Namespace Extension is EnumItems.
The following is a simple example of such a method, which we first saw in the "Writing your first extension" chapter:
public override IEnumerable<ShellItem> EnumItems(SHCONTF options)
{
    yield return new ShellFolder(this, new StringKeyShellItemId("My First Folder"));
    yield return new ShellItem(this, new StringKeyShellItemId("My First Item"));
}
This EnumItems method simply tells the Shell what
Shell items a given Shell folder contains. It is also used, however, by
CBFS Shell when the Shell asks for one single item (e.g., for direct access, parsing,
searching). For the latter purpose, the ShellFolder class defines two
virtual methods, which by default, call EnumItems internally:
    /// Gets an item using its display name.
    protected virtual ShellItem GetItem(string displayName)
    {
        ... pseudo code
        return EnumItems(SHCONTF.SHCONTF_FOLDERS |
            SHCONTF.SHCONTF_NONFOLDERS |
            SHCONTF.SHCONTF_FLATLIST | // all items
            SHCONTF.SHCONTF_INCLUDEHIDDEN |

        SHCONTF.SHCONTF_INCLUDESUPERHIDDEN)?.FirstOrDefault(i => i.DisplayName.EqualsIgnoreCase(displayName));
    }

    /// Gets an item using its identifier.
    public virtual ShellItem GetItem(ShellItemId id)
    {
        ... pseudo code
        return EnumItems(SHCONTF.SHCONTF_FOLDERS |
            SHCONTF.SHCONTF_NONFOLDERS |
            SHCONTF.SHCONTF_FLATLIST | // all items
            SHCONTF.SHCONTF_INCLUDEHIDDEN |

        SHCONTF.SHCONTF_INCLUDESUPERHIDDEN)?.FirstOrDefault(i => i != null && i.Id != null && i.Id.EqualsOrSameBeginning(id));
    }
This scenario is obviously not optimal, Therefore, if retrieval of a single item is supported, it is strongly recommended that you override both of these methods for better performance.
Conditional Enumeration UI
If you need to show a window (like a WPF or Winforms window) from your Namespace Extension, you cannot use CBFS Shell implicit threads (threads are implicitly created by RPC incoming calls from the Shell) because these threads are not STA (Single Threaded Apartment) threads, which is a common requirement for UI-bound objects.
Thus, you can create your own STA threads or use CBFS Shell
utilities. For example, the following code is used to show a WPF window before
enumerating items:
public override IEnumerable<ShellItem> EnumItems(SHCONTF options)
{
    // run code on an STA thread
    var ret = callback.ShellBoost.Core.Utilities.TaskUtilities.StartSTAThreadTask(() =>
    {
        var win = new MyWpfWindow(); // create the WPF window
        return win.ShowDialog(); // show it as a modal dialog
    }).Result; // => the result of ShowDialog
    ...
}
Note: In this case, the window is modal, so the requesting Shell object (e.g., an Explorer view) will wait until the window is dismissed. In the case of an Explorer view, it usually will show the green progress line:
Related Items
Shell folders and Shell items can have related items. Technically, Shell-related items are exposed through the Windows IRelatedItem interface and all derived interfaces.
CBFS Shell supports that feature using special custom properties. These properties are not declared by Windows and are private to CBFS Shell:
- IIdentityName -> callback.ShellBoost.Core.PropertyStore.CurrentItem
- IDelegateItem -> callback.ShellBoost.Core.PropertyStore.DelegateItem
- IDisplayItem -> callback.ShellBoost.Core.PropertyStore.DisplayItem
- IIdentityName -> callback.ShellBoost.Core.PropertyStore.IdentityName
- IPreviewItem -> callback.ShellBoost.Core.PropertyStore.PreviewItem
- ITransferMediumItem -> callback.ShellBoost.Core.PropertyStore.TransferMediumItem
- IViewStateIdentityItem -> callback.ShellBoost.Core.PropertyStore.ViewStateIdentityItem
One common usage for these relations is to associate a virtual item (without a physical file) to a physical file (e.g., in on-demand/lazy loading scenarios).
The following code demonstrates a virtual item, associated
with a physical path. No file exists at the given physical path. The file is
created (or updated) only when the Shell asks for it through a related item
(here, PreviewItem). Shell asks for a related item before it falls back
to the item's content, which creates the opportunity to the application to write that
file down before the originator of the request can access the file.
public class VirtualAndPhysicalShellItem : ShellItem
{
    public VirtualAndPhysicalShellItem(ShellFolder parent, string name)
        : base(parent, new StringKeyShellItemId(name))
    {
        // this item is virtual, but we give it a filesystem path (with nothing in there)
        // so it's half virtual, half physical
        FileSystemPath = Path.Combine(Path.GetFullPath("Data"), VirtualAndPhysicalShellFolder.PhysicalStorageName, name + ".txt");
    }

    // Shell is asking for something
    protected override bool TryGetFileSystemValue(PropertyKey key, out object value)
    {
        if (key == PropertyStore.PreviewItem)
        {
            // make sure the directory exists
            IOUtilities.FileCreateDirectory(FileSystemPath);
            // write something in the file
            // we use a CBFS Shell utility to avoid sharing violation errors
            IOUtilities.WrapSharingViolations(() =>
            {
                File.WriteAllText(FileSystemPath, "hello from " + DisplayName + " at " + DateTime.Now);
            });
        }

        return base.TryGetFileSystemValue(key, out value);
    }
}
Item Rename
Using Explorer, an end user can rename Shell items. This can be accomplished using context menus (if the "Rename" menu item is visible), or by pressing the F2 key while the item is selected. In all cases, the item can be renamed only if the corresponding ShellItem instance has its CanRename property set to true. By default, the property is false.
Renaming is done item by item. A folder may contain items (including subfolders) that can be renamed and others that cannot.
If an item supports the renaming operation, you must override the OnOperate() method of the parent folder class to implement renaming, as follows:
protected virtual void OnOperate(ShellOperationEventArgs e)
The event argument contains the type of operation and its context (e.g., the item being renamed, the new name). The following is a sample implementation of OnOperate:
protected override void OnOperate(ShellOperationEventArgs e)
{
    switch (e.Operation)
    {
        case ShellOperation.SetNameOf:
        case ShellOperation.RenameItem:
            OnRename(e);
            break;
    }
}

private void OnRename(ShellOperationEventArgs e)
{
    if (e.Item.IsFolder)
    {
        // TODO: rename a folder
        return;
    }

    // TODO: rename an item
}
Note 1: Explorer has multiple ways of renaming an item, so you should handle both SetNameOf and RenameItem operations.
Note 2: If the ShellItem instance represents a physical file item, the default implementation of OnOperate() will rename the physical file. In that case, the method does not need to be overridden.
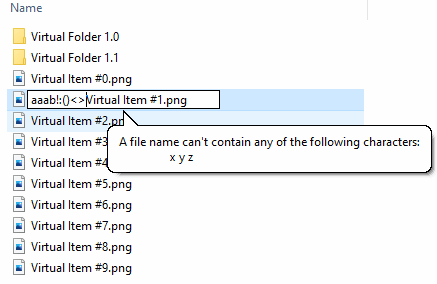
Validation
A Shell folder can validate a Shell item's name, especially during renaming operations. For example, this is how you can limit characters and name length:
protected override void OnGetNameValidCharactersEvent(object sender, GetNameValidCharactersEventArgs e)
{
    e.InvalidCharacters = "xyz";
}

protected override void OnGetNameMaxLengthEvent(object sender, GetNameMaxLengthEventArgs e)
{
    e.MaxLength = 30;
}
In this case, this is what the end user will see when typing an invalid character:
Item Delete
Using Explorer, an end user can delete Shell items. This can be done using context menus (if the "Delete" menu item is visible), or by pressing the DEL key while the item is selected. In all cases, the item can be renamed only if the corresponding ShellItem instance has its CanDelete property set to true. By default, the property is false.
Deleting is accomplished item by item. A folder may contain items (including subfolders) that can be deleted and others that cannot.
If a ShellItem supports the deletion operation, you must override the OnOperate() method of the parent folder class to implement deletion:
protected virtual void OnOperate(ShellOperationEventArgs e)
The event argument contains the type of operation and its context (e.g., the item being deleted). Following is a sample implementation of OnOperate:
protected override void OnOperate(ShellOperationEventArgs e)
{
    switch (e.Operation)
    {
        case ShellOperation.RemoveItem:
            OnRemove(e);
            break;
    }
}

private void OnRemove(ShellOperationEventArgs e)
{
    if (e.Item.IsFolder)
    {
        // TODO: remove a folder
        return;
    }

    // TODO: remove an item
}
Note: If the ShellItem instance represents a physical file item, the default implementation of OnOperate() will delete the physical file. In that case, the method does not need to be overridden.
Recycle Bin Support
Depending on how the end user deletes an item, the operation can be RecycleItem instead of RemoveItem. Again, if the ShellItem instance represents a physical file item, the RecycleItem operation implementation will put the physical file in the recycle bin. In that case, the method does not need to be overridden.
Once the item is in the recycle bin, the end user will be able to restore it to its original folder.
Shell Notifications
Whenever a Shell item or a Shell folder that you handle is created, renamed, changed, or deleted, you can, and often should, notify the Shell about what happened. The underlying technology for this process is the corresponding Windows API: SHChangeNotify function. CBFS Shell provides two versions of easy-to-use wrappers over this API:
- Static overloaded ShellUtilities.ChangeNotify***() methods in the callback.ShellBoost.Core.Utilities.ShellUtilities class.
- Instance methods NotifyUpdate, NotifyCreate, NotifyDelete, and NotifyRename in the ShellItem class. The instance methods use the ShellUtilities methods in their implementation.
For example, if a Shell item has been renamed by some internal implementation of your Namespace Extension, you should call the NotifyRename method of the corresponding ShellItem instance. This will instruct Shell that this item has been renamed, and Shell will react accordingly. For example, if this item was displayed in an Explorer view (or even multiple views), the item in question will be refreshed.
An extension that expands itself using notification events is demonstrated in the Device Manager Folder sample.
Subscribing to Shell Events
Depending on your scenario, you also may be interested in subscribing to events that are raised by other Namespaces in the Shell, including the filesystem itself. Fortunately, CBFS Shell provides the callback.ShellBoost.Core.Utilities.ChangeNotifier class. This class fires events when any part of the system, including any third parties installed on the machine, uses the SHChangeNotify Windows API function in any other process that is running on the desktop. Usage of this class is demonstrated in the Physical Overview sample.
Item Content
The content of an item is normally used when the end user
double-clicks on an item. If the item's type (or extension) is known to the
system and is associated to an application, the content is requested by CBFS Shell
from the ShellItem instance using the GetContent() method. The
method signature is defined as follows:
public virtual ShellContent GetContent()
ShellContent is a stream-oriented abstract class that provides enough information for the CBFS Shell components to provide the content to any Windows component that is requesting it. CBFS Shell also provides severall nonabstract classes to make things easier:
- FileShellContent: uses a physical file as the content.
- MemoryShellContent: uses memory as the content. Memory can be represented by a string, an array of bytes, or a seekable and readable stream.
- StreamShellContent: uses any stream as the content.
Note: If the ShellItem instance represents a physical file item, the default implementation of GetContent() will return an instance of the FileShellContent, initialized with the corresponding physical file. In that case, the method does not need to be overridden.
Item Properties and Folder Columns
Windows Property System
Starting with Windows Vista, each item in the Shell (items and folders) is associated with a set of properties from the Windows Property System. These properties not only are used to describe the item but also are used in Shell folder views. This is especially true and visible in the case of the Details View, in which case a column is associated with a property. This also is true for other views and the standard property sheet, which is available using the "Properties" menu item. Properties are used by the Shell all the time.
A property:
- is uniquely addressed by its PROPERTYKEY, which is a Windows-defined structure (composed of a GUID value and an int32 value);
- has a canonical human-readable name (e.g., "System.ItemNameDisplay"); and
- has a schema description, which is specified in a .propdesc XML file format and expressed programmatically through the Windows-defined IPropertyDescription interface.
A property has a property definition and a property value.
To manipulate these concepts easily in .NET, CBFS Shell defines the PropertyKey structure in the callback.ShellBoost.Core.WindowsPropertySystem Namespace. Its binary layout is 100% compatible with the Windows PROPERTYKEY structure. CBFS Shell also defines the PropertyDefinition class in the same Namespace that uses a PropertyKey as a unique identifier. Both classes have useful methods that allow you to navigate from one to another and to explore the Windows property schema.
The latest version of Windows 10 defines around 1,600 properties of all types. They are all defined as PropertyKey instances in the CBFS Shell .NET assembly, callback.ShellBoost.Core.WindowsPropertySystem Namespace. Note that all properties are not officially documented.
Property Values
In pure Windows code, the value of a property for a given item (if that item contains that property) has a PROPVARIANT type, which is a structure that can hold a variety of data.
To simplify things, CBFS Shell also defines a PropVariant .NET class that can be used to store property values. Most of the time, however, a developer that uses CBFS Shell only will have to deal with values of standard .NET types (e.g., strings, integers, booleans, arrays), because CBFS Shell components automatically handle PropVariant conversions.
Folder Columns
Because each column is now associated with a property, each column also is associated with a PropertyKey and its property definition.
The CBFS Shell ShellFolder class has several AddColumn methods to add columns to a Shell folder view. In general, the set of available columns for a Shell folder is fixed and initialized in the ShellFolder constructor, so the RemoveColumn methods are mostly used to remove the default columns that CBFS Shell defines.
By default, CBFS Shell defines the following columns and property keys for a Shell Folder, in that exact order (shown here using their canonical names):
- System.ItemNameDisplay, with the state flag SHCOLSTATE_ONBYDEFAULT
- System.ItemType, with the state flag SHCOLSTATE_ONBYDEFAULT
- System.Size
- System.DateModified
- System.PerceivedType
- System.Kind
When an end user opens a CBFS Shell Shell folder, this is what will be displayed the first time:
As you can see, only two columns are displayed, although six are available, because of the SHCOLSTATE_ONBYDEFAULT flag that was set only on the first two ones. If the end user right-clicks on the folder view's header, they will be able to see all available columns and choose which one will be shown in the folder view.
Adding Columns to a Folder
Columns are by default associated with registered properties
(from the Windows Property System). To add a column, you will add
the associated PropertyKey.
In general, columns are added in the ShellFolder-derived
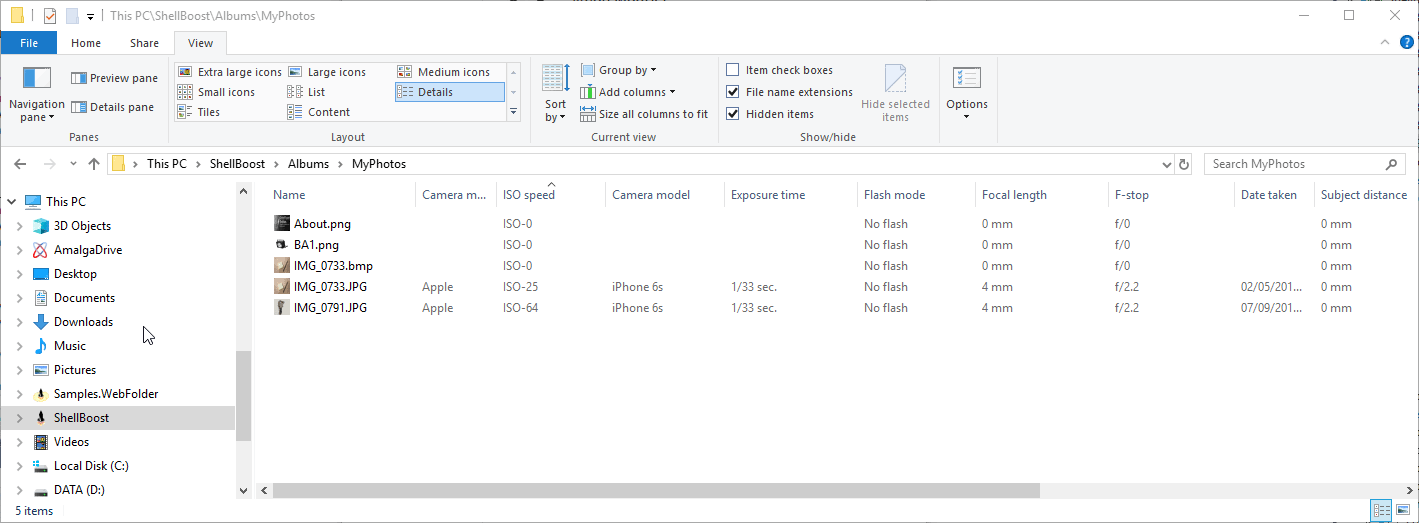
class constructor, which in the case of a Shell folder that would display photos, looks like this:
public PhotosFolder(ShellFolder parent, ShellItemId id)
    : base(parent, id)
{
    CanPaste = true;
    CanLink = true;

    // luckily, all these media/photo properties are already defined in Windows
    // SysProps is an alias for callback.ShellBoost.Core.WindowsPropertySystem.System
    AddColumn(SysProps.Photo.CameraManufacturer, SHCOLSTATE.SHCOLSTATE_ONBYDEFAULT);
    AddColumn(SysProps.Photo.CameraModel, SHCOLSTATE.SHCOLSTATE_ONBYDEFAULT);
    AddColumn(SysProps.Photo.ExposureTime, SHCOLSTATE.SHCOLSTATE_ONBYDEFAULT);
    AddColumn(SysProps.Photo.Flash, SHCOLSTATE.SHCOLSTATE_ONBYDEFAULT);
    AddColumn(SysProps.Photo.FocalLength, SHCOLSTATE.SHCOLSTATE_ONBYDEFAULT);
    AddColumn(SysProps.Photo.ISOSpeed, SHCOLSTATE.SHCOLSTATE_ONBYDEFAULT);
    AddColumn(SysProps.Photo.FNumber, SHCOLSTATE.SHCOLSTATE_ONBYDEFAULT);
    AddColumn(SysProps.Photo.DateTaken, SHCOLSTATE.SHCOLSTATE_ONBYDEFAULT);
    AddColumn(SysProps.Photo.SubjectDistance, SHCOLSTATE.SHCOLSTATE_ONBYDEFAULT);
    AddColumn(SysProps.Media.UniqueFileIdentifier, SHCOLSTATE.SHCOLSTATE_ONBYDEFAULT);
    AddColumn(SysProps.Image.VerticalSize, SHCOLSTATE.SHCOLSTATE_ONBYDEFAULT);
    AddColumn(SysProps.Image.HorizontalSize, SHCOLSTATE.SHCOLSTATE_ONBYDEFAULT);
    AddColumn(SysProps.Image.ImageID, SHCOLSTATE.SHCOLSTATE_ONBYDEFAULT);
}
Then, each Shell item in this folder would set the value (e.g., standard
.NET values, strings, integers, booleans) for all of these properties
accordingly; for example, like this sample, in which we are using a Photo class, defined elsewhere,
that has all of the information for a photo:
public PhotoItem(BaseFolder parent, Photo photo)
    : base(parent, new StringKeyShellItemId(photo.Id))
{
    SetPropertyValue(SysProps.Photo.CameraManufacturer, photo.ExifMake);
    SetPropertyValue(SysProps.Photo.CameraModel, photo.ExifModel);
    SetPropertyValue(SysProps.Photo.ExposureTime, photo.ExifExposure);
    SetPropertyValue(SysProps.Photo.Flash, (photo.ExifFlash ? PHOTO_FLASH_FLASH : PHOTO_FLASH_NONE));
    SetPropertyValue(SysProps.Photo.FocalLength, photo.ExifFocalLength);
    SetPropertyValue(SysProps.Photo.ISOSpeed, photo.ExifIso);
    SetPropertyValue(SysProps.Photo.FNumber, photo.ExifFStop);
    SetPropertyValue(SysProps.Photo.DateTaken, photo.ExifTime);
    SetPropertyValue(SysProps.Photo.SubjectDistance, photo.ExifDistance);
    SetPropertyValue(SysProps.Media.UniqueFileIdentifier, photo.ExifImageUniqueId);
    SetPropertyValue(SysProps.Image.HorizontalSize, photo.Width);
    SetPropertyValue(SysProps.Image.VerticalSize, photo.Height);
    SetPropertyValue(SysProps.Image.ImageID, photo.Id);
}
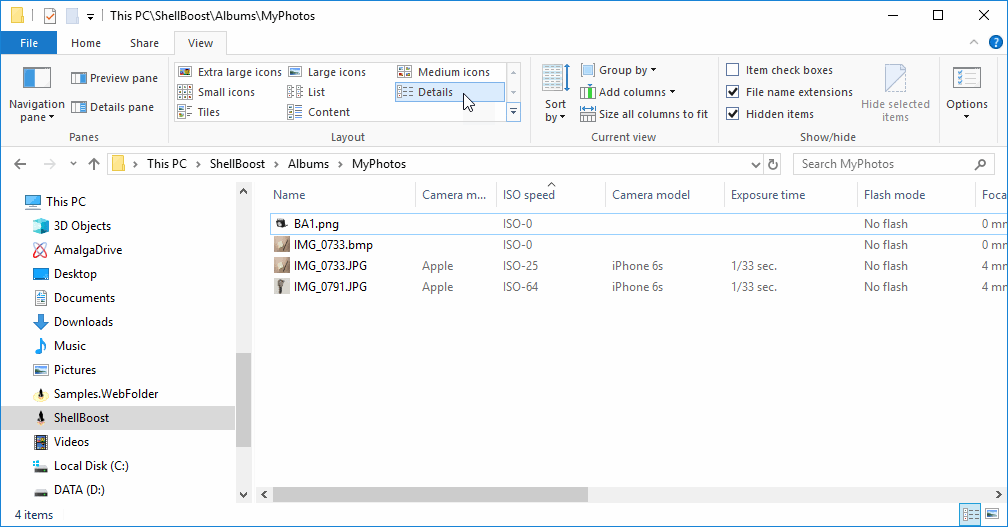
The following image shows what such a folder would like:
A Shell item (or folder) can set a property value using the SetPropertyValue()
method as seen previously, but if the value is dynamic, it may be better to
override the TryGetPropertyValue() method, similar to the following code:
public override bool TryGetPropertyValue(PropertyKey key, out object value)
{
    // we use the current date time as the Display Name
    if (key == Props.System.ItemNameDisplay)
    {
        value = DateTime.Now.ToString();
        return true;
    }
    return base.TryGetPropertyValue(key, out value);
}
The way items are rendered, including header names, is consistent with the type of data they contain because we used only Windows well-known properties that have a lot of predefined characteristics. The benefit of using properties, built-in or not, doesn't stop at the data type and the name, but also comes from how they are rendered, how they are grouped (using a right-click on column headers), how they are sorted, and how they are searched. More information is available on the MSDN site in Understanding the Property Description Schema
Property Lists
Property lists are semicolon delimited strings that have the following form:
prop:[flags]PropertyCanonicalName;[flags]PropertyCanonicalName;...;[flags]PropertyCanonicalName;
They are used as values for properties that expect property lists, for example, System.PropList.InfoTip, which contains the list of properties to be shown in the infotip/tooltip for a Shell item.
These properties are defined in the System.PropList Namespace. Flags are technically defined on the MSDN site in the PROPDESC_VIEW_FLAGS enumeration. Each value in the enumeration has a corresponding special character. The correspondence is available on MSDN: IPropertySystem::GetPropertyDescriptionListFromString method.
Instead of building these strings manually, you may use the CBFS Shell utility class named PropertyDescriptionList in the callback.ShellBoost.Core.WindowsPropertySystem Namespace.
The class also supports flags, which will make the task a lot easier. The following code shows an example:
using Props = callback.ShellBoost.Core.WindowsPropertySystem;
var list = new PropertyDescriptionList(Props.System.ItemNameDisplay, Props.System.ItemTypeText).ToString();
This code will build the "prop:System.ItemNameDisplay;System.ItemTypeText;" string. The utility class also handles various flags that the Shell supports.
Custom Properties
The Windows Property System supports custom properties. As a
developer that uses CBFS Shell, you may create your own properties and use them to create custom columns.
The process is documented on MSDN: Creating Custom Properties. Custom property definitions
must be registered using a custom .propdesc XML file in the system before the Shell can use it.
CBFS Shell provides a helper method in the PropertySystem class in the callback.ShellBoost.Core.WindowsPropertySystem Namespace:
// register a property schema from a .propdesc file path
PropertySystem.RegisterPropertySchema(location);
...
// unregister a property schema from a .propdesc file path
PropertySystem.UnregisterPropertySchema(location);
The Registry Folder sample demonstrates this process with two custom columns defined in a custom .propdesc file.
Note: Because registration (and unregistration) requires write access to some part of the HKEY_LOCAL_MACHINE registry hive, the program that will run that code will need sufficient permissions. This is an inconvenient aspect of defining custom properties. Whenever possible, we recommend using built-in Windows properties.
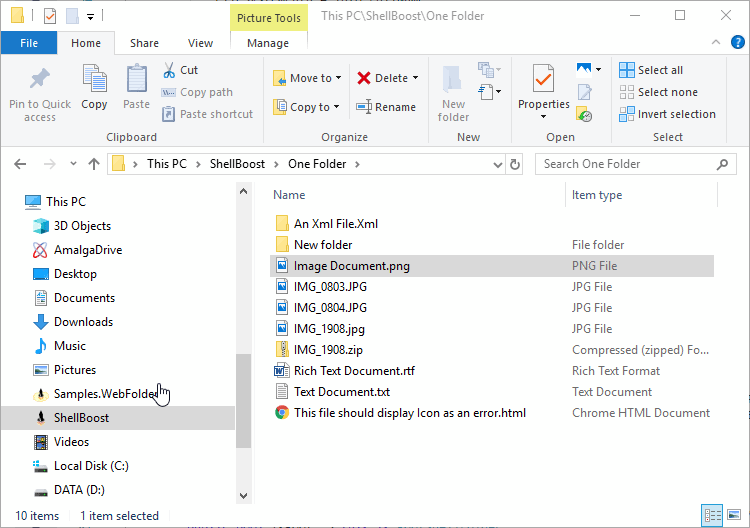
Item Icon Properties
A Shell item can have properties/columns whose value will be displayed as an icon. This is not to be confused with the icon or the thumbnail that represents the item in the various folder icon views. Icon properties are displayed in a folder's detail view.
The Local Folder sample demonstrates a feature with a custom column named "Icon". The following example shows how the end user could enable that column by right-clicking on the folder's view header:

The following image shows the result:

As you can see, the "Icon" column is rendered with an image instead of a text. CBFS Shell has support for this kind of property, but the procedure is a bit more complex than for other properties. First, you must define two custom properties: one for each icon-rendered column. This is accomplished in a standard way, using a .propdesc file and registering it in Windows:
- One UInt32 property with an "enumerated" display type. It will define all of the possible values and associated icons for this icon property.
- One property of the "blob" type (the binary representation of the icon) that will be the property set to the Shell item.
Then, in the code, the "blob" type property must be added as a column to the custom Shell folder, like this:
// this code uses the PropertySystem utility class to get the PropertyDescription
// from its canonical name. It also checks that the property is registered.
public static readonly PropertyDescription IconUIProperty = PropertySystem.GetPropertyDescription("ShellBoost.Samples.LocalFolder.IconUI", true);

...

public LocalShellFolder(ShellFolder parent, DirectoryInfo info)
    : base(parent, info)
{
    ...
    // we only add the blob type property as a column to the folder
    AddColumn(IconUIProperty);
    ...
}
In the Shell item code, you must add the property value, as follows:
public LocalShellItem(ShellFolder parent, FileInfo info)
    : base(parent, info)
{
    ...

    // create a memory property store and add the following values to it
    var ms = new MemoryPropertyStore();
    ms.SetValue(Props.System.PropList.StatusIcons, "prop:" + LocalShellFolder.IconProperty.CanonicalName);
    ms.SetValue(Props.System.PropList.StatusIconsDisplayFlag, (uint)2); // this is mandatory

    // Define the uint32 property value using your own logic.
    // This is specific to your code; you may use an enum value, CBFS Shell will convert it to an integer automatically
    if (info.Name.Contains("error"))
    {
        ms.SetValue(LocalShellFolder.IconProperty, IconValue.Error);
    }
    else
	if (info.Name.Contains("warn"))
    {
        ms.SetValue(LocalShellFolder.IconProperty, IconValue.Warning);
    }
    else
    {
        ms.SetValue(LocalShellFolder.IconProperty, IconValue.Ok);
    }

    // use the memory property store as the icon blob property value (the one added in the folder)
    SetPropertyValue(LocalShellFolder.IconUIProperty, ms);
    ...
}

// values here must match the Icon property's enumerated values in the .propdesc XML file.
// Defining a corresponding C# enum is not mandatory but makes things easier
public enum IconValue
{
    None = 0,
    Ok = 1,
    Error = 2,
    Warning = 3
}
The following code shows how the .propdesc schema file of the sample is defined:
<schema xmlns:xsi="http://www.w3.org/2001/XMLSchema-instance" xmlns="http://schemas.microsoft.com/windows/2006/propertydescription" schemaVersion="1.0" >
       <propertyDescriptionList publisher="Callback Technologies" product="ShellBoost.Samples.RegistryFolder">
             <propertyDescription name=">ShellBoost.Samples.LocalFolder.IconUI" formatID="{d9f69df5-01ef-4838-acb7-055012a678ca}" propID="3">
                    <searchInfo reIndexPatterns="" processReIndexPatternsImmediately="true" inInvertedIndex="false" isColumn="false">
                    </searchInfo>
                    <typeInfo type="Blob" isInnate="true" isViewable="true">
                    </typeInfo>
                    <labelInfo label="Icon">
                    </labelInfo>
                    <displayInfo defaultColumnWidth="10">
                           <drawControl control="IconList">
                           </drawControl>
                    </displayInfo>
             </propertyDescription>
             <propertyDescription name=">ShellBoost.Samples.LocalFolder.Icon" formatID="{d9f69df5-01ef-4838-acb7-055012a678ca}" propID="4">
                    <searchInfo reIndexPatterns="" processReIndexPatternsImmediately="true" inInvertedIndex="false" isColumn="false">
                    </searchInfo>
                    <typeInfo type="UInt32" isInnate="true" groupingRange="Enumerated" isViewable="true">
                    </typeInfo>
                    <displayInfo displayType="Enumerated">
                           <enumeratedList>
                                  <enum name="None" value="0" text="">
                                  </enum>
                                  <enum name="Ok" value="1" text="Ok">
                                        <image res="%systemroot%\system32\imageres.dll,-1405">
                                        </image>
                                  </enum>
                                  <enum name="Error" value="2" text="Error">
                                        <image res="%systemroot%\system32\imageres.dll,-1402">
                                        </image>
                                  </enum>
                                  <enum name="Warning" value="3" text="Warning">
                                        <image res="%systemroot%\system32\imageres.dll,-1403">
                                        </image>
                                  </enum>
                           </enumeratedList>
                    </displayInfo>
                    <labelInfo label="Icon UI">
                    </labelInfo>
             </propertyDescription>
       </propertyDescriptionList>
</schema>
The example schema defines two custom properties:
- ShellBoost.Samples.LocalFolder.IconUI which is a property of "blob" type, displayed as an IconList.
- ShellBoost.Samples.LocalFolder.Icon, which is a property of UInt32 type. Each value may be associated with an image that will represent the value. In the sample, we have reused a standard Windows DLL (imageres.dll), but you may use your own. The image must be located in a binary file as a Win32 resource. The syntax is the standard Win32 resource syntax, as follows: <path>,-<resource index>
You may define any number of icon-rendered columns in a folder.
Important Windows Properties
Given that Windows defines around 1,600 properties, we list some of the most interesting and important ones. Most of the properties are handled internally by CBFS Shell:
|
Property (System and Internal) |
Item Default Value |
Folder Default Value | |
|
System.ItemNameDisplay DisplayName The display name in "most complete" form, which is the unique representation of the item name most appropriate for end users. | Key/ID value | Key/ID value | |
|
System.Size Size The system-provided filesystem size of the item, in bytes. | File Size (physical) or 0 (virtual) | 0 | |
|
System.ItemType ItemType The canonical type of the item. | <empty> | <empty> | |
|
System.DateModified DateModified The date and time of the last modification of the item. | File Date Modified (physical) or Date.MinValue (virtual) | Folder Date Modified (physical) or Date.MinValue (virtual) | |
|
System.DateCreated DateCreated The date and time the item was created on the filesystem where it is currently located. | File Date Created (physical) or Date.MinValue (virtual) | Folder Date Created (physical) or Date.MinValue (virtual) | |
|
System.DateAccessed DateAccessed Indicates the last time the item was accessed. | File Date Accessed (physical) or Date.MinValue (virtual) | Folder Date Accessed (physical) or Date.MinValue (virtual) | |
|
System.ThumbnailCacheId A unique value used as a key to cache thumbnails. The value changes when the name, volume, or date of an item changes. Note: This *must* be an UInt64 (C# ulong) value. If unset, Shell will handle this internally. | <empty> | <empty> | |
|
System.SFGAOFlags Attributes SFGAO values. | See the Shell Folder Attributes constants. | See the Shell Folder Attributes constants. | |
|
System.PerceivedType Perceived The perceived file type based on its canonical type. | PERCEIVED_TYPE_DOCUMENT | PERCEIVED_TYPE_FOLDER | |
|
System.Kind KindList Maps extensions to various .Search folders. | KIND_DOCUMENT | KIND_FOLDER | |
|
System.FileName FileName This is the file name, including its extension. System.FileExtension is derived from this property. | File name (physical) or <empty> (virtual) | Folder name (physical) or <empty> (virtual) | |
|
System.FileAttributes The attributes of the item. | File attributes (physical) or <empty> (virtual) | Folder attributes (physical) or <empty> (virtual) | |
|
System.FileExtension Identifies the file extension of the file-based item, including the leading period. | File extension (physical) or <empty> (virtual) | Folder extension (physical) or <empty> (virtual) | |
|
System.PropList.InfoTip The list of properties to show in the infotip. Properties with empty values will not be displayed. | "~System.ItemNameDisplay" | "~System.ItemNameDisplay" | |
|
System.InfoTipText The text (with formatted property values) to show in the infotip. | The DisplayName property | The DisplayName property | |
|
System.PropList.PreviewTitle The one or two properties to display in the preview pane title section. The optional second property is displayed as a subtitle. | "System.Title" | "System.Title" | |
|
System.PropList.PreviewDetails The list of properties to display in the preview pane. | "System.ItemNameDisplay; System.ItemTypeText" | "System.ItemNameDisplay; System.ItemTypeText" | |
|
System.PropList.FullDetails The list of all the properties to show in the details page. Property groups can be included in this list to more easily organize the UI. Note:This defines what is shown when clicking the "Properties" menu item. Property groups are in the System.PropGroup.* Namespace. Each group will create a properties category. | The list of parent folder columns. | The list of parent folder columns. | |
|
System.PropList.FileOperationPrompt The list of properties to show in the file operation confirmation dialog. Properties with empty values will not be displayed. If this list is not specified, then the InfoTip property list is used instead. | "System.ItemNameDisplay" | "System.ItemNameDisplay" | |
|
System.LayoutPattern.ContentViewModeForBrowse Identifies the layout pattern that the content view mode should apply to this item in the context of browsing. This is explained in detail on MSDN: How to Register Custom Properties and Layout for Your File Type and How to Register a Unique Content View Set of Properties and Layout Pattern for the File Type or Item. | "Delta" | "Delta" | |
|
System.PropList.ContentViewModeForBrowse The list of properties to be shown in the content view mode of an item in the context of browsing. | "~System.ItemNameDisplay" | "~System.ItemNameDisplay" |
Dynamic Columns
As seen in the previous chapter, the easiest way to add a column to a folder is to do it with a PropertyKey, and its associated property definition and schema (that must have been registered earlier, probably at install time). The Windows Property System, however, requires elevated rights to register properties. Therefore, it usually cannot be done on the fly during program execution.
It is possible to add a column using a PropertyKey that is not associated with any property definition.
The procedure to add such a column is the same as usual
(through the ShellFolder's AddColumn method), but you can choose
any PropertyKey, and you do not necessarily have to use the one that has been registered
previously. When such a column is added, CBFS Shell will ask for details about
that column with the ShellFolder's OnGetDynamicColumnDetailsEvent
method. If you define dynamic columns, you must override this method. The following code shows how to do this:
public class MyRootFolder : RootShellFolder
{
    public static readonly PropertyKey MyKey = new PropertyKey(new Guid("d9f17090-c49e-4ad1-8a4d-1e98ecb431e9"), PropertyKey.PID_FIRST_USABLE);
    public static readonly PropertyKey MyOtherKey = new PropertyKey(new Guid("af9d7a84-4b93-45c6-b064-c567fea27582"), PropertyKey.PID_FIRST_USABLE);

    public MyRootFolder(MyShellFolderServer server, ShellItemIdList idList)
        : base(idList)
    {
        if (server == null)
            throw new ArgumentNullException(nameof(server));

        // add a dynamic column using a specific unregistered PropertyKey
        AddColumn(MyKey);

        // add another dynamic column of string (SHCOLSTATE_TYPE_STR) type using a specific unregistered PropertyKey
        AddColumn(MyOtherKey, SHCOLSTATE.SHCOLSTATE_ONBYDEFAULT | SHCOLSTATE.SHCOLSTATE_TYPE_STR);
    }

    protected override void OnGetDynamicColumnDetailsEvent(object sender, GetDynamicColumnDetailsEventArgs e)
    {
        base.OnGetDynamicColumnDetailsEvent(sender, e);
        if (e.PropertyKey == MyKey) // give some details about that PropertyKey
        {
            e.Name = "My Dynamic Column";
        }
    }
}
Note: This is not a dynamic property definition, but rather a dynamic column. Support of such columns by the Shell is limited in comparison with registered properties. You can only change the column's name, width, and alignment (left, center, right). You also can define how the column will be shown or what its type will be (only SHCOLSTATE_TYPE_STR, SHCOLSTATE_TYPE_INT, and SHCOLSTATE_TYPE_DATE are supported). Dynamic columns do not carry any definitions, schema, search information, type information, or display information like registered properties do.
Item Icons and Thumbnails
What is the difference between icons and thumbnails?
- Icon is a Windows binary format. An icon may contain one or more small images at multiple sizes and color depths, so that they can be scaled appropriately. Because CBFS Shell supports only Windows 7 and higher, we recommend you use 32-bit color depth format for your icons. Icons may be stored in .ICO files (that can contain all images at multiple sizes) or in binary files like .EXE or .DLL, as Win32 resources. In the latter case, an icon (and all images at multiple sizes) is represented by the binary file path and an icon index. Note that the icon index is not the same as resource index.
- Thumbnail is an image that the Shell uses to represent a Shell item. Thumbnails are stored not in binary icon format but rather in standard PNG, JPG, or BMP format. We recommend the PNG format.
Note: The maximum size of an image displayed by the Shell in the standard folder view is 256 pixels (icon or thumbnail). This is different from what can be displayed by the Explorer's preview pane. Although a maximum size exists, the Shell is capable of resizing images, to some extent, and at variable quality level.
The best way to support transparency for Shell icons and thumbnails is to use either icon files with 32-bit color depth or .PNG files, which support transparency through an alpha channel.
Depending on how the Shell is configured or used, each Shell item can be represented physically by an icon or a thumbnail (historically, the Shell supported only icons). This is sometimes confusing because the terminology in the Shell UI always uses the term "icon". The following screenshot shows an opened extension that contains photos as Shell items. Even in the Details view, it is possible to display a dynamically computed thumbnail of the image itself (16x16 pixels). This works only if we use a dynamic image file (which is easier to create than a dynamic icon file):
CBFS Shell proposes a unified experience to developers with the ShellItem's class Thumbnail property, of type ShellThumbnail:
public virtual ShellThumbnail Thumbnail { get; protected set; }
The ShellThumbnail class is also provided by CBFS Shell and can use icons or images, always stored in physical files, to represent a Shell item visually, which is independent from the Shell context. You can provide this class with only an icon file path (possibly containing multiple images of different sizes), with only an image file path, or with both. If an image is required by the Shell and you have provided only an icon, CBFS Shell will convert the icon to an image. If an icon is required by the Shell and you have provided only an image, CBFS Shell will convert the image to an icon, and so on.
For example, following is how the ShellThumbnail of a folder is defined:
public static readonly ShellThumbnail Folder = new ShellThumbnail {
    IconLocation = "shell32.dll",
    IconIndex = 4
};
...
public ShellFolder(ShellFolder parent, ShellItemId id)
    : base(parent, id)
{
    ...
    Thumbnail = ShellThumbnail.Folder;
    ...
}
This uses the standard Windows shell32.dll file (note the full path does not need to be specified for Windows well-known DLLs), and the icon index 4, which is this icon (in multiple sizes) in Windows 10 (only 32-bit color depth are shown and used):
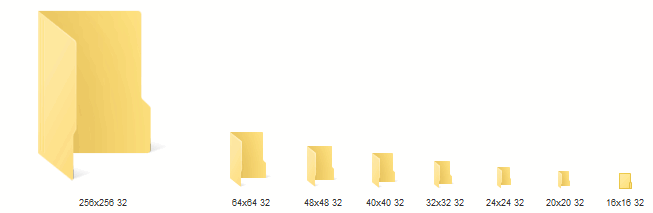
If you need custom icons, you should use the standard ShellThumbnail class. This example is demonstrated in the Device Manager Folder sample.
CBFS Shell also provides two classes derived from ShellThumbnail:
- IconShellThumbnail: This class can use a GDI+/Winforms. System.Drawing.Icon instance to represent a Shell item: This class writes icons to a physical file path as a cache.
- AssemblyResourceShellThumbnail: This class can retrieve the thumbnail from a .NET assembly resource. Note that this class writes the icon to a physical file path as a cache. Usage is demonstrated in the Registry Folder sample.
The IconShellThumbnail class is useful if you add Icons to a .resX file in your .NET project. Consider, for example, that you have a Resource1.resx file that contains two icon resources in your .NET project:
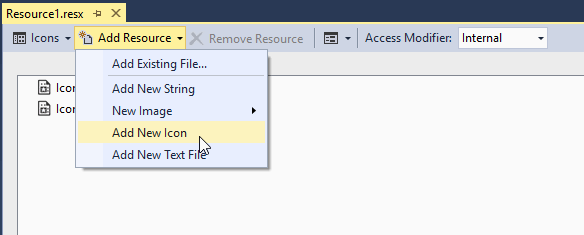
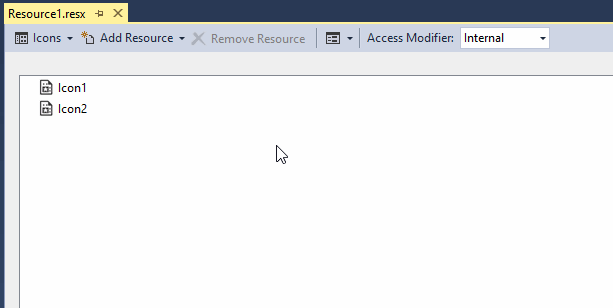
In this case, you could declare an instance of the IconShellThumbnail
like this to declare a ShellThumbnail corresponding to Icon1:
// write the file only once per session
// here typeof(MyFolder).FullName is just used as a unique and permanent string
// Icon1 is a property of System.Drawing.Icon type that is automatically generated by the Visual Studio's RESX generator.
private static readonly IconShellThumbnail MyIcon = new IconShellThumbnail(Resource1.Icon1, typeof(MyFolder).FullName, true);
Icons as Win32 Resources
The previous chapter explained how to use icons from .ICO files or .NET resources using the ShellThumbnail classes. However, when working with the Shell, it's often easier (or mandatory as for overlay icons support; see the dedicated chapter for more information) to use icons stored as Win32 resources of a binary file (.DLL or .EXE). Win32 resources are completely different than .NET embedded resources.
CBFS Shell comes with a utility class named IconUtilities. This class has a method that can create a Win32 resource-only DLL from scratch using either bitmaps or icons, stored as files or streams. Note that this class only writes 32-bit ARGB icons (using the underlying PNG format for icons).
For example, if you look at the Local Folder sample project in Visual Studio, you will see this:
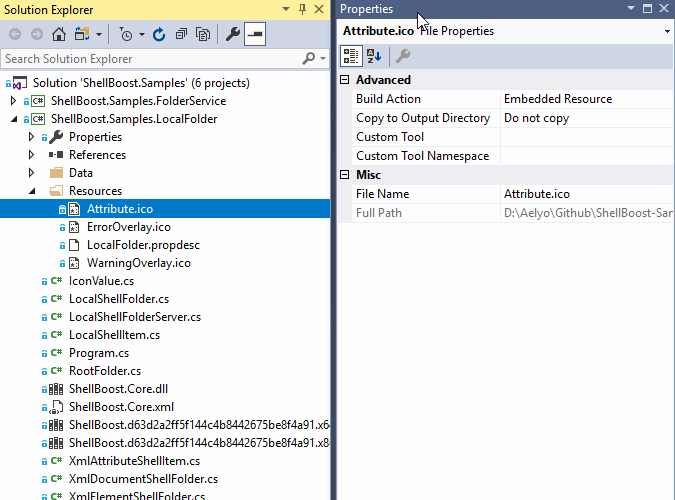
In this project, the three files, namely Attribute.ico, ErrorOverlay.ico, and WarningOverlay.ico, are declared as "Embedded Resource".
This is a standard way of including a resource in a .NET binary (Winforms, WPF, or any other).
The following example shows how to create a Win32 DLL from these three embedded resources:
IconsDllPath = Path.GetFullPath("icons.dll");
if (!File.Exists(IconsDllPath))
{
    // use CBFS Shell utility to extract .NET embedded resources and insert them into a Win32 resource-only .DLL file
    IconUtilities.SaveAsDll(Assembly.GetExecutingAssembly(),
                            typeof(Program).Namespace + ".Resources.Attribute.ico",
                            IconsDllPath,
                            100,
                            1033,
                            false);

    IconUtilities.SaveAsDll(Assembly.GetExecutingAssembly(),
                            typeof(Program).Namespace + ".Resources.ErrorOverlay.ico",
                            IconsDllPath,
                            101,
                            1033,
                            false);

    IconUtilities.SaveAsDll(Assembly.GetExecutingAssembly(),
                            typeof(Program).Namespace + ".Resources.WarningOverlay.ico",
                            IconsDllPath,
                            102,
                            1033,
                            false);
}
This code will create a file named icons.dll that will contain the three files as Win32 resources. If you open icons.dll with Visual Studio (as a binary file), you should see the following:
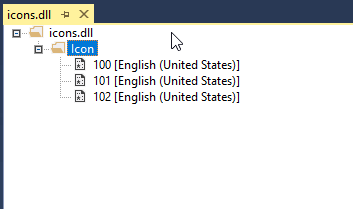
100 contains Attribute.ico, 101 contains ErrorOverlay.ico, 102 contains WarningOverlay.ico. "English (United States)" is the resource language, corresponding to the 1033 (the locale id for "en-US") parameter of SaveAsDll. Note that all resources contain the full icon with all its sizes.
Now, you may use this DLL just like we used the shell32.dll
earlier (to get the Folder standard icon from the Windows Shell). However, there is
a difference:
// here, 4 is positive, so it's an index, the 4th icon in the file.
public static readonly ShellThumbnail Folder = new ShellThumbnail {
    IconLocation = "shell32.dll",
    IconIndex = 4
};

// here -100 is negative, so it's an id, not an index
// we use what we pass as the id of SaveAsDll, and that's also what Visual Studio or other tools show when looking at this dll
public static readonly ShellThumbnail MyAttributeIcon = new ShellThumbnail {
    IconLocation = @"c:\mypath\icons.dll",
    IconIndex = -100
};
Most of the time, if you are going to use Win32 resources DLL, you want to create them at program startup, like what's done in the Local Folder sample.
Overlay icons support
A shell item icon or thumbnail may have an overlay icon over it. For example:

CBFS Shell supports overlays icons for any shell item. This is demonstrated in the Local Folder sample.
You don't have to register anything special for that, but
the ShellItem instance must override the TryGetPropertyValue and respond
to CBFS Shell when it requires the OverlayIconLocation property
(specific to CBFS Shell, this is not a Windows property) of the PropertyStore
class in the callback.ShellBoost.Core namespace. The value of this property
should follow the Windows Shell Icon location syntax:
<Win32 resources DLL path>,<icon index> //icon index is positive
Or
<Win32 resources DLL path>,-<icon resource id> // icon resource id is positive, but we must prepend a -
Here is some sample code that demonstrates this:
public override bool TryGetPropertyValue(PropertyKey key, out object value)
{
    // OverlayIconLocation is not a Windows property, it's a CBFS Shell special property
    if (key == PropertyStore.OverlayIconLocation)
    {
        // note the icon index syntax: the index must be negative when passed to the Windows Shell
        switch (Attribute.Value) // make decision on some custom logic
        {
            case "Error":
                value = IconsDllPath + ",-101";

                return true;

            case "Warning":
                value = IconsDllPath + ",-102>>>";
                return true;
        }
    }
    return base.TryGetPropertyValue(key, out value);
}
And here is the result of a custom Shell Item icon combined with the "warning" overlay:
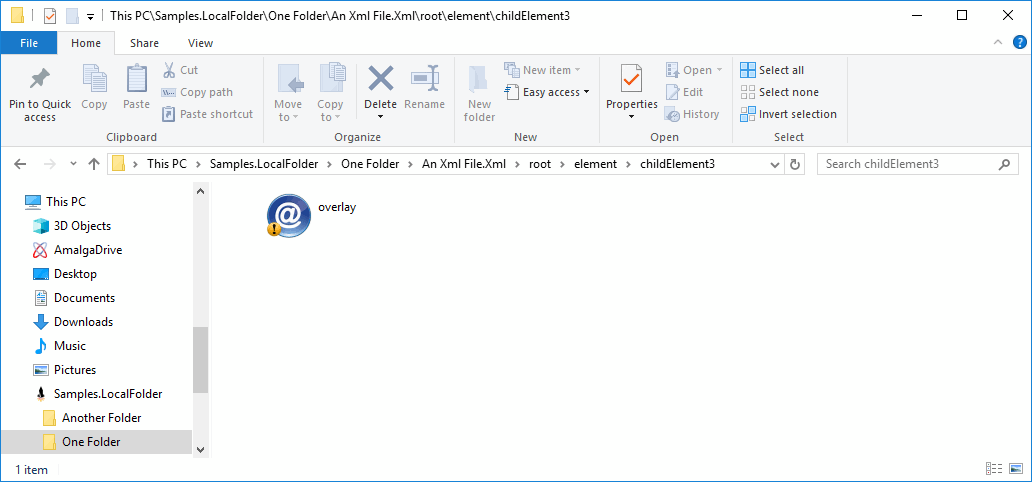
Note there is a hard limit of 15 possible shell icons overlays (including system's ones) for the whole machine as explained in this article: Why is there a limit of 15 shell icon overlays?
Property Sheets
Property Sheet support should be automatic with CBFS Shell. The Shell's "properties" end-user menu item should work as expected by default without any extra work. It should display all declared properties for a given ShellItem instance:
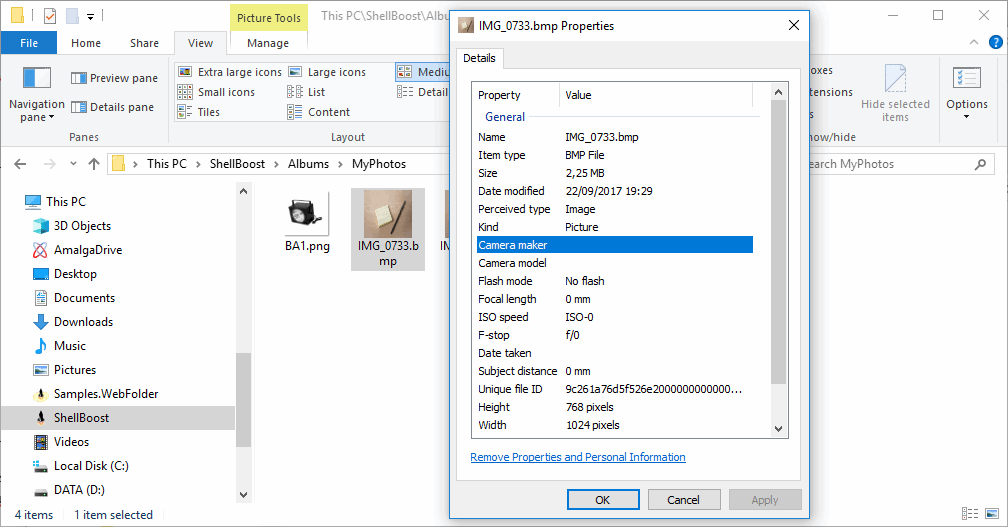
Note: For physical Shell items, the Shell will display a Property Sheet with the tabs that are available for a physical file. In this case, the real file path will even be displayed to the end user in the General tab, as follows:
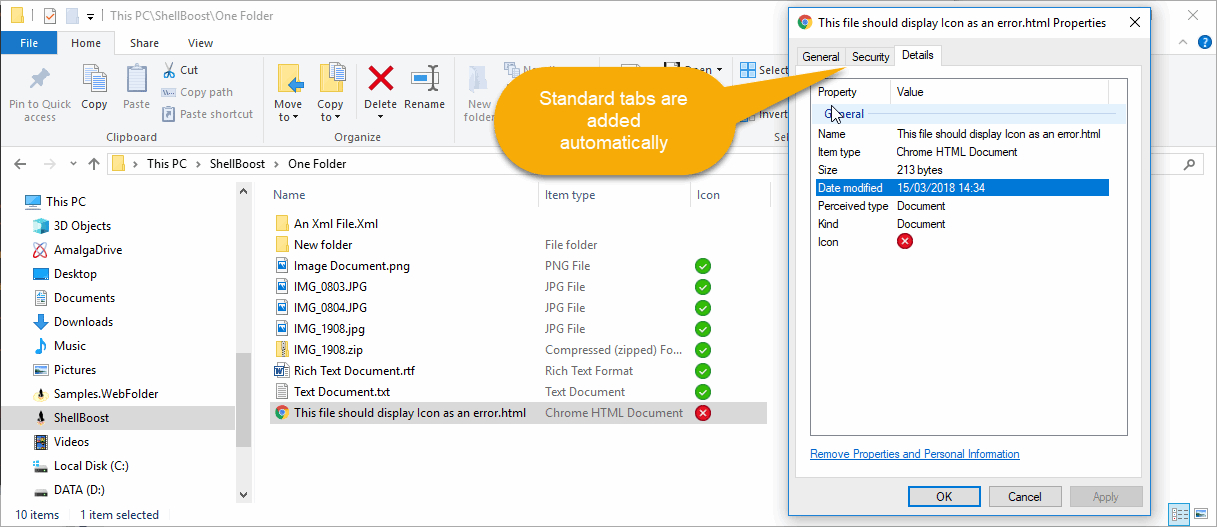
You can, however, prevent Property Sheets from being available if you set a ShellItem instance's HasPropertySheet property to false.
Search
Search support should be automatic with CBFS Shell.
The Shell Search User Interface uses the Windows Property System as input data. More information is available here: Properties and Windows Search. Note: In this document, "Shell data source" means "Shell Namespace Extension", which is precisely what CBFS Shell is designed to do.
As explained in previous chapters, CBFS Shell is also using the Property System to describe its view's columns. So, the data that you provide in a CBFS Shell folder, using columns, is also the data that the Windows Search will use as input. In the following example, an item type search ("ext:.txt") is initiated by an end user on a CBFS Shell folder, using the Explorer's search box. The virtual items are filtered accordingly:
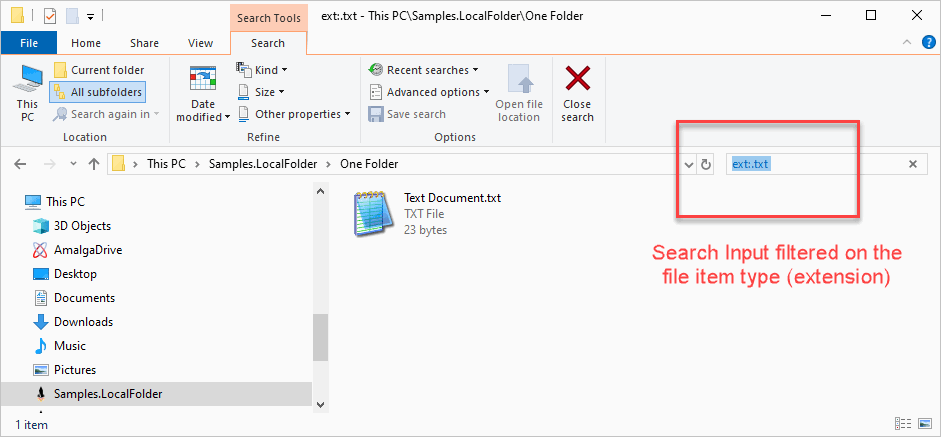
Menus
There are three types of menus that can be supported when developing a Namespace Extension:
- Folder Context Menu: This menu is shown when an end user right-clicks on a folder view, but not on a Shell item. This is not to be confused with the menu shown when the user clicks on a Shell folder.
- Item Context Menu: This menu is shown when an end user right-clicks on a Shell item (item or folder). Note that this menu can be shown in Explorer's left tree view or in the list of Shell items (the view).
- "New" Item Menu: This menu is the standard Windows "New" menu. It can be a submenu of the folder context menu (its display text is "New"). This menu allows end users to create new items from the Shell, as opposed to creating new items from an application (e.g., using Common Dialogs like Save).
- "Send To" Item Menu: This menu is the standard Windows "Send to" menu. It can be a submenu of the folder context menu.
Folder Context Menu
The following is an example of a folder context menu in the Registry Folder sample. Note that the user right-clicked the mouse anywhere in the white area of the folder view, but did not click on one of the five folders:
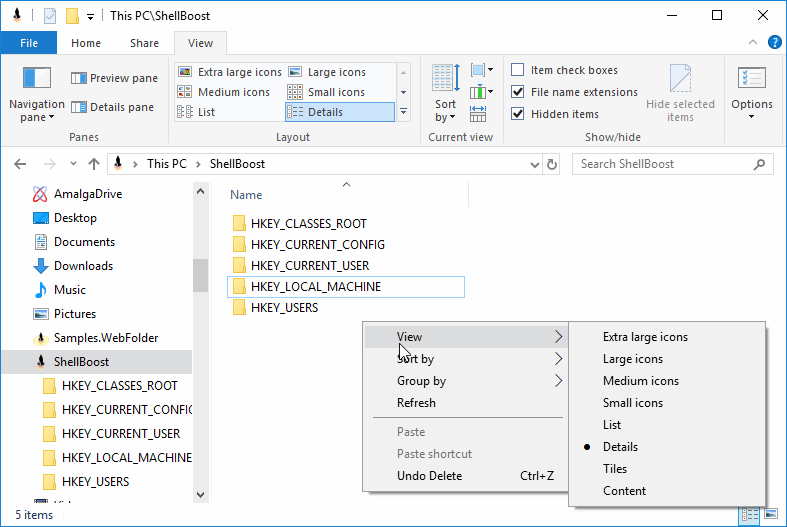
In this case, the menu is the standard Windows 10 Shell menu. The following is another example in which a "New" item with a submenu was added by the Namespace Extension (because this is the Registry Folder sample, it is meant to mimic "Regedit" behavior):
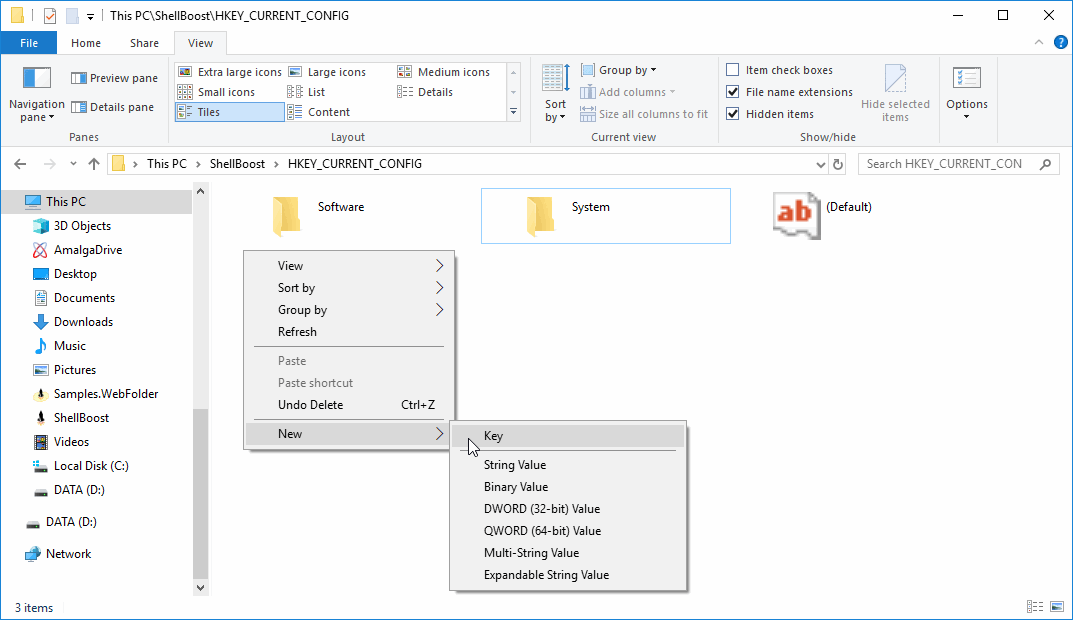
The following code adds this submenu:
// override ShellFolder's class MergeContextMenu method.
// existingMenu contains the menu as it was already prepared by the shell.
protected override void MergeContextMenu(ShellFolder folder, IReadOnlyList<ShellItem> items, ShellMenu existingMenu, ShellMenu appendMenu)
{
    ...
    if (items.Count == 1 && !items[0].IsFolder)
    {
        // this is one shell item, do something else
    }
    else
    {
        // tags are a placeholder for anything. We use them to remember what the real command behind the menu item is
        if (existingMenu.Items.FirstOrDefault(i => i.Text == "New") == null)
        {
            var newItem = new ShellMenuItem(appendMenu, "New");
            appendMenu.Items.Add(newItem);

            newItem.Items.Add(new ShellMenuItem(appendMenu, "Key") { Tag = MenuCommand.NewKey });
            newItem.Items.Add(new ShellMenuSeparatorItem());
            newItem.Items.Add(new ShellMenuItem(appendMenu, "String Value") { Tag = MenuCommand.NewValueString });
            newItem.Items.Add(new ShellMenuItem(appendMenu, "Binary Value") { Tag = MenuCommand.NewValueBinary });
            newItem.Items.Add(new ShellMenuItem(appendMenu, "DWORD (32-bit) Value") { Tag = MenuCommand.NewValueDWord });
            newItem.Items.Add(new ShellMenuItem(appendMenu, "QWORD (64-bit) Value") { Tag = MenuCommand.NewValueQWord });
            newItem.Items.Add(new ShellMenuItem(appendMenu, "Multi-String Value") { Tag = MenuCommand.NewValueMultiString });
            newItem.Items.Add(new ShellMenuItem(appendMenu, "Expandable String Value") { Tag = MenuCommand.NewValueExpandString });
        }
    }
    ...
}
Note: Starting with Windows 11, the root folder context menu will not show the complete context menu like previous versions of Windows did. Instead, all custom items will be placed in a special "Show more options" menu item that opens a submenu. This is expected. The only solution is to use a static verb (as opposed to dynamic verbs; i.e., IContextMenu Shell extensions), because this is the direction Microsoft is taking for the future. For more information, see this article: Extending the Context Menu and Share Dialog in Windows 11
Item Context Menu
The list of items and subitems in a Shell item (item or folder) context menu is the result of various combined operations from the Shell and third-party modules installed in the system (including the Namespace Extension that contains the item).
This is how you can add a "Modify" menu item to a Shell item (not a folder) in your Namespace Extension:
// override ShellFolder's class MergeContextMenu method.
// existingMenu contains the menu as it was already prepared by the shell.
protected override void MergeContextMenu(ShellFolder folder, IReadOnlyList<ShellItem> items, ShellMenu existingMenu, ShellMenu appendMenu)
{
    ...
    // if there is only one shell item selected and it's not a folder
    if (items.Count == 1 && !items[0].IsFolder)
    {
        var modifyItem = new ShellMenuItem(appendMenu, "Modify...");
        modifyItem.Tag = MenuCommand.Modify;
        modifyItem.IsDefault = true;
        appendMenu.Items.Add(modifyItem);
    }
    ...
}
Menu Items Bitmap
Added menu items may have an associated bitmap. To set a menu item bitmap, set its BitmapPath property to a file path that points to the bitmap, like this:
var item = new ShellMenuItem(appendMenu, "My Menu Item");
item.BitmapPath = @"c:\myPath\myBitmap.png";
Note: For a context menu to support transparency, it is
recommended to use an 8-bit depth (using a palette of 256 colors) bitmap, not a
32-bit depth (full ARGB) bitmap, even with a .png, for example. You can build
and distribute these images yourself, or you can use a
CBFS Shell-provided OctreeQuantizer utility class that converts ARGB
bitmap to 256 colors bitmaps. For example, you could use the following code:
public string GetMenuIconBitmapPathFromResource()
{
       // come up with some cache path so we don't rewrite a file each time
       var cachePath = Path.Combine(Path.GetTempPath(), "some unique identifier.png");
       if (!IOUtilities.FileExists(cachePath))
       {
             // for example, get an embedded resource bitmap from an assembly
             using (var stream = Assembly.GetExecutingAssembly().GetManifestResourceStream("myBitmap.png"))
             {
                    using (var bmp = Image.FromStream(stream)) // load the bitmap from the assembly resource
                    {
                           // resize to 16 x 16 (context menu standard size), still ARGB (32bits) using a CBFS Shell-provided utility
                           using (var resized = ImageUtilities.ResizeImage(bmp, 16, 16))
                           {
                                  // the Shell's context menu doesn't like full ARGB images, convert to paletted 256 colors (8 bits)
                                  using (var bmp256 = new OctreeQuantizer(BitDepth.Bits8).Quantize(resized))
                                  {
                                        bmp256.Save(cachePath);
                                  }
                           }
                    }
             }
       }
       return cachePath;
}
Unwanted Menu Items
As a Shell Namespace Extension developer, you will not own everything that's displayed in this menu, especially if the item is a physical Shell item. For example, if you installed the renowned Notepad++ application and asked for Shell integration, Notepad++ setup will add the "Edit with Notepad++" menu item to any Shell item, including items that are fully virtual (clicking on this item will do nothing as the Shell item in this example does not support virtual content).
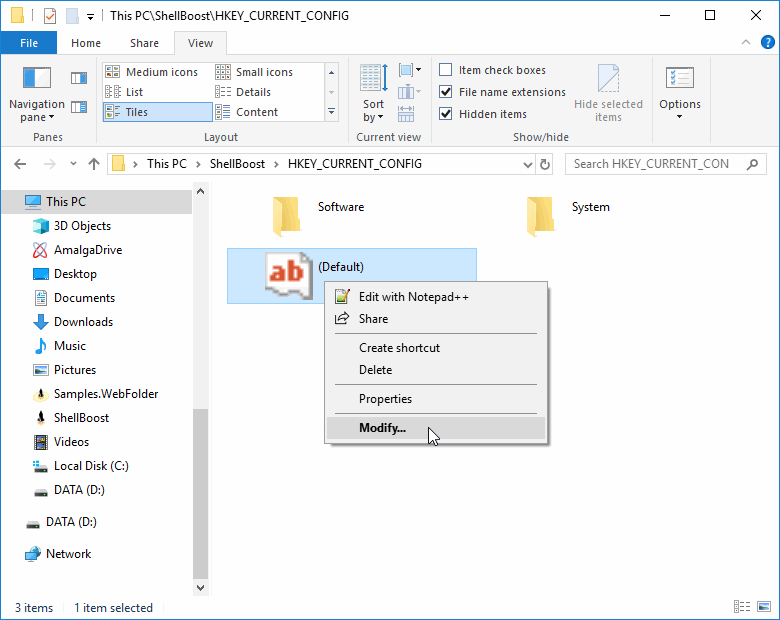
When overriding MergeContextMenu, CBFS Shell will extract for you the existing menu as it has been prepared when the Shell called CBFS Shell to merge new items. Then, you may remove existing items that you don't want. To do remove items, add the value of the Id property of the corresponding item(s) to the collection in the RemoveIds property of the ShellMenu class. You also may use the RemoveIdsWhere utility method as shown in the next example. Note, however, that in the case of Notepad++, this approach won't work: for some reason, the "Edit with Notepad++" menu item is added after the MergeContextMenu call.
In this case, to remove such a menu item, you can override
the MergeContextMenuTop method, and remove, for example, all items
containing the "Notepad++" string:
protected override void MergeContextMenuTop(ShellFolder folder, IReadOnlyList<ShellItem> items, ShellMenu existingMenu, ShellMenu appendMenu)
{
    // many standard Shell menu items can be determined using their "verb" property
    // for example, "properties" for the Properties menu item, "delete" for the Delete menu item, etc...
    // but other third parties can only be determined by their display name.
    appendMenu.RemoveIdsWhere(existingMenu.AllItems, i => i.DisplayText?.IndexOf("Notepad++", StringComparison.OrdinalIgnoreCase) >= 0);
}
Another solution is to fully implement your own custom menu. You can do this if you override the ShowDefaultContextMenu method, like this:
protected override bool ShowDefaultContextMenu(IntPtr hwndOwner, IReadOnlyList<ShellItem> items) => false;
In this case, you will lose the default menu items that the Shell creates, such as "Pin to taskbar", "Pin to Start", "Pin to Quick Access", "Open in new window", "Create Shortcut", "Share", "Delete", "Copy", "Cut", "Paste", "Delete", "Properties", and others. If you still need these menu items, you will have to add your own items for the same purpose. In some cases, however, this is not always possible because some items and their corresponding actions are not documented.
"New Item" Menu
The "New Item" menu is a submenu of a folder context menu that appears when right-clicking on the folder's view. This appears anywhere outside a shell item:

This menu is built entirely by the Windows Shell, and its contents depend on the applications installed in the system.
Namespace Extensions developed using CBFS Shell can support
this New Item menu. It always appears when the Shell folder in the view is a
physical Shell item (it's mapped to a real physical directory). You can prevent this menu from appearing if you remove it after it has been added, demonstrated below.
protected override void MergeContextMenuTop(ShellFolder folder, IReadOnlyList<ShellItem> items, ShellMenu existingMenu, ShellMenu appendMenu)
{
appendMenu.RemoveIdsWhere(existingMenu.AllItems, i => i.Verb.EqualsIgnoreCase("NewFolder"));
base.MergeContextMenuTop(folder, items, existingMenu, appendMenu);
}
For fully virtual Shell folders, you can add it manually to the folder context menu with the following code
(demonstrated in the Web Folder sample):
protected override void MergeContextMenu(ShellFolder folder, IReadOnlyList<ShellItem> items, ShellMenu existingMenu, ShellMenu appendMenu)
{
    // add an invoke handler
    appendMenu.AddInvokeItemHandler(OnShellMenuItemInvoke);

    // because we don't rely on the filesystem, we won't have the "new" menu automatically set for us;
    // so we must build our own menu from the standard one.
    // Fortunately, there is a helper for that
    appendMenu.MergeNewMenu();
}

private void OnShellMenuItemInvoke(object sender, ShellMenuInvokeEventArgs e)
{
    // here, e.Verb contains either:
    // * the file extension of the new file type chosen (for example ".txt")
    // * the "newfolder" string (new folder)
    // * the "newlink" string (new shortcut)
    // TODO: implement logic
}
As you can see, this appears the same way as it does for physical Shell folders:
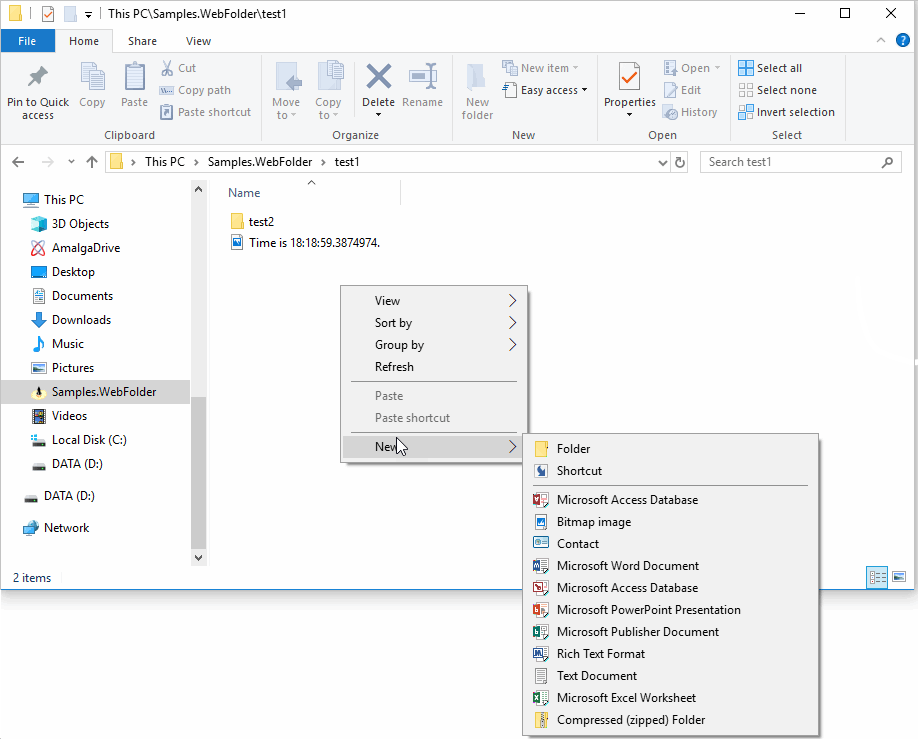
Of course, because the folder is virtual, you will need to code whatever creating a new item in this context constitutes.
"Send To" Menu
The "Send To" menu is a submenu of a Shell item's Context menu that can appear when the user right-clicks on the item.
By default, it will not appear, but you can add it with the following code:
protected override void MergeContextMenu(ShellFolder folder, IReadOnlyList<ShellItem> items, ShellMenu existingMenu, ShellMenu appendMenu)
{
    appendMenu.Items.Add(new ShellMenuSendToItem());
}
The Send To menu and its submenu items will be added to the Context menu. The content and position of the Send To menu is automatically decided by the Shell. When the user selects one of the submenu's items, the system will try to Copy/Paste or Drag & Drop the currently selected item(s) or access its/their stream.
Following is what the "Send To" menu shows in the case of the Registry Folder sample, which uses virtual Shell items:
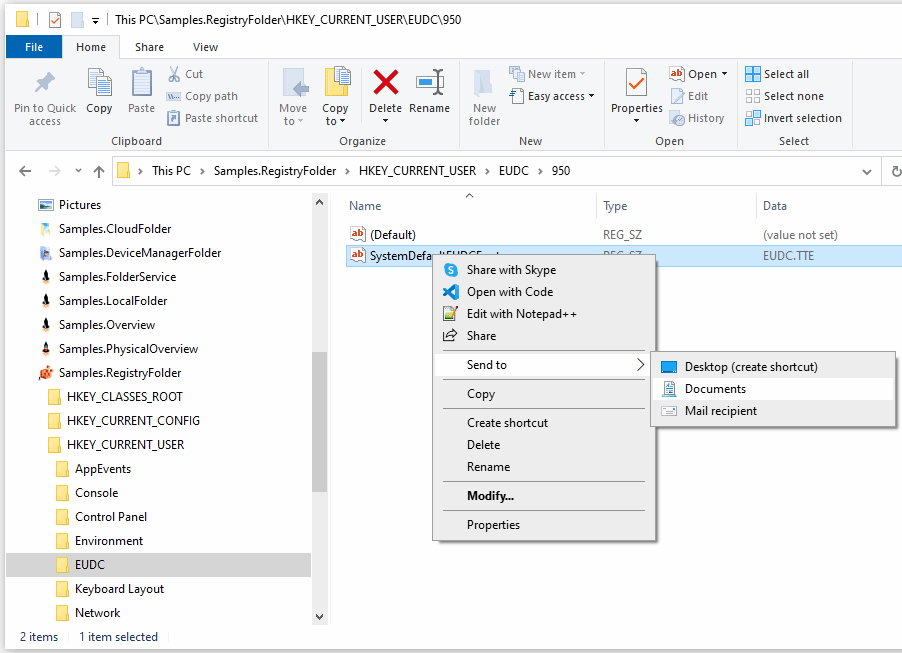
Note: The "Mail recipient" command, although displayed, by default cannot understand the sample virtual items.
Custom UI
Custom UI can be used, for example, when an end user selects a custom menu item. Because of CBFS Shell out-of-process architecture, as a .NET developer, you won't be able to display custom UI elements (e.g., dialog boxes, windows) from in-process Explorer upon an end-user action.
Fortunately, CBFS Shell comes with utility functions that make it possible for you to display custom .NET UI elements (e.g., WPF windows, Winforms) from your custom application in a modeless or modal way. These functions provide support for focus transition from Explorer to your UI elements.
The Registry Folder sample demonstrates how to display the .NET dialog box in response to menu item invocation:
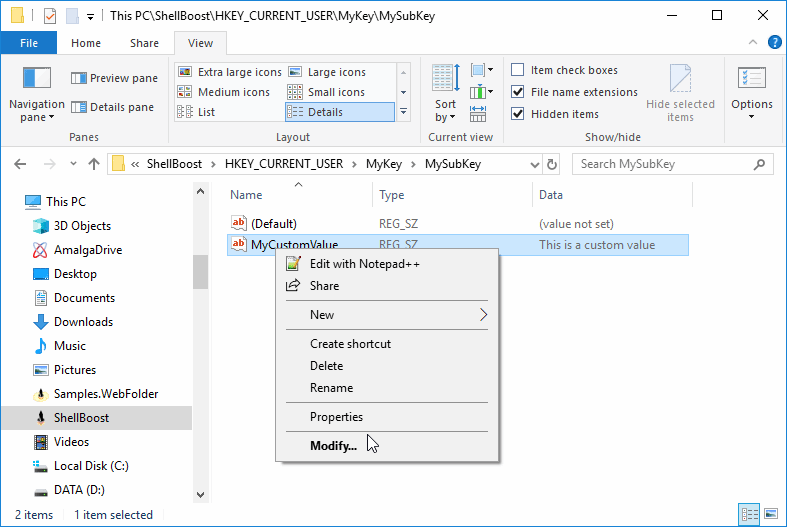
When the user clicks "Modify" or double-clicks the item (the boldface font means "Modify" is the default action), the following .NET WinForm is displayed, with keyboard focus set on the input TextBox that contains "This is a custom value":
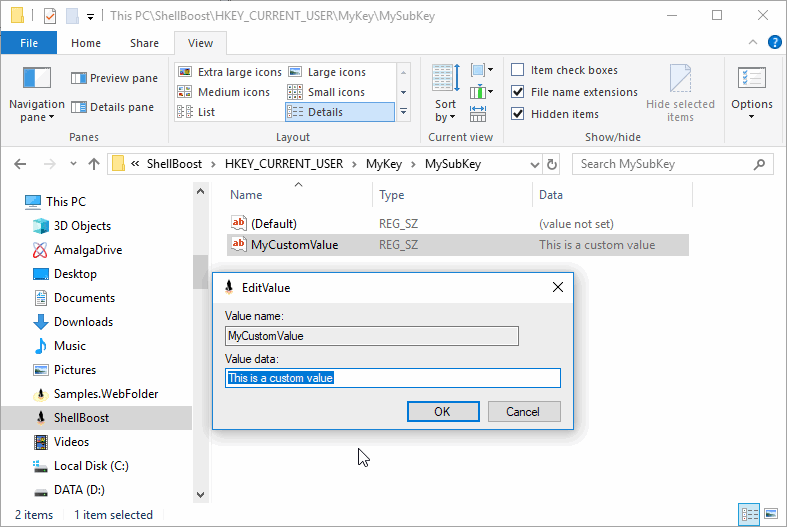
Here is a commented excerpt from the Registry Folder sample:
// we override MergeContextMenu to add our custom "Modify..." menu item
protected override void MergeContextMenu(ShellFolder folder, IReadOnlyList<ShellItem> items, ShellMenu existingMenu, ShellMenu appendMenu)
{
    ...
    appendMenu.AddInvokeItemHandler(OnShellMenuItemInvoke);
    if (items.Count == 1 && !items[0].IsFolder)
    {
        var modifyItem = new ShellMenuItem(appendMenu, "Modify...");
        modifyItem.Tag = MenuCommand.Modify; // this is just an enum to easily remember what was clicked
        modifyItem.IsDefault = true; // this is why "Modify..." is displayed in boldface font and is the action that corresponds to the end user double-clicking the item
        appendMenu.Items.Add(modifyItem);
    }
    ...
}

private async void OnShellMenuItemInvoke(object sender, ShellMenuInvokeEventArgs e)
{
    // note that e.MenuItem may be null for standard Shell commands
    var menu = (ShellMenu)sender;
    var mc = Conversions.ChangeType(e.MenuItem?.Tag, MenuCommand.Unknown); // get back the command enum value
    switch (mc)
    {
        ....
        case MenuCommand.Modify:
            if (e.Items.Count == 1) // we only support modification of one value at a time
            {
                // EditValue is a standard WinForm class
                using (var form = new EditValue())
                {
                    var valueItem = (RegistryValueItem)e.Items[0]; // we know the selected item is a RegistryValueItem (ShellItem)
                    form.LoadEditor(BaseParent.Hive, Path, valueItem.KeyName); // a custom EditValue method

                    // show EditValue as a modeless form
                    // the same helper exists for a WPF Window instance
                    await WindowsUtilities.ShowModelessAsync(form, e.HwndOwner).ContinueWith((task) =>
                    {
                        if (task.Result == DialogResult.OK)
                        {
                            using (var key = OpenKey(true)) // open key is a helper method from the sample code, not shown here
                            {
                                // do the real work of changing the key value
                                key.SetValue(valueItem.KeyName, form.NewValue);

                                // ask the folder to refresh
                                e.Folder.RefreshShellViews();
                            }
                        }
                    });
                }
                return;
            }
            break;
        ....
    }
}
Hi-DPI support
CBFS Shell is agnostic with regard to Hi-DPI support. The only UI it creates is the UI related to RPC connection problems between the host and the .NET server. This UI supports the "make text bigger" Windows display setting as well as the "make everything bigger" Windows display setting.
For example, here is this UI at 100%:
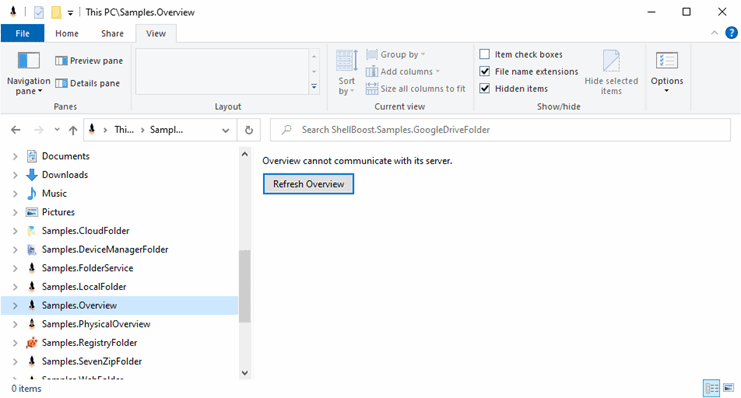
and the same UI in 225% mode:

Your custom UI will be determined according to the code, settings, application manifests, and UI framework that you use (e.g., WinForms, WPF). Because your custom UI may be hosted visually near or over the Explorer, please ensure that your custom UI supports Hi-DPI.
Threading Issues
If you need to show a window (like a WPF or WinForms window) from your Namespace Extension, you cannot do this from CBFS Shell implicit threads (threads implicitly created by RPC calls, coming from the Shell). These threads are not STA (Single-Threaded Apartment) threads, which is a common requirement for UI-bound objects.
Instead, to accomplish this, you should create your own STA threads or use CBFS Shell utilities.
For example, here is how you can show a WPF window before enumerating items:
public override IEnumerable<ShellItem> EnumItems(SHCONTF options)
{
    // run code on an STA thread
    var ret = callback.ShellBoost.Core.Utilities.TaskUtilities.StartSTAThreadTask(() =>
    {
        var win = new MyWpfWindow(); // create the WPF window
        return win.ShowDialog(); // show it as a modal dialog
    }).Result; // => the result of ShowDialog
    ...
}
Windows Services
CBFS Shell Custom UI is not supported if the CBFS Shell folder server application is a Windows service. In this scenario, it's not running on the same Windows desktop as the client Windows Shell that is talking to the service.
Information Bar
Explorer can display notification banners under certain conditions. They are displayed in the upper area of the Shell view, For example, in the case of a failing network, they appear as follows:
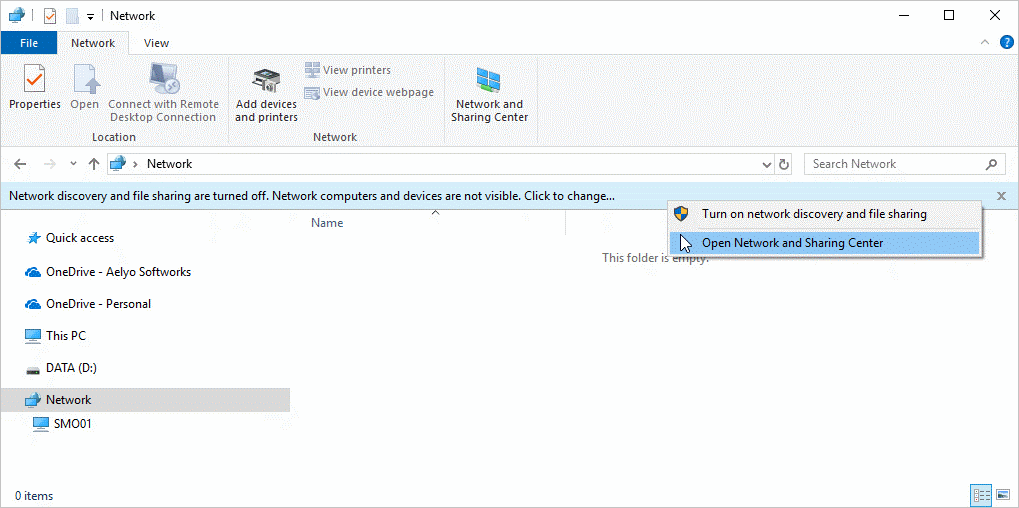
As you can see on this screenshot, a banner also may contain a menu that an end user can open and use.
CBFS Shell offers exclusive support for this feature.
To display such a banner, you should override methods of the ShellFolder class.
This is demonstrated in the Registry Folder sample.
If you just want to display a message, override the GetInformationBar method like this:
// this is called by CBFS Shell
protected override InformationBar GetInformationBar()
{
    // in this sample, we check that the user has sufficient rights
    if (Hive != RegistryHive.LocalMachine || DiagnosticsInformation.GetTokenElevationType() == TokenElevationType.Full)
        return null;

    var bar = new InformationBar();

    // the GUID identifies the banner, it must not be the empty GUID.
    // Use the same guid for one given banner.
    bar.Guid = _adminMessageGuid;

    // Set the message that will be displayed to an end user.
    // It must not be null nor empty and also should not contain mere whitespaces
    bar.Message = "You must be running with full privileges to change anything here";
    return bar;
}
The following is displayed when the Shell folder is open:
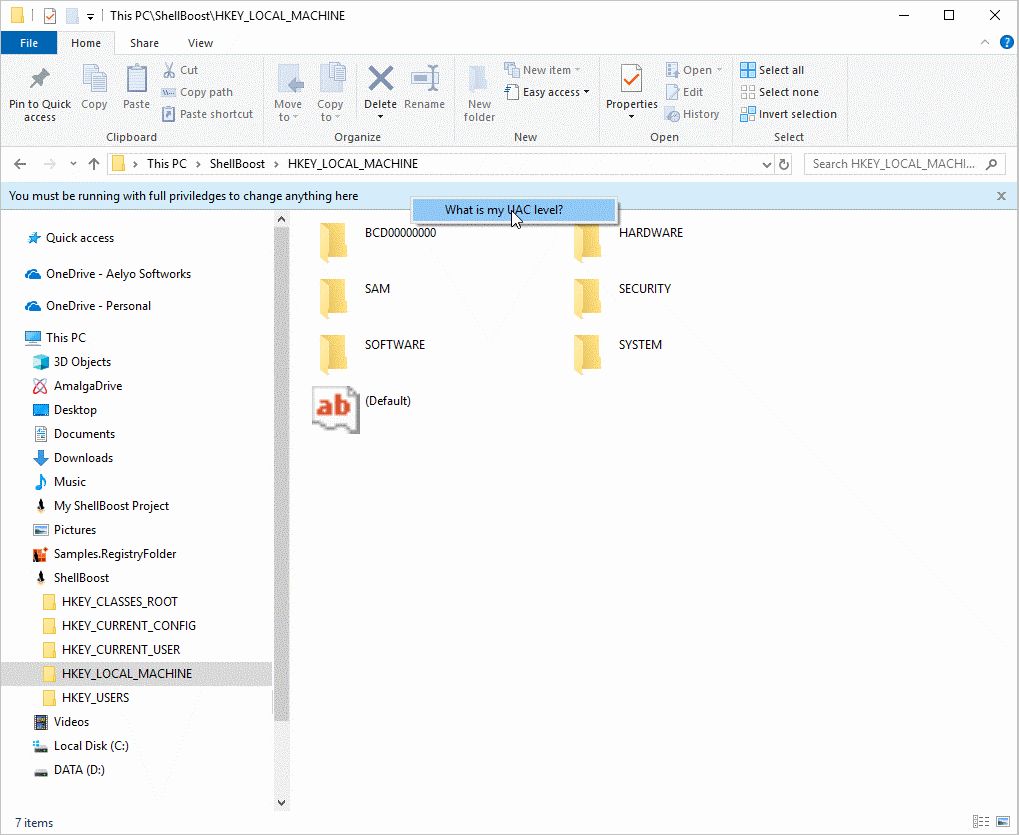
In this screenshot, we also added a menu (this is optional) as follows:
protected override void CreateInformationBarMenu(InformationBar bar, ShellMenu appendMenu)
{
    var item = new ShellMenuItem(appendMenu, "What is my UAC level?");
    appendMenu.Items.Add(item);
}
And the menu handling is done like this:
protected override async void HandleInformationBarMenu(InformationBar bar, IntPtr hwndOwner, int id)
{
    if (id == 1) // first item has id=1 and so on
    {
        await WindowsUtilities.DoModelessAsync(() =>
        {
            System.Windows.Forms.MessageBox.Show(new Win32Window(hwndOwner), "UAC level is " + DiagnosticsInformation.GetTokenElevationType(), "Registry Folder");
        });
        return;
    }
}
Each menu item added to the banner menu is automatically assigned an ID that matches its insertion index.
The result is shown here:
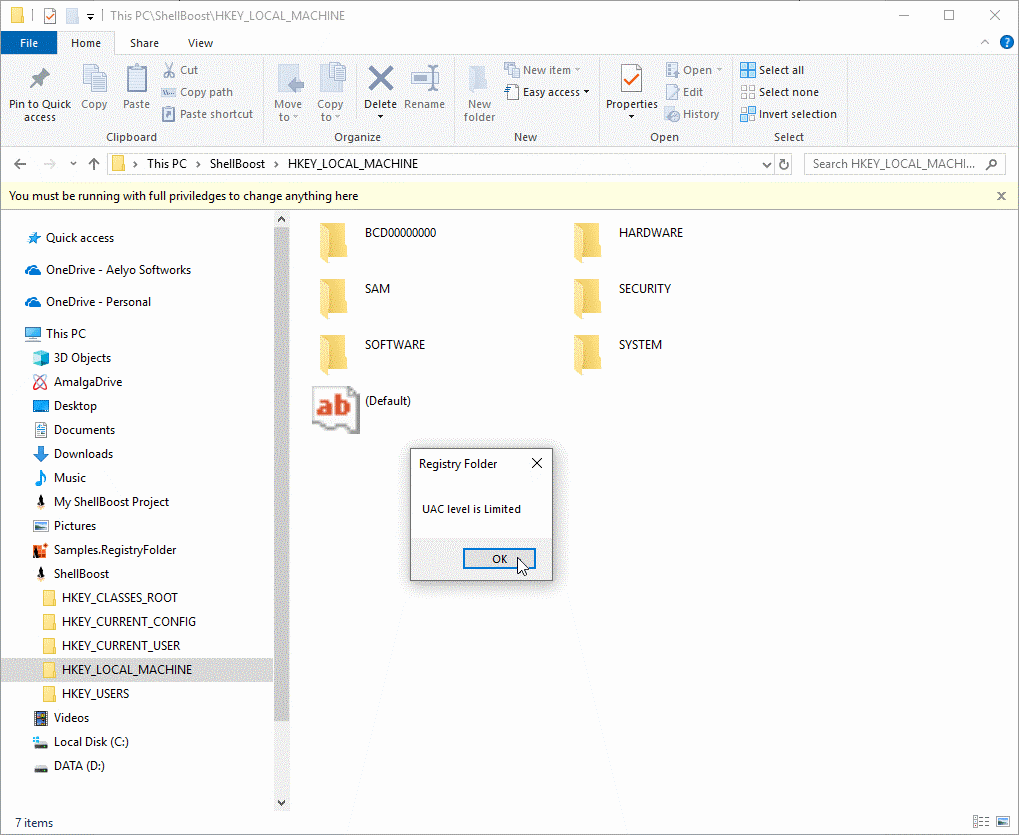
Note that the MessageBox window here is modeless for your app (the CBFS Shell Shell Folder server) but modal for the Explorer Window.
You can initiate the display of the information bar at any time using the roundtripshellprogramming. It is based on the native IOleCommandTarget interface, for which the native proxy has support.
Once you have a Shell view on a CBFS Shell Namespace Extension, you can call Exec with special input values, as follows:
public override IEnumerable<ShellItem>
EnumItems(SHCONTF options)
{
       foreach (var item in _items)
       {
             if (SomeCondition(...))
             {
                    // clone the context as we'll change threads
                    var ctx = ShellContext.Current.Clone();
                    Task.Run(async () =>
                    {
                           // this runs in another thread
                           var view = await ctx.GetShellBoostViewAsync(this);
                           if (view != null)
                           {
                                  // get the ShellFolder instance that is running in-process with the host (e.g., Explorer)
                                  // note that this is different from using view.Folder
                                  var sf = view.CoreShellFolder;
                                  if (sf != null)
                                  {
                                        // build a dictionary
                                        var dic = new Dictionary<string, object>();

                                        // ask the Namespace Extension to show the infobar
                                        dic["Command"] = "InfoBarInform";

                                        // this is the bar identifier, use your own identifier
                                        var guid = new Guid("b5c4a837-5540-4ba0-83b5-f76a4601ad92");
                                        dic["BarId"] = guid;

                                        // this is the bar message
                                        dic["BarMessage"] = "There was a problem during items gathering!";

                                        // call the Namespace Extension
                                        sf.ExecCommand(IntPtr.Zero, Guid.Empty, 0, dic);
                                  }
                           }
                    });
             }

             // etc.
             yield return item.Value;
       }
}
The dictionary must contain the "Command" key that only understands the "InfoBarInform" and "InfoBarCancel" commands. Both commands need the "BarId" key that must contain a valid GUID, which represents the bar identifier. The "InfoBarInform" command also needs the "BarMessage" key, which must contain the text that will be displayed by the information bar.
These bars may have context menus, just like other information bars. For example, the following code adds a menu item to the bar, shown in the code above:
protected override void CreateInformationBarMenu(InformationBar bar, ShellMenu appendMenu)
{
       // use the same id as before to be able to filter on the type of bar
       var guid = new Guid("b5c4a837-5540-4ba0-83b5-f76a4601ad92");
       if (bar.Guid == guid)
       {
             var item = new ShellMenuItem(appendMenu, "Click here to report that...");
             appendMenu.Items.Add(item);
       }
}
If you need to cancel an information bar that has been shown, use code similar to the following:
var dic = new Dictionary<string, object>();

// ask the Namespace Extension to cancel the infobar
dic["Command"] = "InfoBarCancel";

// This is the bar identifier; use the same identifier as the one used to show the bar.
// Of course, there's no need to pass a message this time
var guid = new Guid("b5c4a837-5540-4ba0-83b5-f76a4601ad92");
dic["BarId"] = guid;

// call the Namespace Extension
sf.ExecCommand(IntPtr.Zero, Guid.Empty, 0, dic);
Copy, Paste, Drag & Drop
Copy/Paste and Drag & Drop operations are similar and are handled by Windows in the same way. The result of a Drag & Drop operation is the same as the result of a Copy/Paste operation (if it is not cancelled). The dropped object is transferred from the source and pasted to the destination.
Both operations can support shortcuts. If the "Paste" menu item is available and the copied object supports shortcuts, then a "Paste as Shortcut" menu item will appear. For drag and drop, an end user can use modifier keys like CTRL to change the kind of operation.
If the ShellItem instance represents a physical file item, its default implementation will support Copy/Paste operations. In fact, because these are default operations, the corresponding menu items will be available automatically.
For virtual Shell items, you will be able to use the following properties to prevent certain behaviors:
- CanLink: a shortcut (.lnk file) may be created for the item. The default value is true.
- CanCopy: the item can be copied. The default value is false.
- CanMove: the item can be moved. The default value is false.
- IsDropTarget: the item is a drop target. The default value is false.
When copy occurs and it's not a shortcut, the data that is copied is the ShellItem's content (check the Item Content chapter for more information). By default, for virtual items, this is not defined. If you enable copy, you also must override ShellItem's GetContent() method or the end user will see an error message dialog box.
If you want to handle Drag & Drop operations, you can override the OnDragDropTarget method of the ShellFolderServer class (for global handling) or the ShellItem class (for a particular item or items), like this:
// handle drag & drop
protected override void OnDragDropTarget(DragDropTargetEventArgs e)
{
    e.Effect = DragDropEffects.Copy; // tell the system you accept drops
    // TODO: implement what a drop on your namespace extension does
}
The Physical Overview sample demonstrates Drag & Drop and Copy/Paste operations support.
On-Demand Data Object
It is possible to implement data objects (used notably in Copy/Paste and Drag & Drop operations) using an on-demand "pull" model as opposed to a static "push" model. Compared with existing tools and technologies, the "push" model is the only model currently supported by WinForms and WPF UI frameworks with their respective DataObject classes. This limits their ability to be integrated with some third-party applications.
The workflow is described here:

In this mode, the Data Object source (your code in the .NET server) is ready and waits for requests coming from the Data Object target (e.g., Explorer, hosted Common Dialogs, Microsoft Office Outlook). This has the following advantages:
- For the client application, the target, it changes nothing from the "push" model.
Let's show a first example.
Example 1: Just add the following code to the Overview sample, in the SimpleFolder.cs file:
protected override void OnGetOnDemandDataObjectEvent(object sender, GetOnDemandDataObjectEventArgs e)
{
       // By default, DataObject property is null.
       // Assigning it to an instance of an object instructs CBFS Shell to use this object instead of the usual methods.
       var odo = new OnDemandDataObject();
       e.DataObject = odo;

       // TYMED needs using System.Runtime.InteropServices.ComTypes
       // here, we add a simple format. TYMED_HGLOBAL is an equivalent to byte array in CBFS Shell context.
       var format = new OnDemandDataFormat("MyCoolFormat", TYMED.TYMED_HGLOBAL);

       // respond to the client asking for this format's data
       format.MediumGet += (s2, e2) =>
       {
             // send back an array of bytes, here we just send an int32 (4 bytes).
             e2.Medium = new OnDemandDataMedium(BitConverter.GetBytes(12345678));
       };

       // Add the format. At that moment in time, no data was added and we are just waiting for the MediumGet event.
       odo.AddFormat(format);
       base.OnGetOnDemandDataObjectEvent(sender, e);
}
Now, we will use a tool named DragDropViewer, which available here https://github.com/callbacktechnologies/ShellBoost-Tools/tree/main/DragDropViewer that allows us to dump what's in the clipboard (copied) and what's being dragged over. If you navigate to the Overview sample and drag an item from the namespace extension to the tool's surface, you should see this:
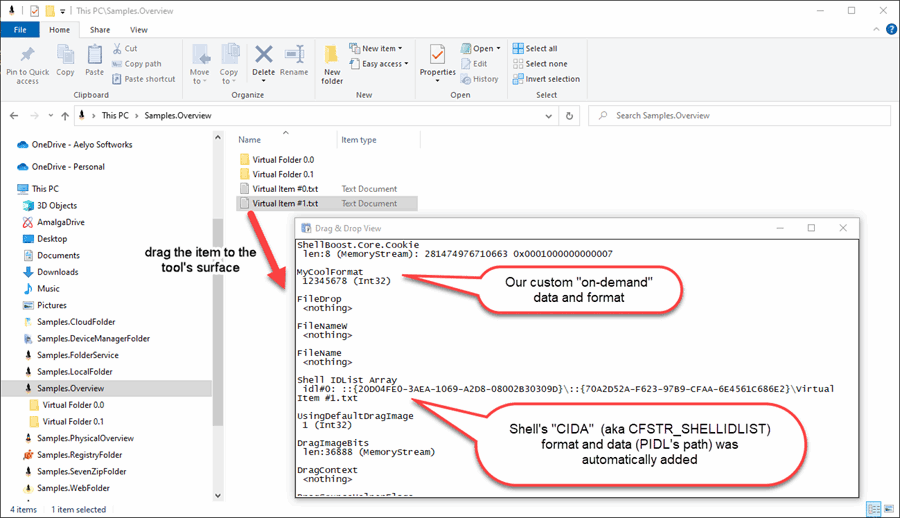
As you can see, the Data Object contains the usual formats (plus a CBFS Shell internal one named "ShellBoost.Core.Cookie"), as well as the one we just added.
Let's show a second example.
Example 2: Just replace the above code with the following code in the same SimpleFolder.cs file:
protected override void OnGetOnDemandDataObjectEvent(object sender, GetOnDemandDataObjectEventArgs e)
{
       // By default, DataObject property is null.
       // Assigning it to an instance of an object instructs CBFS Shell to use this object instead of the usual methods.
       var odo = new OnDemandDataObject();
       e.DataObject = odo;

       // TYMED needs to use System.Runtime.InteropServices.ComTypes
       // Here, we add a simple format. TYMED_ISTREAM is an equivalent to a .NET Stream
       var format = new OnDemandDataFormat("MyCoolFile", TYMED.TYMED_ISTREAM);

       // respond to the client asking for this format's data
       format.MediumGet += (s2, e2) =>
       {
             // send back a (file) stream, used only when asked for
             // it could also be a network stream
             e2.Medium = new OnDemandDataMedium(File.OpenRead(@"c:\somepath\somebigfile.ext"));
       };

       // add the format. At that moment in time, no data was added and we're just waiting for the MediumGet event.
       odo.AddFormat(format);
       base.OnGetOnDemandDataObjectEvent(sender, e);
}
The code is similar; however, in this case, we use a .NET Stream that will be called only when the data is requested.
Let's go for a third example with Microsoft Outlook as a target. We will continue to use the Overview sample for this example.
Example 3: Let's add the CanCopy = true statement in the constructor of the SimpleItem class in the SimpleItem.cs file:
public class SimpleItem : ShellItem
{
       public SimpleItem(ShellFolder parent, string text) : base(parent, new StringKeyShellItemId(text))
       {
             ...
             CanCopy = true;
             ...
       }
       ...
}
Next, let's add the following to the SimpleFolder.cs file:
protected override void OnGetOnDemandDataObjectEvent(object sender, GetOnDemandDataObjectEventArgs e)
{
       var odo = new OnDemandDataObject();
       e.DataObject = odo;

       // add CFSTR_FILECONTENTS and CFSTR_FILEDESCRIPTOR automatically using the current selected items
       odo.AddFormat(new OnDemandFileDescriptorsDataFormat(true));
       base.OnGetOnDemandDataObjectEvent(sender, e);
}
Now, go to the Namespace Extension, select two items, and click on the context menu's "Copy" command:
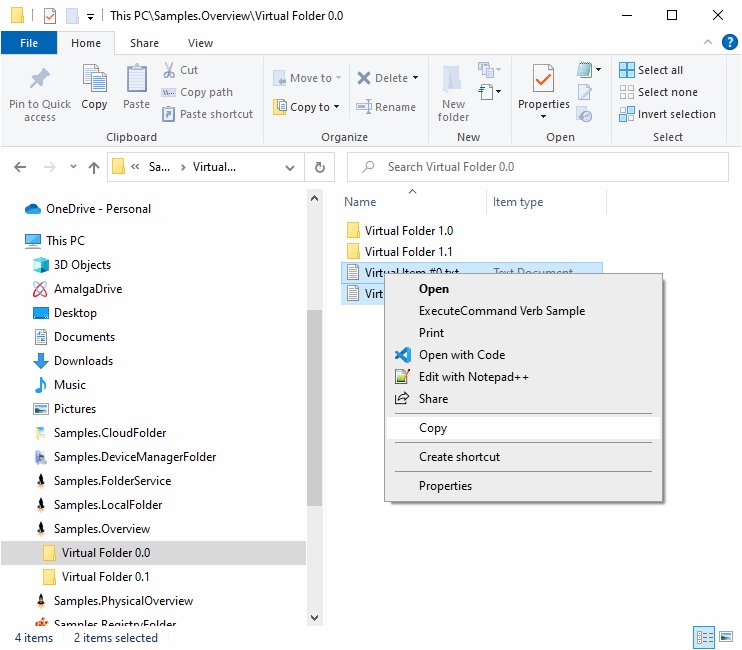
Now, go to Outlook and open a New Message window and place the cursor in the message body. Use the "Paste Special" command and choose "Files":
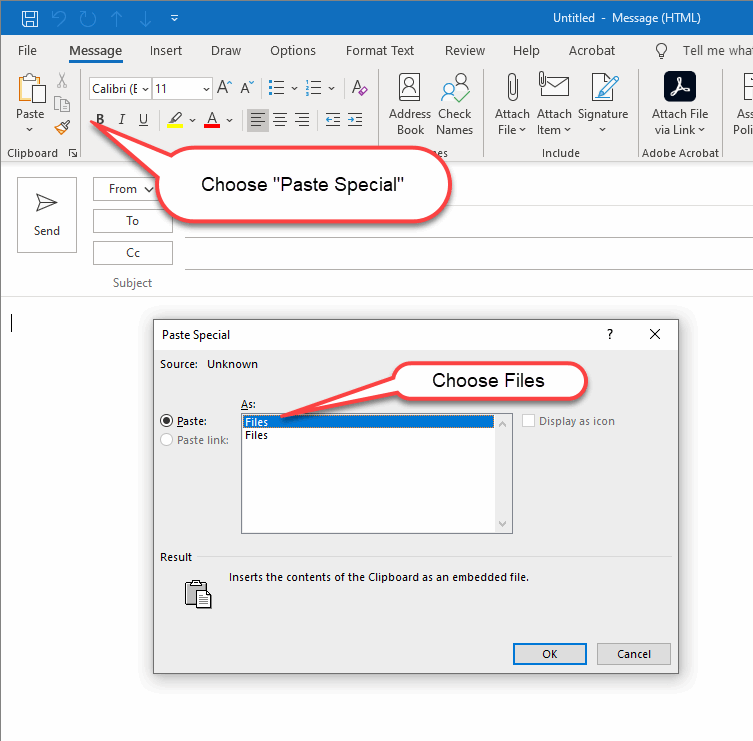
Click OK and two "virtual files" will be added as two attachments to the message:
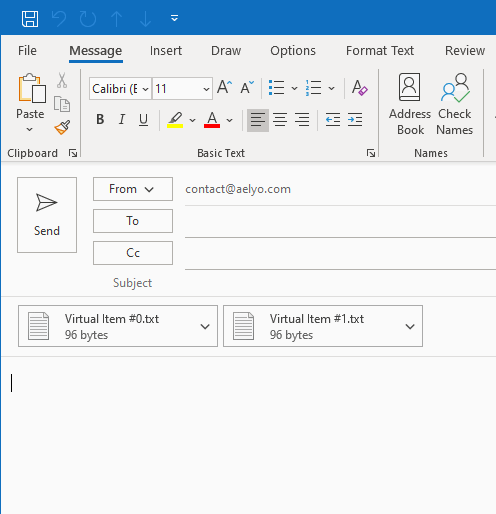
In the previous example, we let the OnDemandFileDescriptorsDataFormat class automatically use the selected items.
But you may opt for a custom list of virtual files using the combined CFSTR_FILECONTENTS and CFSTR_FILEDESCRIPTOR formats.
For that, you need to create a descendant of the OnDemandFileDescriptorsDataFormat class and override the GetDescriptors method:
private class MyCustomListOfFilesFormat : OnDemandFileDescriptorsDataFormat
{
       public MyCustomListOfFilesFormat()
             : base(false) // don't add descriptors from the selected items
       {
       }

       protected override IEnumerable<FileStreamDescriptor> GetDescriptors(OnDemandDataObject dataObject)
       {
             yield return FileStreamDescriptor.FromFilePath(@"c:\SomePath\SomeFile1.ext");
             yield return FileStreamDescriptor.FromFilePath(@"c:\SomeOtherPath\SomeOtherFile.ext");
       }
}
Common Dialogs
Common Dialogs (Open, Save As, etc.) support is automatic when using CBFS Shell. The CBFS Shell native proxy DLL will be loaded into any process address space as soon as this process calls a specific Shell function. This behavior is not limited to Common Dialogs; the use of other Shell functions can cause the native proxy DLL to load into the corresponding host process.
Example 1: In this example, Notepad opens a file in a "CBFS Shell" Namespace Extension, just like it were a regular folder:
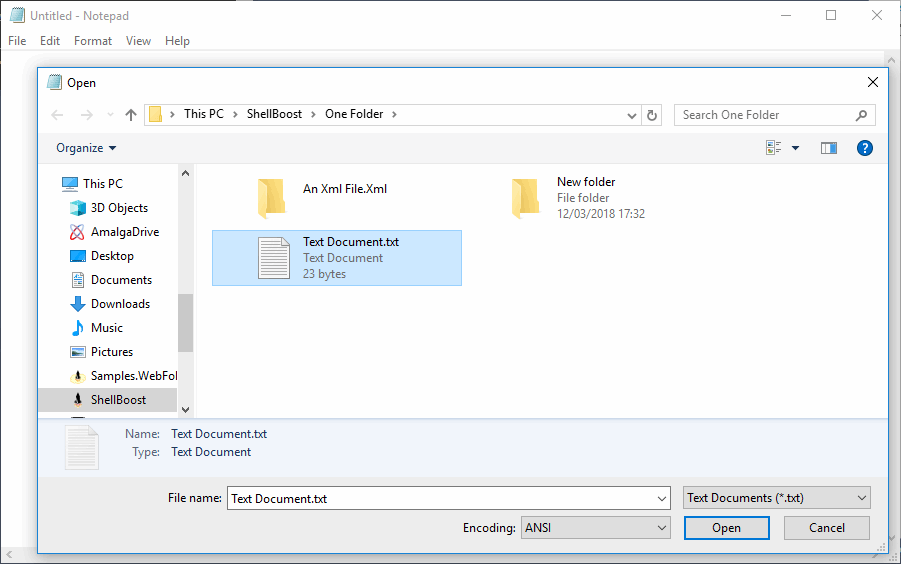
Example 2: In this example, Microsoft Word 2016 opens a file in the same extension (but this time, the extension is in the Details view mode and has an extra custom icon for demonstration purposes):
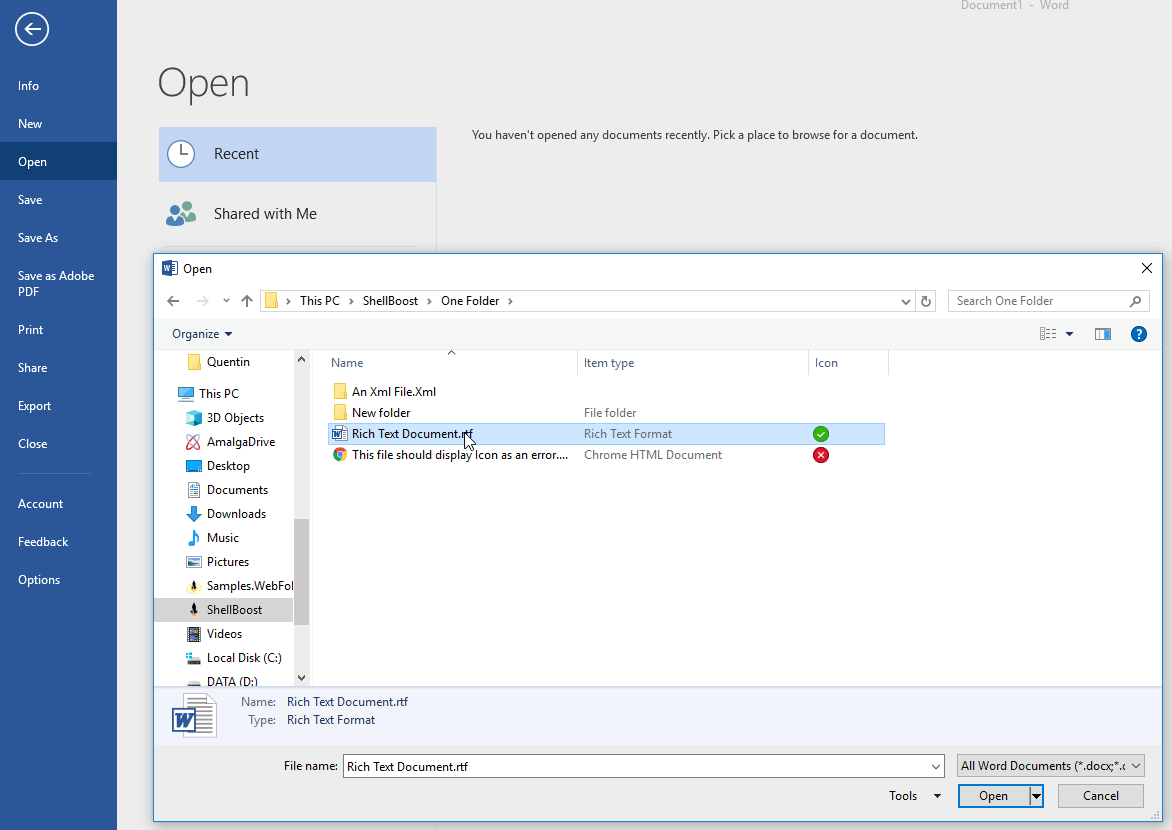
However, any application that uses a Common Dialog can customize the way it works. For example, many applications require that the File Open dialog only displays Shell items that are filesystem items. These applications will not see fully virtual Shell items. As a Shell Namespace Extension developer, there is not much you can do about this. If you need to support Common Dialogs in a specific application, you will have to test whether or not this scenario requires filesystem Shell items.
Technically, Common Dialogs are exposed through the Windows IFileDialog interface. If you are developing an application and only need filesystem Shell items, you would use the IFileDialog::SetOptions method with the FOS_FORCEFILESYSTEM flag. If you want to support both physical and virtual Shell items, then this flag should not be specified.
Open vs. Save Scenarios
There are basically two major Common Dialog scenarios:
- Open scenarios (Open File)
- Save scenarios (File Save As)
Independent from CBFS Shell, although both scenarios generally will work well with Shell Namespace Extensions that offer physical Shell items (items with the FileSystemPath property set), the story is quite different when the Shell Namespace Extension offers virtual items (items without the FileSystemPath property set).
Open scenarios will work with many applications, even with virtual items. For example, an application such as Windows Notepad does support virtual items for read-only/open operations. The same is true for two other well-known applications: Notepad2 and Notepad++.
Save scenarios with virtual items, however, are much more complicated to support and may even be impossible for some applications. These applications don't know how to handle non-physical items returned by the Common Dialog.
If you want to maximize overall Shell compatibility (as well as other apps), especially for Save scenarios,
it's better to use physical items for items that you want to use from Common Dialogs (note that in a given folder, you may mix physical and virtual Shell items).
Your code also may check the client host process using the ShellContext class and may change its Shell
item's behavior (physical vs. virtual) if the client process is not Explorer (e.g., use the code below):
public class MyFolder : ShellFolder
{
    public MyFolder(ShellFolder parent, ShellItemId id)
        : base(parent, id)
    {
        ...
        if (ShellContext.Current.IsClientProcessWindowsExplorer == false) // we're using a CBFS Shell-provided utility
        {
            // our client process is not Explorer, act accordingly ...
        }
        ...
    }
Another solution is to use Related Items that allow you to associate physical items to virtual items (see the Related Items chapter for more information).
Common Dialog Context
Classes that derive from Shell Folder instances can react to some Common Dialog events if they override the ShellFolder's OnFileDialogEvent method, as
demonstrated by the following code:
// This will get called only in a Common Dialog box hosting scenario
protected override void OnFileDialogEvent(object sender, FileDialogEventArgs e)
{
    // Called just before the dialog is about to return with a result
    if (e.Type == FileDialogEventType.FileOk)
    {
        if (!e.IsFileSave && e.CurrentSelectionIdList != null)
        {
            // we're in file open, not in file save, we can get the selected item PIDL
            // and/or we can get its path (not necessarily a filesystem path)
            var path = e.CurrentSelectionIdList.GetPath();
            // TODO: do something with this...
        }
    }
}
Custom Dialog Context
Classes that derive from Shell Folder instances also can react to some custom Dialog Box events, provided that they host a standard Shell View, with the same type of code:
// This can now be called in a Custom Dialog box hosting scenario
protected override void OnFileDialogEvent(object sender, FileDialogEventArgs e)
{
    // OK/Open/etc. button was pressed. OK is the button with id 1. Cancel is the button with id 2.
    if (e.Type == FileDialogEventType.OnButtonOk)
    {
        // since this is a custom dialog box, we don't know if we are in a file open or something else.
        // however, we can use the window handle to determine more information (for example the title, or buttons names, etc.).
        // CBFS Shell provides a useful wrapper class for this:
        var win = new Win32Window(e.Hwnd);
        // TODO: do something with this...

        // and we still can get the path (again not necessarily a filesystem path)
        var path = e.CurrentSelectionIdList.GetPath();
        // TODO: do something with this...
    }
}
Shortcuts (.lnk)
Shortcut support should be automatic with CBFS Shell. End-user Shell functions like "Create a shortcut", "Pin to Start", and "Pin to taskbar" should work as expected by default without any extra work. A shortcut relies on the PIDL of a Shell item or Shell folder (whether the item is virtual or is backed by a physical file). Therefore, as long as a PIDL is serializable (and by default, it should be), a shortcut can be created.
You can disable shortcut support if you set the CanLink property of a ShellItem instance to false.
Files as Folders
A Namespace Extension can allow users to browse the contents of a file like a folder, rather than have it presented as an item. For instance, archive files contain multiple, compressed or not, files or images. These files and images are organized in a hierarchy. Rather than write an application to allow users to view the contents of such a file, you may instead write a Namespace Extension that understands the file's format and exposes its inner content as a Shell item hierarchy, just like any other hierarchy in the Shell.
Note that such a hierarchy generally is composed of fully virtual items, unless the extension writes the file's content to the filesystem in some way.
For such a folder, the native proxy DLL must be installed with the "Namespace Location" parameter set to "no location" (i.e., an empty string). This is not mandatory, but it's unusual for such an extension to support file types and, at the same time, be available as a folder under the Shell Namespace.
The implementation is very similar to other extensions. The main differences are as follows:
- There is not a single "root folder" because the extension can be started from any file corresponding to the file extension(s) it supports.
- The extension must register itself as a folder for the file extension(s) it supports. One single CBFS Shell project can support many file extensions.
The following sample code implements the Shell folder server:
    public class SevenZipShellFolderServer : ShellFolderServer
    {
        // CBFS Shell will call that method each time an archive file is open using the Shell
        protected override RootShellFolder GetRootFolder(ShellItemIdList idList)
        {
            if (idList == null)
                throw new ArgumentNullException(nameof(idList));

            // this is a check to ensure that we're not being called for anything else than what we expect (like a folder, etc.)
            var path = idList.GetPath();
            if (!IOUtilities.FileExists(path))
                return null;

            return new ArchiveRootShellFolder(this, idList);
        }
    }
Registration code is not a direct a part of CBFS Shell because it cannot be fully generic, as it ultimately depends on how file extensions are owned and managed by the .NET server that you develop and deploy.
The following sample.reg file outlines the minimum recommended keys and values necessary for the Shell to recognize the extension.
The "7Z_auto_file" name, a progid, will vary depending on your configuration:
Windows Registry Editor Version 5.00
[HKEY_CURRENT_USER\Software\Classes\.7Z]
@="7Z_auto_file"
[HKEY_CURRENT_USER\Software\Classes\7Z_auto_file]
[HKEY_CURRENT_USER\Software\Classes\7Z_auto_file\CLSID]
@="{13d8f906-6a6c-3a2c-5898-1f1e7b333712}"
[HKEY_CURRENT_USER\Software\Classes\7Z_auto_file\shell]
[HKEY_CURRENT_USER\Software\Classes\7Z_auto_file\shell\open]
[HKEY_CURRENT_USER\Software\Classes\7Z_auto_file\shell\open\command]
@="%SystemRoot%\\explorer.exe /idlist,%I,%L"
"DelegateExecute"="{11dbb47c-a525-400b-9e80-a54615a090c0}"
The first GUID (in the CLSID key) must match the Namespace Extension's Shell folder class ID. The second GUID is usually {11dbb47c-a525-400b-9e80-a54615a090c0}, which corresponds to CLSID_ExecuteFolder, a well-known system GUID.
This feature is demonstrated in the SevenZip Folder sample. The application comes with some sample registration code in Program.cs (RegisterAsVirtualFolder and UnregisterAsVirtualFolder).
The following screenshot shows a .7z file named "7z1900-src.7z" (this is a .7z file that corresponds to 7-Zip source code, downloadable from 7-Zip web site) that is in a d:\Tests folder. This file is opened and browsed like it is a folder. All items are fully virtual. The behavior is very similar to how Explorer handles .zip files out of the box:
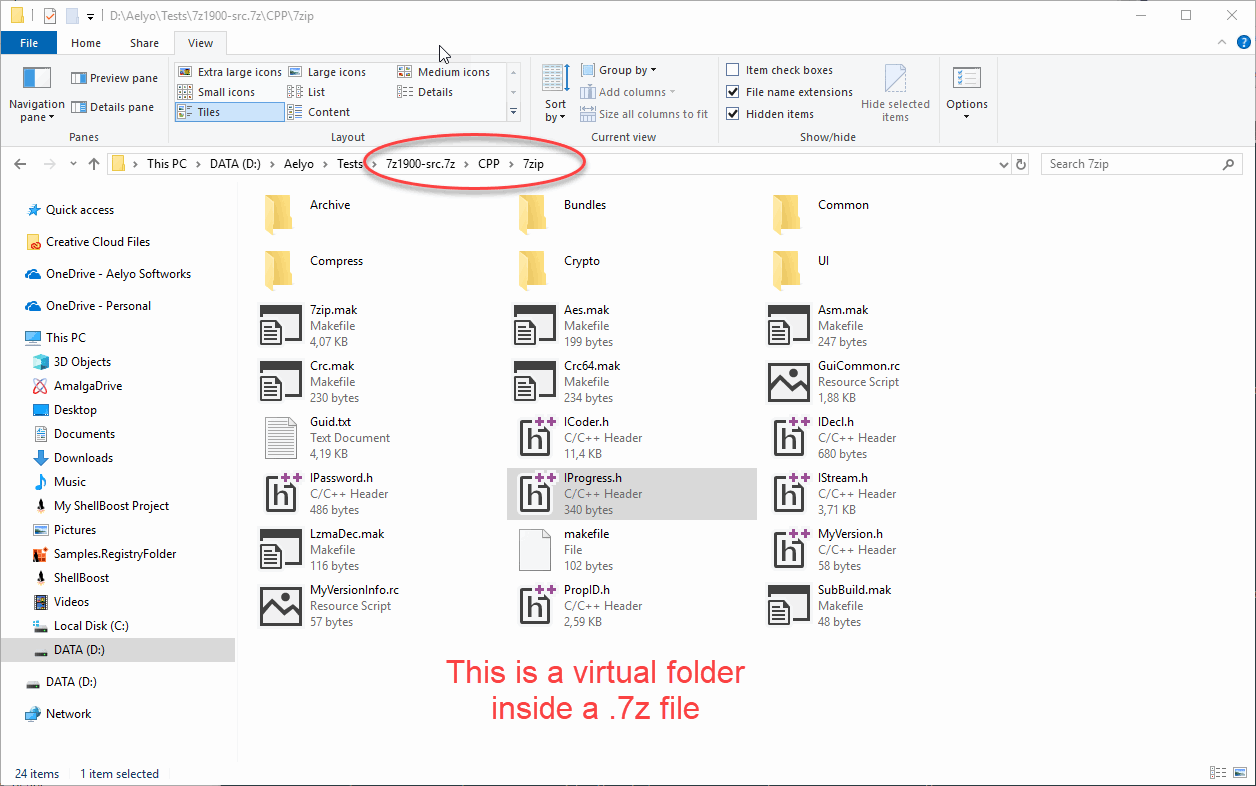
Roundtrip Shell Programming
It is easier to manipulate a CBFS Shell Namespace Extension from the .NET server, as illustrated in the following image:

The higher parts of the image show the standard CBFS Shell architecture with Explorer (or another application) calling the CBFS Shell .NET server in a pull or fetch mode. The .NET server always reacts to something that was initiated by the Shell itself or by end-user interactions with the Shell.
The typical scenario that this enables is to allow folder settings modifications from a context menu with a specific context item, for example, when you want to add a context menu that allows the user to change the current view settings or columns.
Threading
It's very important that these Shell Programming calls do not run in the context of implicit threads (the ones implicitly created by incoming RPC calls from the Shell). Running those calls in implicit threads will cause both the .NET server and the client process to hang immediately as they will be caught in an infinite loop.
The following example code manages the CBFS Shell view in another thread:
public class MyFolder : ShellFolder
{
    public MyFolder(ShellFolder parent, string name)
        : base(parent, new StringKeyShellItemId(name))
    {
        ...
    }

    // hook the context menu so we can add an item to it
    protected override void MergeContextMenu(ShellFolder folder, IReadOnlyList<ShellItem> items, ShellMenu existingMenu, ShellMenu appendMenu)
    {
        ...
        appendMenu.AddInvokeItemHandler(OnShellMenuItemInvoke);
        ....
        var newItem = new ShellMenuItem(appendMenu, "Switch to Details View") { Tag = MenuCommand.SwitchToDetailsView };
        appendMenu.Items.Add(newItem);
        ...
    }

    private enum MenuCommand
    {
        Unknown,
        ...
        SwitchToDetailsView,
        ...
    }

    private async void OnShellMenuItemInvoke(object sender, ShellMenuInvokeEventArgs e)
    {
        // get the menu tag and execute accordingly
        var menu = (ShellMenu)sender;
        var mc = Conversions.ChangeType(e.MenuItem?.Tag, MenuCommand.Unknown);
        switch (mc)
        {
            ....
            case MenuCommand.SwitchToDetailsView:
                // Use CBFS Shell context to get the current view
                // You must not use Wait() or Result on GetShellBoostViewAsync but continue the task on the thread it was running on
                var view = await ShellContext.Current.GetShellBoostViewAsync(this);
                // Shell programming must be very defensive and must always check for nulls
                // because an end user may change the UI (close windows, etc.) at any time
                if (view != null)
                {
                    var folderView = view.FolderView;
                    if (folderView != null)
                    {
                        folderView.ViewMode = FOLDERVIEWMODE.FVM_DETAILS;
                    }
                }
                break;
            ....
        }
    }
}
Programming Model
Although it is always possible to write native or interoperability code against the Shell using its native API, CBFS Shell offers a .NET object model that wraps most of the interesting Shell concepts. It does so not necessarily in the context of CBFS Shell but as a general-purpose managed Shell API. CBFS Shell defines this model in the callback.ShellBoost.Core.WindowsShell Namespace with the following classes:
- View: A Shell view, wrapping a native IShellView reference. A view instance has a folder, a FolderView, a browser, and a list of columns.
- Item: A Shell item, wrapping a native IShellItem reference. An item instance has names and a list of properties. You also can create an item or open a stream of an item for reading and/or writing operations.
- Thumbnail: A Shell item (or folder) thumbnail as displayed by the Shell. From a thumbnail instance, you can get the corresponding bitmap (GDI+ or WPF) with transparency (alpha channel) support.
- Folder: A Shell folder, also wrapping a native IShellItem reference, capable of enumerating the children as items.
- KnownFolder: A Shell known folder, wrapping a native IKnownFolder reference. This is useful to get known folders (like Desktop or My PC) as .NET objects.
- Propertyy: A Windows Property System's property. A property instance has a PropertyKey and a value.
- FolderView: A Shell folder view, wrapping a native IFolderView (and IFolderView2) reference. A folder view instance has many properties that can be configured (e.g., mode, flags, sort columns, group by).
- Browser: A Shell browser, wrapping a native IShellBrowser reference. Browser is useful to tell the view to navigate to other folders.
- NamespaceTreeControl: A Shell tree view, wrapping a native INamespaceTreeControl reference. This can be used to interact with the Explorer's tree view.
- Menu and MenuItem: A Shell menu, wrapping a native IContextMenu2 reference. This can be used to interact with Shell item's context menus or "New" menus.
- ShellBoostView: A specialization of the View class that corresponds to a Shell view displaying a CBFS Shell Namespace Extension folder.
Events Support
The Roundtrip API can subscribe to standard Shell events:
- Windows events: raised when windows are opened and closed on the desktop.
- Folder View events: events related to a Shell view, such as SelectionChanged, which is triggered when a ShellItem is selected.
- Browser events: events related to "browser" applications, such as NavigateComplete2, which is triggered when the view goes from one Shell folder to another. Explorer and a Common Dialog host are the examples of "browsers".
The following example of a C# console application hooks what is happening on the desktop:
static void Main()
{
       using (var ev = new ViewEvents())
       {
             // hook windows events
             ev.WindowRegistered += OnWindowRegistered;
             ev.WindowRevoked += OnWindowRevoked;

             // get the first shell view
             var view = View.Windows.FirstOrDefault();
             if (view == null)
             {
                    // none was open, just open one on a given folder, here C:\
                    Item.FromParsingName("c:\\").OpenView(OFASI.OFASI_OPENFOLDER);
                    view = View.Windows.FirstOrDefault();
             }

             // hook folder view 'SelectionChanged' events on that view
             var viewEvents = new FolderViewEvents(view);
             viewEvents.SelectionChanged += OnSelectionChanged;

             // get the view's browser and hook 'NavigateComplete2'
             using (var browserEvents = new BrowserEvents(view.Browser))
             {
                    browserEvents.NavigateComplete2 += (s, e) =>
                    {
                           // the view changes each time the end-user changes the current folder
                           if (viewEvents != null)
                           {
                                  viewEvents.SelectionChanged -= OnSelectionChanged;
                                  viewEvents.Dispose();
                           }

                           // NavigateComplete2 has arguments https://docs.microsoft.com/en-us/previous-versions/windows/internet-explorer/ie-developer/platform-apis/aa768285(v=vs.85)
                           var newView = View.FromNativeObject(e.Arguments[1]);
                           Console.WriteLine("A new view was opened on " + newView.Folder.SIGDN_DESKTOPABSOLUTEPARSING);
                           viewEvents = new FolderViewEvents(newView);
                           viewEvents.SelectionChanged += OnSelectionChanged;
                    };

                    do
                    {
                           var key = Console.ReadKey(true);
                           if (key.Key == ConsoleKey.Escape)
                                  break;
                    }
                    while (true);

                    ev.WindowRegistered -= OnWindowRegistered;
                    ev.WindowRevoked -= OnWindowRevoked;
             }
       }
}
Note: By design, Window and FolderView events do not carry arguments.
Common Dialog Support
Roundtrip Shell Programming does not support Shell views that are hosted in Common Dialog boxes in third-party applications. It only supports views that are opened by Explorer.
Common Dialog Shell views can be programmed like Explorer views only in the case of CBFS Shell Shell Namespace Extensions.
Security Considerations
For roundtrip programming between the CBFS Shell .NET server ("server") and Explorer to succeed, they both must be running at the same security (and UAC) level. For example, if the .NET server is started as an administrator, it will not be able to communicate with an Explorer process. The server will be able do so only if the Explorer process was started as administrator, which is not the default behavior (and generally is not recommended).
Calling a Namespace Extension Programmatically
If you need to call your Namespace Extension from a custom external program, you may use the roundtrip API, just like with any Shell object.
If you need to call it with custom commands not supported by standard namespace extensions (like a view, folder, or item access), you may reuse the Shell API and the
CBFS Shell RPC implementation. For example, you can override the ShellFolder's OnCommandExec method like this:
private static Guid MyGuid = new Guid("775f7c12-9c5b-45a3-8bcf-9a8dd13b8965"); // TODO: change this GUID!
private static int MyGetStatisticsCommand = 1234; // this is an arbitrary value
private static DateTime StartupTime = DateTime.Now;

// You must use your own command group (GUID) and identifiers
// as the Shell or any program may call this method with well-known GUIDs and command ID (like Windows' SDK OLECMDID with Guid.Empty)
protected override void OnCommandExec(object sender, CommandExecEventArgs e)
{
       ...
       if (e.Group == MyGuid && e.Id == MyGetStatisticsCommand)
       {
             // we can use e.Input as a custom argument, e.g., a string here
             if ("StartupTime".Equals(e.Input))
             {
                    // we can use most standard .NET types, but remember this will cross process boundaries
                    e.Output = StartupTime;
             }
             else
			 if ("IOEngine".Equals(e.Input))
             {
                    // dictionaries are supported too
                    var dic = new Dictionary<string, object>();
                    dic["OutboundCalls"] = 12345678;
                    e.Output = dic;
             }

             // return OK
             e.HResult = ShellUtilities.S_OK;
             return;
       }

       ...
       base.OnCommandExec(sender, e);
}
From any other program, you can now call your .NET server. The following example shows how this works in a .NET console application:
class Program
{
       private static Guid MyGuid = new Guid("775f7c12-9c5b-45a3-8bcf-9a8dd13b8965");
       private static int MyGetStatisticsCommand = 1234;

       [STAThread] // if you want to support dictionaries in ExecCommand, you must use STA threads
       static void Main()
       {
             ...
             // get access to your root folder (the .NET server must be running) using a Shell moniker.
             // in this context:
             // {20D04FE0-3AEA-1069-A2D8-08002B30309D} is CLSID_MyComputer (because our CBFS Shell Root Folder is configured to be a child of "This PC")
             // {F3875120-C8BC-4E13-ACF6-C515D400F585} is your Shell Folder's Class Id
             var item = Item.FromParsingName(@"::{20D04FE0-3AEA-1069-A2D8-08002B30309D}\::{F3875120-C8BC-4E13-ACF6-C515D400F585}");

             // get some value
             var startupTime = (DateTime)item.ExecCommand(MyGuid, MyGetStatisticsCommand, "StartupTime");

             // get dictionary
             var dic = item.ExecCommand(MyGuid, MyGetStatisticsCommand, "IOEngine");
             ...
       }
}
Note: This programmatic access is not limited to .NET. You can achieve the same result using any COM-capable language (e.g., C/C++). In
C/C++, you would program it as follows (using Visual Studio's ATL library):
static CLSID MyGuid = {
       0x775f7c12,0x9c5b,0x45a3,{0x8b,0xcf,0x9a,0x8d,0xd1,0x3b,0x89,0x65}
};
static int MyGetStatisticsCommand = 1234;

int main()
{
       // error checks ommitted
       CoInitialize(nullptr);
       {
             ...
             CComPtr<IShellItem> item;
             SHCreateItemFromParsingName(L"::{20D04FE0-3AEA-1069-A2D8-08002B30309D}\\::{0D0C11AE-0002-0000-0000-0000AE110C0D}", nullptr, IID_PPV_ARGS(&item));

             CComPtr<IOleCommandTarget> target;
             item->BindToHandler(nullptr, BHID_SFObject, IID_PPV_ARGS(&target));

             CComVariant input(L"StartupTime");
             CComVariant output;
             target->Exec(&MyGuid, MyGetStatisticsCommand, 0, &input, &output);
             ...
       }
       CoUninitialize();
       return 0;
}
Opening a folder
It is sometimes necessary to open a shell folder view opened with the specific virtual folder. The roundtrip programming makes it easy for an application.
For example, you need to open a folder with a parseable path "::{Shell Folder's Class Id}\Virtual Folder 1\Virtual Folder 1.1". First, you need to build a full path for it. If your virtual folder is a subfolder of My Computer, such a path would be
::{20D04FE0-3AEA-1069-A2D8-08002B30309D}\::{Shell Folder's Class Id}\Virtual Folder 1\Virtual Folder 1.1
The first GUID is CLSID_MyComputer. It is defined in Windows SDK, in the ShlGuid.h file. If you have a different root location, you may need to search for the corresponding name within CLSIDs in Windows SDK.
The code that opens the view looks like this:
        public static void Main(string[] args)
        {
            // get the ShellItem from its parsing name (it should be of folder type since it's a folder)
            var folder = (Folder)Item.FromParsingName(@"::{20D04FE0-3AEA-1069-A2D8-08002B30309D}\::{Shell Folder's Class Id}\Virtual Folder 1\Virtual Folder 1.1");

            // open a view (should be Explorer) on this folder
            folder.OpenView(OFASI.OFASI_OPENFOLDER);
        }
Interprocess Communication
The CBFS Shell native proxy DLL ("client") and the CBFS Shell .NET server ("server") communicate using the local-Windows-only RPC "ncalrpc" protocol.
This CBFS Shell RPC channel uses, by default, an endpoint that is common on both sides but specific to the current user desktop. This means that by default, communication is possible only between a "client" and the "server" within the same desktop.
Note: The desktop associated with a given process can be determined by the SessionId property of the .NET's standard System.Diagnostics.Process class.
RPC Endpoint
If you want to deploy the "server" as a Windows service or as server process shared between multiple clients, you should define a fixed or stable endpoint and use that endpoint instead of the default one.
For a client, a custom endpoint may be set only when installing the native proxy DLL. This is done by specifying the endpoint name via the configuration settings using the Config method of the CBShellBoost component:
using (var Initializer = new callback.CBFSShell.CBShellBoost())
{
    Config("IpcFormat=MyFixedEndPoint");
    Install(...);
    ...
}
This defines the "client" endpoint.
Now, to make sure the "server" answers to the same endpoint, you should configure it at startup with a .NET code like this:
using (var server = new OverviewShellFolderServer())
{
    var config = new ShellFolderConfiguration();
    config.IpcFormat = "MyFixedEndPoint";
    ...
    server.Start(config);
    ...
}
Multi-User Per-Machine Scenarios
If you want to support multiple users per machine, two scenarios exist.
Scenario 1: The first possibility is one-to-one communication as shown in the following image:

Key points:
- Each user runs their own CBFS Shell .NET server process. This server process runs in the same desktop session in which both (1) the Explorer processes run and (2) other applications that may open Common Dialogs also run.
- The CBFS Shell .NET server binary location can be shared by all users (e.g., the server may be installed in Program Files) or may be individual to each user (the server may be installed in a user's private directory, such as %localappdata%), but each user will have to launch the server process, for example, at login time.
Scenario 2: The second possibility is shown in the following image:

Key points:
- A common CBFS Shell .NET server process must be started independently from users logging in or logging out. It probably will be a Windows service. See the Security Considerations chapter for more on this.
- A common RPC endpoint must be configured. See the previous "RPC Endpoint" chapter for more information.
- Custom UI is not supported in this mode.
Security Considerations
During interprocess communications, the RPC server does not enforce security at a network level. This means that the "server" can serve any RPC client that connects to this endpoint; the user credentials of the "server" may be different from the user credentials of the "client".
Client Identity
The .NET CBFS Shell RPC server always provides the client user identity through the ClientPrincipalName string property of the CBFS Shell-provided ShellContext class.
CBFS Shell also provides an impersonation feature that allows the .NET server to behave as the connecting client. This feature is enabled by default. It can be turned off, however, using the following startup code (config is of the ShellConfiguration type):
using (var server = new MyShellFolderServer())
{
    var config = new ShellFolderConfiguration();
    config.ImpersonateClient = false;
    ...
    server.Start(config);
    ...
}
Thanks to impersonation turned on by default, the result of calling Environment.UserName or WindowsIdentity.GetCurrent() standard .NET methods should return the same value as ShellContext.Current.ClientPrincipalName, even if the client process is calling from a different desktop/session than the server process. If you turn impersonation off, however, you must rely only on ShellContext.Current.ClientPrincipalName to determine the client user identity.
Note: Independent from security issues, custom UI (e.g., dialog box, windows, windows messages) is not supported when a server and a client run in different desktop sessions.
CBFS Shell as a Windows Service
A Windows service is probably going to be running under specific credentials, different from users working with their Windows Shell in their desktop sessions. In this case, a CBFS Shell developer may choose to impersonate the client user (run "as" the user, with the user's credentials), or just identify it. Impersonation is a global setting that, if required, should be set at application start time. By default, CBFS Shell enables client impersonation.
Even with impersonation disabled, a CBFS Shell developer can obtain the client identity and client process identifier using the ShellContext class.
The following extract is taken from the Folder Service sample. The root folder services five items that display diagnostic-type information. The following example is for demonstration purposes:
public class RootFolder : RootShellFolder
{
    public RootFolder(OverviewShellFolderServer server, ShellItemIdList idList)
        : base(idList)
    {
        Server = server;
    }

    public OverviewShellFolderServer Server { get; }

    public override IEnumerable<ShellItem> EnumItems(SHCONTF options)
    {
        yield return new SimpleItem(this, "Client Principal Name: " + ShellContext.Current.ClientPrincipalName);
        yield return new SimpleItem(this, "Client Process Id: " + ShellContext.Current.ClientProcessId);
        yield return new SimpleItem(this, "Client Process: " + Process.GetProcessById(ShellContext.Current.ClientProcessId)?.ProcessName);

        // if we impersonate, this will be the same as the client principal name
        // otherwise it will be the identity that runs the service process
        yield return new SimpleItem(this, "Server Windows Identity: " + WindowsIdentity.GetCurrent()?.Name);
        yield return new SimpleItem(this, "Server Process: " + Process.GetCurrentProcess().ProcessName);
    }
}
The service's OnStart() method is implemented as follows:
protected override void OnStart(string[] args)
{
    _server = new OverviewShellFolderServer();
    var config = new ShellFolderConfiguration();
    config.ImpersonateClient = true; // true is the default
    config.NativeDllRegistration = RegistrationMode.User;
    _server.Start(config);
}
As you can see in the following image, the service is configured to run as "Local System".
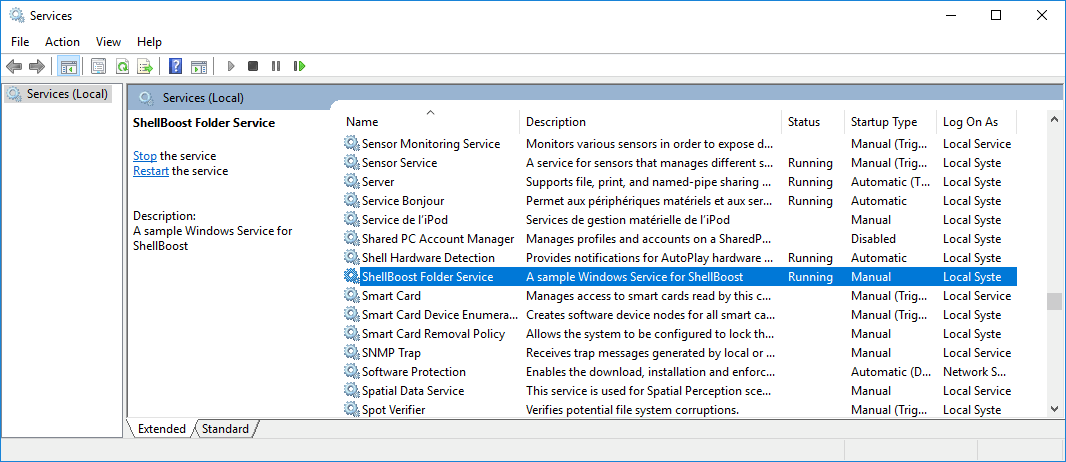
The CBFS Shell Namespace Extension appears as follows:
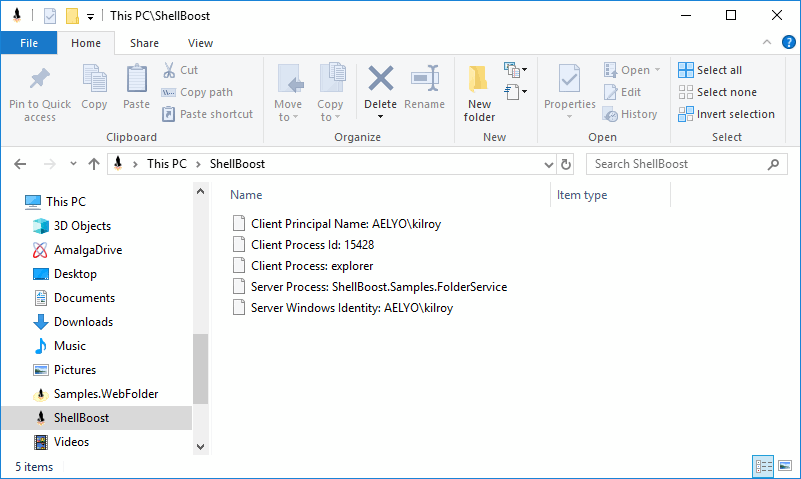
This information is computed from the ShellBoost.Samples.FolderService, running as "Local System". Because the user is impersonated, the service's Windows identity name is the same as the client's principal name. In this case, the client process is Explorer (.exe).
Next, we can change the startup code, as follows (stop the service, recompile, restart the service, refresh Explorer):
config.ImpersonateClient = false;
Then, the CBFS Shell Namespace Extension will appear as follows:

Now, the service's Windows identity is NT AUTHORITY\SYSTEM (which is "Local Service"). The correct client identity, however, is still available.
Note: Custom UI is not supported from Windows services because they cannot interact with desktops.
Starting The Server
Your .NET server application can be designed to be started manually by users or automatically at login. It also can be built as a Windows service to automatically start on boot.
In some cases, however, the .NET server application may not be running, and the user will navigate to the virtual folder that is supposed to be managed by your application. In this situation, the native proxy DLL cannot communicate with the .NET server application and the user will receive an error message. It is possible to have the native proxy DLL start the .NET server application when the application is not reachable. Then, the native proxy DLL will use the ShellExecute function of the Shell API to execute the command.
To tell the proxy DLL which command to execute, you will need to set up several configuration settings using the Config method of the CBShellBoost component. The names of all relevant settings start with "ServerStart". The settings must be set before you call CBShellBoost.Install method.
Remember: Each time the application is started, it must call the CBShellBoost.Initialize method before starting the ShellFolderServer instance.
Deployment
CBFS Shell does not mandate any deployment system and also does not provide a specific system. The following is all that you need to deploy a Namespace Extension written with CBFS Shell:
- Copy these files:
-
The CBFS Shell native proxy DLL for the processor architectures to which you plan to deploy your solution. For x64 systems, be sure to include both CBFSShell.{id}.x64.dll and CBFSShell.{id}.x86.dll as 64-bit Windows has both 64-bit and 32-bit shells. For ARM systems, include both the x64 and x86 dlls as well as CBFSShell.{id}.ARM64.dll.
Note: The {id} portion of the filename is based on your license and is autmatically generated when running the setup.
- The CBFS Shell .NET assembly.
- Your application's binaries.
-
- Install the native proxy DLL using the Install method of the CBShellBoost component.
- During uninstallation of the application, remember to uninstall the native proxy DLL using the Uninstall method of the CBShellBoost component. You don't need to call Uninstall() when you update the proxy DLL in the system.
32 and 64-Bit Support
Thanks to its out-of-process architecture, CBFS Shell supports all 32-bit and 64-bit deployment scenarios:
- in 32-bit (x86) Windows
- in 64-bit (x64) Windows, for 64- and 32-bit clients (running on WOW https://en.wikipedia.org/wiki/Windows_on_Windows) simultaneously
- in ARM64 Windows, for all kinds of clients
The Shell folder server, the .NET application that you write when you use CBFS Shell, also can run in 32-bit or in 64-bit. This "server" can be hosted in two different ways:
- Option 1: As a .NET .exe. This is the easiest and preferred method and the one that is demonstrated in most CBFS Shell samples. In this case, we recommend that you compile this .exe as "Any CPU" (when possible), which will allow you, without any extra effort, to deploy your Namespace Extension to both 32-bit and 64-bit systems.
- Option 2: As a .NET .dll. In this case, the .dll also should be compiled as "Any CPU" (when possible) so it will adapt to its host program architecture.
In option 2, how your Shell folder server .NET .dll should be hosted is an architectural choice that ultimately depends on your context. You can host it in another .NET application written using your preferred .NET language or in an application written in any other language and tool (e.g., C/C++, Delphi), provided that this environment can run or host a .NET assembly by any means. Following are some possibilities for hosting a managed .NET .dll in a native program:
- COM: an obvious choice because it's fully supported by native code and .NET
- Native CLR Hosting: https://docs.microsoft.com/en-us/dotnet/framework/unmanaged-api/hosting/clr-hosting-interfaces
- DllExport for .NET assemblies: https://github.com/3F/DllExport
Troubleshooting
Following are helpful resources for troubleshooting issues with CBFS Shell.
Issue 1: The CBFS Shell Namespace Extension is not visible
- If the Namespace Extension is not visible, this is usually a registration issue. Registration occurs during installation of the native proxy DLL and serves two purposes: (1) to register the CBFS Shell native proxy as a COM object, and (2) to register the CBFS Shell native proxy as a Shell Namespace Extension.
- Check the CBShellBoost.Attributes property. For example, setting the SFGAO_HIDDEN attribute will, as the name suggests, hide your extension. You only change these for valid reasons and do so only if you know exactly what you are doing. The default attributes are as follows: SFGAO_STORAGE, SFGAO_DROPTARGET, SFGAO_STREAM, SFGAO_STORAGEANCESTOR, SFGAO_FOLDER, and SFGAO_HASSUBFOLDER.
- The Shell/Explorer keeps many things (e.g., icons, names) in a private cache, so sometimes, you'll have to reset it. You can kill all of the explorer.exe processes (make sure they are all gone using a tool such as the Task Manager, Details tab) or use the hidden "Exit Explorer" menu trick described here https://www.howtogeek.com/198815/use-this-secret-trick-to-close-and-restart-explorer.exe-in-windows/ . Note: This trick can keep some rogue explorer.exe instances running, so always check explorer.exe running using the Windows Task Manager. Sometimes, you will have to restart your session or even reboot, but that should be the exception.
- In some cases (especially, during development), there can be registry entries left without a corresponding extension being present in th system. In this case, the extension will still appear but will not be functional. To check this, you can verify that there is no "{Your Folder Class Id}" key in subkeys of HKEY_CURRENT_USER\Software\Microsoft\Windows\CurrentVersion\Explorer\ or HKEY_LOCAL_MACHINE\Software\Microsoft\Windows\CurrentVersion\Explorer (please, use RegEdit search function for this). Your Folder Class Id is available through the callback.ShellBoost.Core.ShellFolderServer.FolderId static property (valid only after the ShellFolderServer is started).
- Make sure your Namespace Extension is not Disallowed. To check this, you verify that there is no <Your Folder Class Id> value in the HKEY_CURRENT_USER\Software\Microsoft\Windows\CurrentVersion\Shell Extensions\Disallowed registry key.
If you installed the shell folder object for all users, you need to check these two registry keys:
- HKEY_LOCAL_MACHINE\Software\Microsoft\Windows\CurrentVersion\Shell Extensions\Disallowed
- (if you have an x64 system) HKEY_LOCAL_MACHINE\Software\WOW6432Node\Microsoft\Windows\CurrentVersion\Shell Extensions\Disallowed
- Make sure your Namespace Extension is not Blocked. To check this, verify that there is no <Your Folder Class Id> value in the HKEY_LOCAL_MACHINE\Software\Microsoft\Windows\CurrentVersion\Shell Extensions\Blocked registry key. If you have an x64 system, you need to check HKEY_LOCAL_MACHINE\Software\WOW6432Node\Microsoft\Windows\CurrentVersion\Shell Extensions\Blocked registry key as well.
- Shell extension handlers, such as the CBFS Shell native proxy, run in the Shell process. Because this is a system process, the administrator of a system can limit Shell extension handlers to those on an approved list by setting the EnforceShellExtensionSecurity value of the Explorer key to 1. If this is the case, ensure that your Namespace Extension is Approved. To check this, verify that there is a <Your Folder Class Id> value in the HKEY_LOCAL_MACHINE\Software\Microsoft\Windows\CurrentVersion\Shell Extensions\Approved registry key. See the official Microsoft documentation at Registering Shell Extension Handlers for more information.
Issue 2: The CBFS Shell Namespace Extension is visible but does not respond to Shell requests
This problem could be a UAC (User Account Control) issue. If your .NET server runs at a different UAC level than the Explorer or a third-party application hosting Common Controls, then communication may not work. For example, if you run your .NET server as administrator and Explorer is run as normal (not as administrator), then you may experience this problem.
This also could be a disabled UAC (User Account Control) issue. See the Microsoft articles here: Merged View of HKEY_CLASSES_ROOT and Application Compatibility: UAC: COM Per-User Configuration. "If an application is run with administrator rights and User Account Control is disabled, the COM runtime ignores per-user COM configuration and accesses only per-machine COM configuration. Applications that require administrator rights should register dependent COM objects during installation to the per-machine COM configuration store". This typically is the case when running on default Windows server or in some Windows sandbox configurations.
To address the problem, try installing the proxy DLL for the machine, not for the user. For this, set the PerUserInstallation property to false.
Another reason of this issue is the incomplete deployment of the proxy DLLs to the target system. To x64 systems, be sure to deploy both {id}.x64.dll and {id}.x86.dll as x64 Windows have both 64-bit and 32-bit shells. To ARM systems, deploy all of {id}.x64.dll, {id}.x86.dll, and {id}.arm64.dll.
Issue 3: The CBFS Shell Namespace Extension is not visible in Common Dialogs
- Unfortunately, there are not always solutions to this problem. Ultimately, applications host the Common Dialog and the loading process is the application's process, not explorer.exe. Therefore, they can customize it the way they want and thus may prevent any Namespace Extension from running.
- Another common example of this issue occurs when an application restricts the Common Dialog views to just filesystem Shell items. Applications may do this with the IFileDialog::SetOptions method: https://docs.microsoft.com/en-us/windows/win32/api/shobjidl_core/nf-shobjidl_core-ifiledialog-setoptions using the FOS_FORCEFILESYSTEM flag. In this case, your extension will be shown only if it is declared as a filesystem extension using its project characteristics. All folders under the root also have to be filesystem-compatible. If you own the application using the Common Dialog, you can adapt your code to ensure that a custom Namespace Extension is shown.
- Even if your extension is fully filesystem-compliant (i.e., exposes what CBFS Shell calls "physical items"), some applications may still fail for various reasons, depending on the way they are implemented.
- You will have to test your extension with applications that you explicitly plan to target (e.g., Office applications, Notepad, Adobe Reader) because they can behave differently. Some applications hook (as in "Windows hook") Common Dialogs to deeply change their behavior or even implement custom dialog boxes with custom shell-like controls in them. In such cases, the custom dialog boxes most likely will not support Namespace Extensions.
- In general, Drag & Drop and Copy/Paste operations are better alternatives to the Common Dialogs "Save As" operation because they use a standard clipboard protocol. Drag & Drop from an Outlook message or an attachment from a message are examples of this behavior. See the Physical Overview sample for a code example that demonstrates this functionality.
Issue 4: Preview images (from preview handlers) are not displayed for items in a CBFS Shell Namespace Extension
- Preview images are supported through the Shell's native IPreviewHandler COM interface. Some preview handlers are provided by Windows (e.g., image, simple text), whereas others are provided by third-party binaries (e.g., PDF files). Handlers also should implement one of the three native COM interfaces: IInitializeWithStream (strongly preferred and recommended by Microsoft), IInitializeWithFile, or IInitializeWithItem.
- Unfortunately, some handlers are not capable of loading Shell items that are not physical files because they simply do not implement IInitializeWithStream (which uses a stream that can come from anywhere) but IInitializeWithFile (which uses a physical file), which is the legacy interface.
- For these legacy handlers, you have to provide physical Shell items for the handler to work.
- To check if your Namespace Extension works properly with a preview handler, you can install and test the official Microsoft "Recipe Preview Handler Sample" https://docs.microsoft.com/en-us/windows/win32/shell/samples-recipepreviewhandler. Just add a .recipe file (or a virtual file) corresponding to the expected format into a folder within your Namespace Extension. Then test that this item has the correct preview image.
Issue 5: What is displayed in the Namespace Extension is not expected, the icons are incorrect, or Drag & Drop does not work properly (shows stop icon)
If you are in the process of developing your application, and you stop to restart your .NET server repeatedly while keeping Explorer views open with your Shell folder, things may get out of hand. Some discrepancy may occur between what your .NET server gives back (notably PIDLs) and what these Explorer views expect, or what they remember or keep in memory/cache. To avoid this situation, close the Explorer views that are connected to your server and then reopen them. The F5 (Refresh) key pressed in Explorer views also should reset memory, but this may not always happen.
Issue 6: You see too many calls to your .NET implementation
Most of the calls you can see from CBFS Shell are initiated by the Shell and are proxied back to your code. The number and the order of calls are not defined; they may change depending on Windows version, machine setup, and other reasons beyond our control.
Any third party (e.g., other Shell extensions, context menu extensions) may call into your extension indirectly by using the Shell API.
In general, do not assume that you can match end-user operations with what occurs on the process level. For example, the context menu is asked and used to determine the result of a double-click on a Shell item, even though no context menu is shown to an end user upon the double-click.
Depending on your context, caching techniques often are used between the Shell call and your final code being executed.
If you think there are too many calls to the ShellFolder's EnumItems method, make sure that you have overridden the two GetItems methods, as explained in the Items enumeration chapter.
Microsoft Resources
The following list includes the most important and relevant articles from Microsoft about Shell Namespace Extension programming and about how they relate to CBFS Shell concepts:
- CommonExplorer Concepts covers the IDL / PIDL concept. CBFS Shell also uses PIDLs to identify Shell items as this is a mandatory mechanism, but it does this through the easy to use .NET classes: ShellItemId and ShellItemIdList, which are available in the callback.CBFSShell.dll assembly.
- Understanding Shell Namespace Extensions is a must read, even for CBFS Shell users as it explains the general Shell concepts.
- Implementing the Basic Folder Object Interfaces is another introduction, but it is focused on Shell Namespace Extensions.
- Specifying a Namespace Extension's Location explains junction points.
- Using the search Protocol details the Search protocol.
- Windows Property System introduces the Windows Property System.
- How to Display a Rooted View of a File explains the registry setup for virtual files.
Note: Many other articles available on the Internet from Microsoft on Shell Namespace Extensions are not listed here because their subject matter is covered elsewhere by CBFS Shell or the information is not directly applicable when you use CBFS Shell and its out-of-process architecture.
Samples
The following samples demonstrate the usage of CBFS Shell in various applications. All demos listed below are available on GitHub at https://github.com/callbacktechnologies.
- Overview: A simple .NET framework console application, a Shell folder that contains a fixed set of virtual Shell items and folders. This sample also exists for .NET Core 3.1 (compatible with .NET 5 and higher), VB.NET, and C++/CLI.
- Local Folder: A console application, a Shell folder that supports a combination of virtual Shell items and physical Shell items.
- Registry Folder: A console application, a Shell folder that mimics the Windows Registry Editor ("regedit.exe") with only virtual Shell items and custom UI using WinForms.
- 7Zip Folder: A console application, a Shell folder server that demonstrates how to create a non-rooted, virtual file folder which integrates files with the .7z extension in the Shell Namespace, just like Windows does using .zip files.
- Physical Overview Folder: A console application, a Shell folder that uses a physical folder as a backend for all operations. It demonstrates the following features: Advanced Drag & drop, Copy/Paste operations, Common Dialog (Open, Save) operations, Shell Change Notifications from other folders.
- Web Folder: A WPF application Shell folder that connects to a custom web server (that exposes a custom REST/JSON API), which is also included.
- Folder Service: A console application, a Shell folder that demonstrates a Windows service written using CBFS Shell.
- Device Manager Folder: A .NET Core console application folder that mimics the official Windows Device Manager application. Demonstrates asynchronous hierarchy building.
- Mirror: A .NET Core console application that demonstrates a Namespace application mirroring a physical folder present on the disk. It's implemented in only a few lines of code.
Overview Sample
This simple .NET Framework C# console application serves a Shell folder that contains a fixed set of virtual Shell items and folders. The following screenshot shows a child folder with six items: two folders, two images, and two text files.

Items in this view automatically support the preview pane (image and text files).
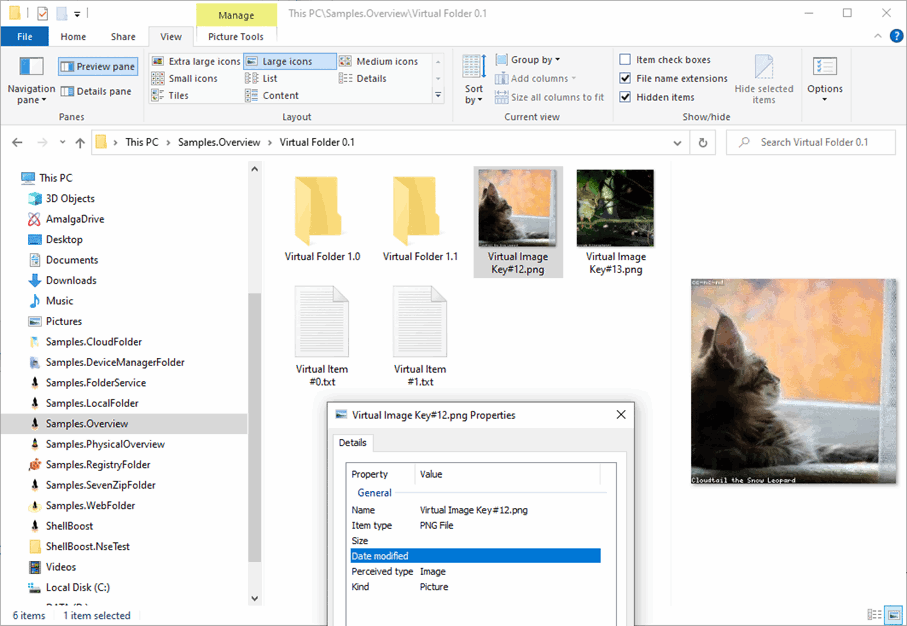
VBOverview
This is a VB.NET version of the Overview sample.
CoreOverview
This is a .NET Core 3.1 (compatible with .NET 5 and higher) C# version of the Overview sample. The code in this sample is the same as the Overview sample. C# files simply are linked to it.
This sample can be found in the GitHub repository with CBFS Shell samples.
CppOverview
This a .NET Framework C++/CLI version of the Overview sample.
This sample can be found in the GitHub repository with CBFS Shell samples.
Local Folder Sample
This is a console application with a Shell folder that supports a combination of virtual Shell items and physical Shell items. It demonstrates custom properties, overlays icons, and icon properties. It also demonstrates dynamic columns and the "roundtrip" feature.
This sample can be found in the GitHub repository with CBFS Shell samples.
The project is laid out as follows:
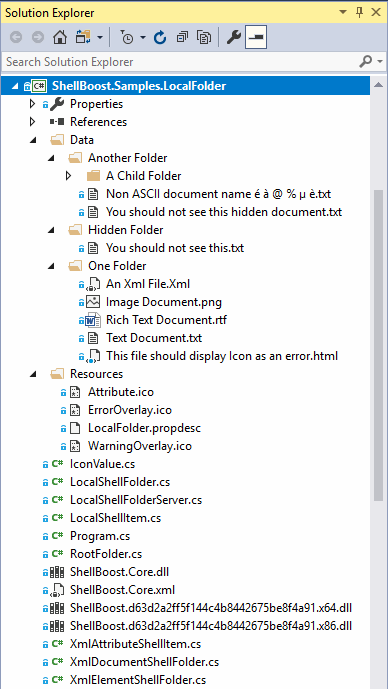
The "Data" directory contains a bunch of physical sample files that we will use as a built-in hierarchy when we run the project. They are all configured with a Visual Studio Build Action set to "Copy if newer".
The "Resources" directory contains two overlay icons, one Shell item icon, and one custom property .propdesc schema file. They are all configured with a Visual Studio Build Action set to "Embedded resource".
Because the project contains custom properties, it must be run at least once (for a production program, it would be at install time) with administrative rights. If you run the project with administrative rights the first time, you should see the following:
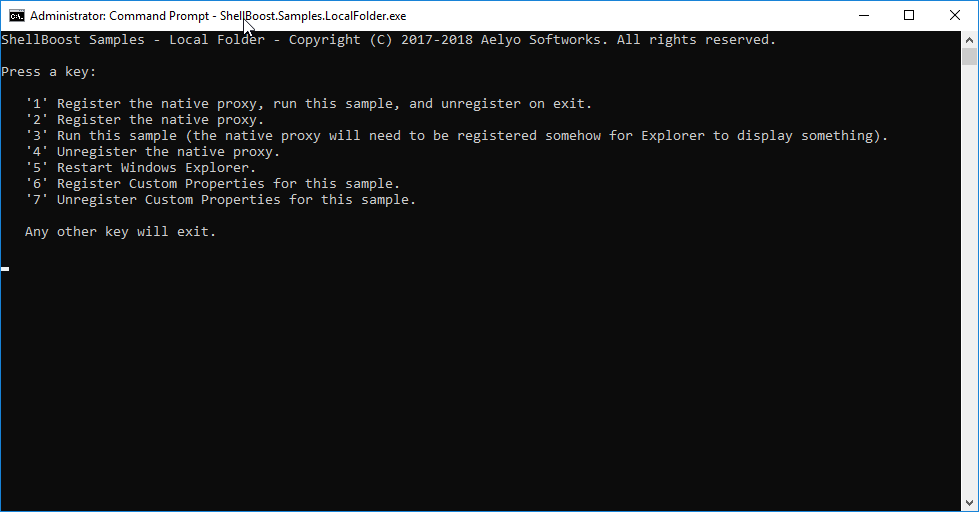
Press 6 to register the custom properties. If everything goes well, you should get the following answer:
Properties are registered. Schema location is:
C:\Users\kilroy\AppData\Local\ShellBoost\cache\fc1e70e78c9b3c9df1a78038bcd69ff4.propdesc
Properties can be successfully retrieved from database.
The second message means the program has used the ShellBoost's PropertyDescription utility class to test whether or not the properties are correctly registered.
Now you can continue or quit and restart the sample without administrative rights. You can press 1 or 2+3 to register in the Windows Shell as a Namespace Extension.
Open Explorer and browse to "This PC\Samples.LocalFolder". You should see the following:
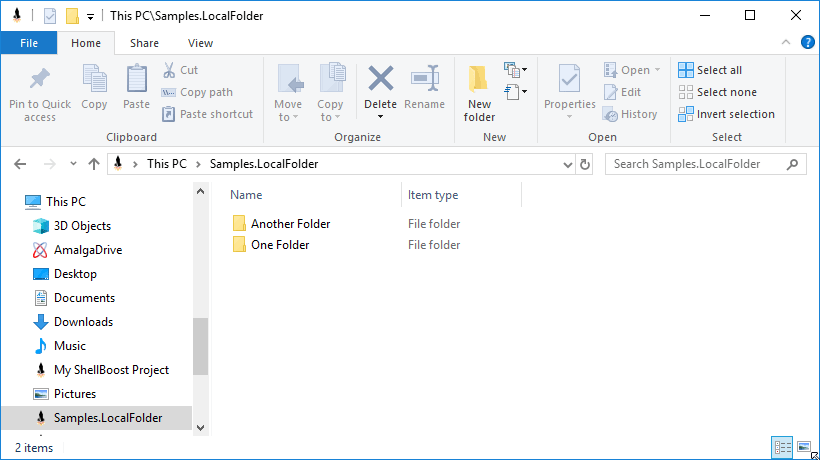
As you can see, the folder named "Hidden folder" in the "Data" folder of the Visual Studio project is not shown.
This is the result of custom code in LocalShellFolder.cs:
internal static IEnumerable<FileSystemInfo> EnumerateFileSystemItems(DirectoryInfo info, string searchPattern)
{
    // for demonstration purpose, we hide any file or directory that has "hidden" in its name
    foreach (var child in info.EnumerateFileSystemInfos(searchPattern))
    {
        if (child.Name.IndexOf("hidden", StringComparison.OrdinalIgnoreCase) >= 0)
            continue;
        yield return child;
    }
}
If you browse the "One Folder" folder, you should see the following:
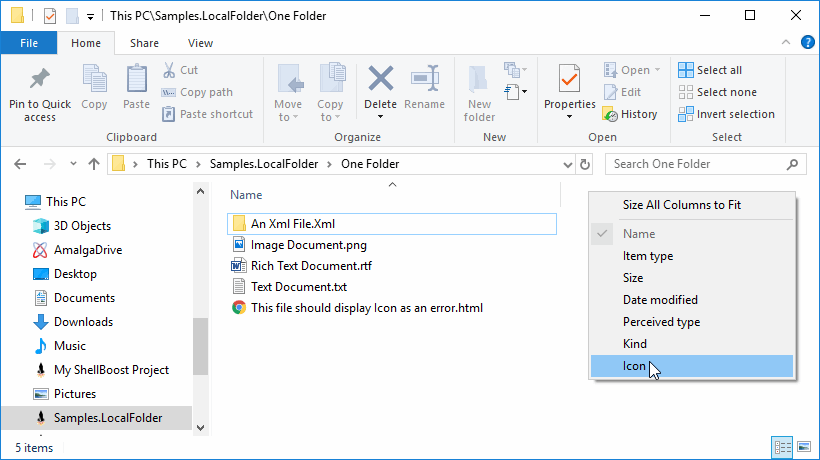
If you right click on the column's header, a custom "Icon" column will be available, as follows:
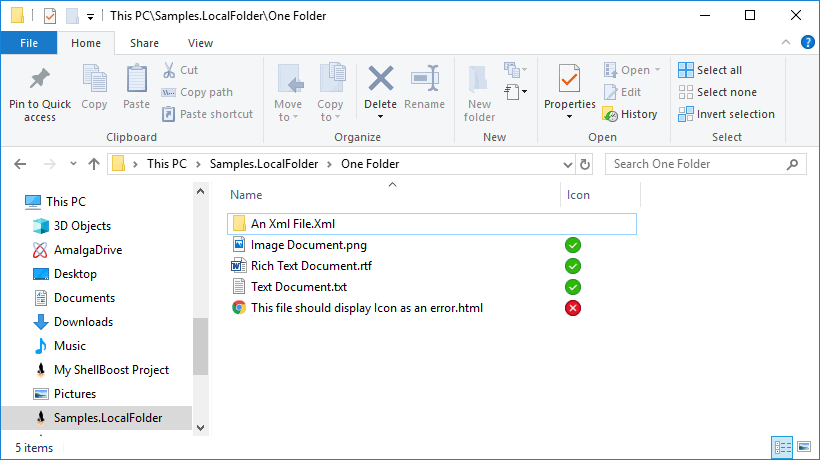
This sample demonstrates a custom icon property. The relevant code is found in LocalShellFolder.cs and LocalShellItem.cs:
public class LocalShellFolder : ShellFolder
{
  // Declared in LocalFolder.propdesc schema file. This file must be registered once. Check Program.cs.
  public static readonly PropertyDescription IconUIProperty = PropertySystem.GetPropertyDescription("ShellBoost.Samples.LocalFolder.IconUI", true);
  public static readonly PropertyDescription IconProperty = PropertySystem.GetPropertyDescription("ShellBoost.Samples.LocalFolder.Icon", true);

  public LocalShellFolder(ShellFolder parent, DirectoryInfo info) : base(parent, info) // there is a specific overload for DirectoryInfo
  {
      ...
      AddColumn(IconUIProperty);
      ...
  }
  ...
}

public class LocalShellItem : ShellItem
{
    public LocalShellItem(ShellFolder parent, FileInfo info)
        : base(parent, info)
    {
        ...
        var ms = new MemoryPropertyStore();
        ms.SetValue(Props.System.PropList.StatusIcons, "prop:" + LocalShellFolder.IconProperty.CanonicalName);
        ms.SetValue(Props.System.PropList.StatusIconsDisplayFlag, (uint)2);

        if (info.Name.Contains("error"))
        {
            ms.SetValue(LocalShellFolder.IconProperty, IconValue.Error);
        }
        else if (info.Name.Contains("warn"))
        {
            ms.SetValue(LocalShellFolder.IconProperty, IconValue.Warning);
        }
        else
        {
            ms.SetValue(LocalShellFolder.IconProperty, IconValue.Ok);
        }

        SetPropertyValue(LocalShellFolder.IconUIProperty, ms);
    }
    ...
}
If you browse the "An Xml File.Xml\root\element" folder, you enter virtual folders. For demonstration purposes, the code handles .XML files in a specific way: it opens the file content and displays the Xml element as virtual Shell folders and the Xml attribute as virtual Shell item. The content of an attribute Shell item is the Xml attribute's value.
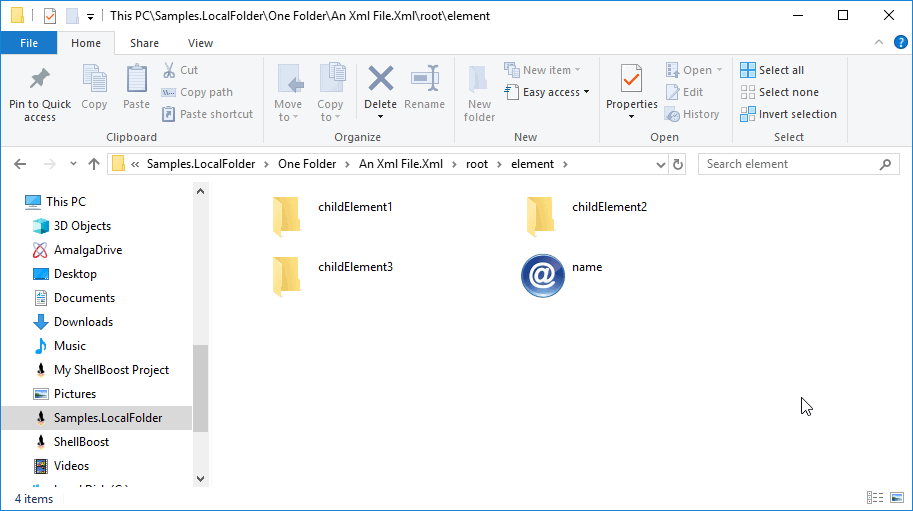
The following code creates a virtual Shell folder when
browsing an Xml physical file:
protected override ShellItem
CreateFileSystemItem(FileInfo info)
{
    // for demonstration purpose, we handle XML files like they are a folder over their elements
    if (string.Compare(info.Extension, ".xml", StringComparison.OrdinalIgnoreCase) == 0)
        return new XmlDocumentShellFolder(this, info);

    return new LocalShellItem(this, info);
}
The following code creates two types of Shell items:
public class XmlElementShellFolder : ShellFolder
{
    public XmlElementShellFolder(ShellFolder parent, XmlElement element)
        : base(parent, new StringKeyShellItemId(element.LocalName))
    {
        Element = element;
        DisplayName = element.LocalName;
    }

    public XmlElement Element { get; }

    public override IEnumerable<ShellItem> EnumItems(SHCONTF options)
    {
        // shell is asking for folders, use Xml elements as folder
        if (options.HasFlag(SHCONTF.SHCONTF_FOLDERS))
        {
            foreach (var child in Element.ChildNodes.OfType<XmlElement>())
            {
                yield return new XmlElementShellFolder (this, child);
            }
        }

        // shell is asking for non-folders (items), use Xml attributes as items
        if (options.HasFlag(SHCONTF.SHCONTF_NONFOLDERS))
        {
            foreach (var att in Element.Attributes.OfType<XmlAttribute>())
            {
                yield return new XmlAttributeShellItem(this, att);
            }
        }
    }
}
The attributes have a custom icon "'Attribute.ico" that was embedded in the .NET project.
If you navigate to the folder, you will see the following:
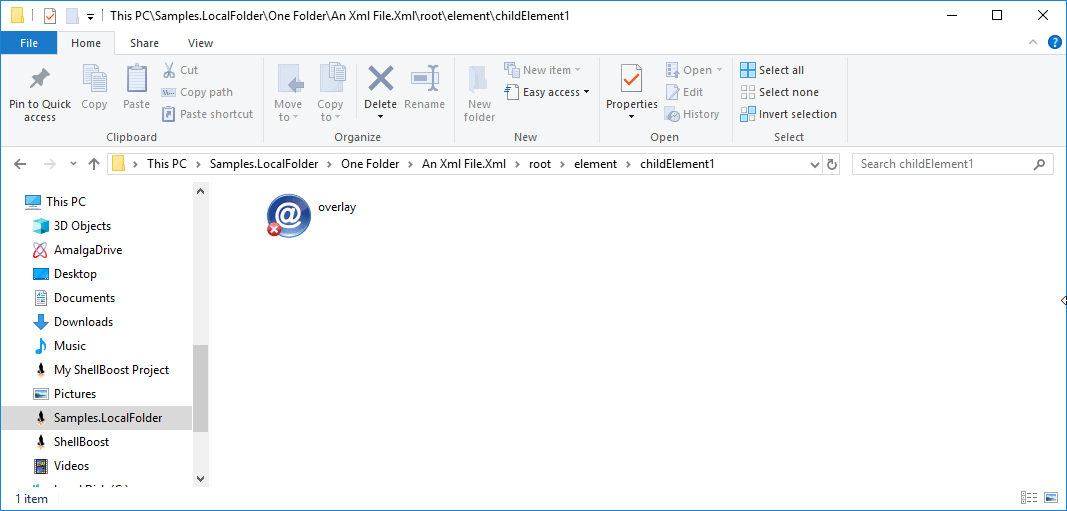
The attribute has an overlay icon, which was added with the following code:
public override bool TryGetPropertyValue(PropertyKey key, out object value)
{
    // OverlayIconLocation is not a Windows property, it's a ShellBoost special property
    if (key == PropertyStore.OverlayIconLocation)
    {
        var iconsPath = ((RootFolder)Parent.Root).Server.IconsDllPath;

        // note the icon index syntax: the index must be negative when passed to the Shell
        switch (Attribute.Value)
        {
            case "Error":
                value = iconsPath + ",-" + LocalShellFolderServer.ErrorOverlayIconIndex;
                return true;

            case "Warning":
                value = iconsPath + ",-" + LocalShellFolderServer.WarningOverlayIconIndex;
                return true;
        }
    }

    return base.TryGetPropertyValue(key, out value);
}
Overlay icons are explained in detail in the "Overlay icons support" subchapter of the Item icon and thumbnail support chapter.
Registry Folder Sample
This console application has a Shell folder that mimics the Windows Registry Editor ("regedit.exe") in Explorer with only virtual Shell items. You can read and rename keys and values using standard Shell UI, and you can create and edit keys and values, using a regedit.exe-like UI written using WinForms.
Shell items representing values have the same icons as regedit.exe.
Two .NET icons have been added to the project as embedded resources.
Following is the corresponding code:
Thumbnail = new
AssemblyResourceShellThumbnail(Parent.Root.Server, GetType().Namespace + ".Resources." + (iconIsString ? "REG_SZ.ico" : "REG_BINARY.ico"));
The sample also demonstrates how to declare and register custom properties (you need to run the sample with enough rights at least once). In this case, we use only three properties:
- Name (the standard name property)
- Type (custom property of string type)
- Value (custom property if string type)
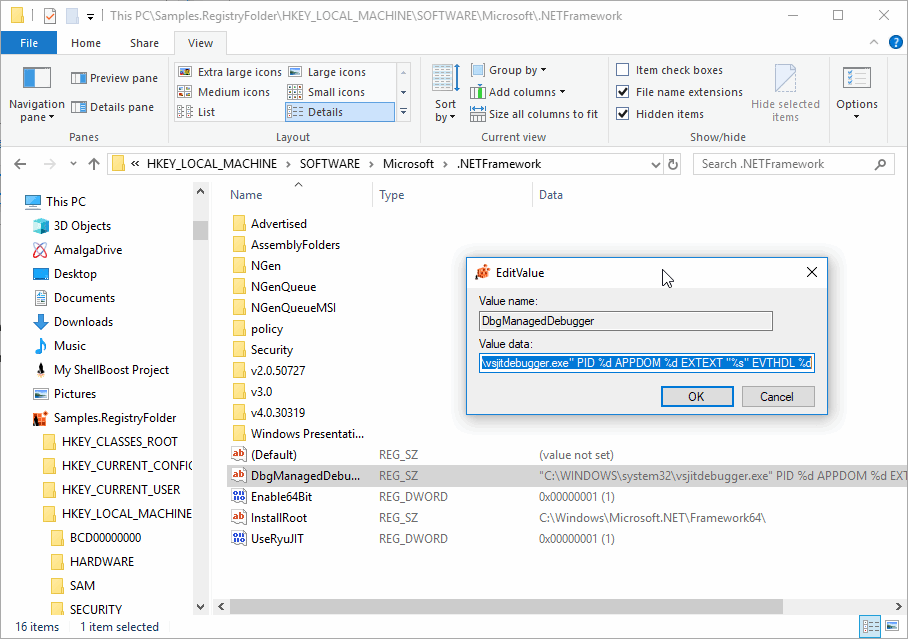
Because Notepad supports fully virtual items, we can even open a key value with Notepad (because values names don't have a .txt type/extension, you have to select "All Files" in the Open Common Dialog to see values):
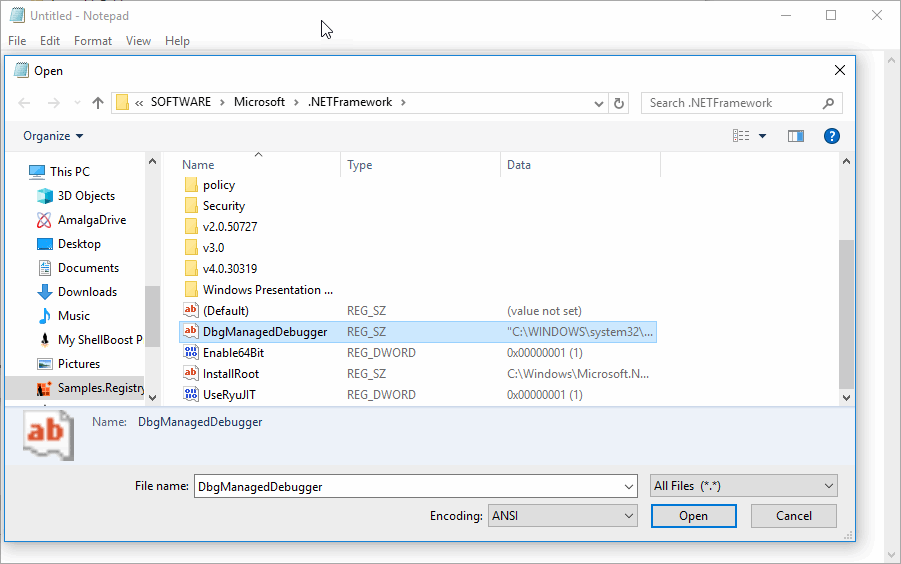
If you press "Open", Notepad will open the value as the item content (but you won't be able to save it back since it's a fully virtual item):
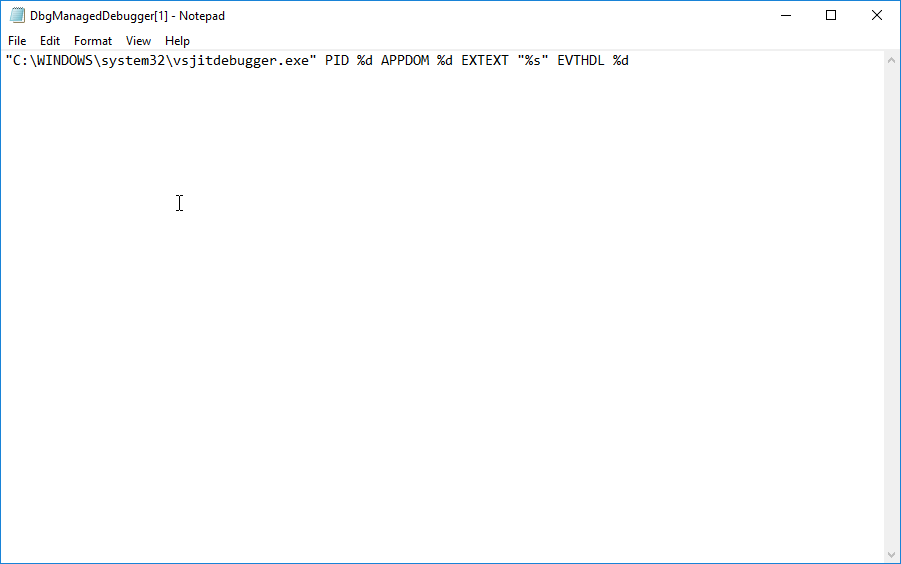
This is the corresponding code:
public override ShellContent GetContent() => new MemoryShellContent(Data?.ToString());
The sample also demonstrates a custom comparison between Shell items in a folder: the (default) item (registry value) always appears ahead of nonfolders (registry keys) items. Following is the corresponding code:
protected override bool TryCompare(ShellItem other,
ShellFolderColumn column, out CompareIdReturnValue value)
{
    if (other is RegistryValueItem otherValue)
    {
        if (IsDefault)
        {
            if (otherValue.IsDefault)
            {
                value =
CompareIdReturnValue.LeftEqualsRight;
                return true;
            }

            value =
CompareIdReturnValue.LeftPrecedesRight;
            return true;
        }
        else if (otherValue.IsDefault)
        {
            value =
CompareIdReturnValue.LeftFollowsRight;
            return true;
        }
    }
    return base.TryCompare(other, column, out value);
}
The sample also demonstrates Explorer notification banners as described in the Information Bar chapter.
7Zip Folder Sample
This console application has a Shell folder server that demonstrates how to create a nonrooted, virtual file folder using ShellBoost. The application integrates files with the .7z extension in the Shell Namespace, just like Windows does using .zip files.
See the File as Folder support chapter for more information.
This sample can be found in the GitHub repository with CBFS Shell samples.
Notes:
- This sample requires 7-Zip (https://www.7-zip.org/) to be installed on the machine.
- This sample uses Squid-Box's SevenZipSharp (https://www.nuget.org/packages/Squid-Box.SevenZipSharp/) NuGet packages as an Interop wrapper over 7-Zip.
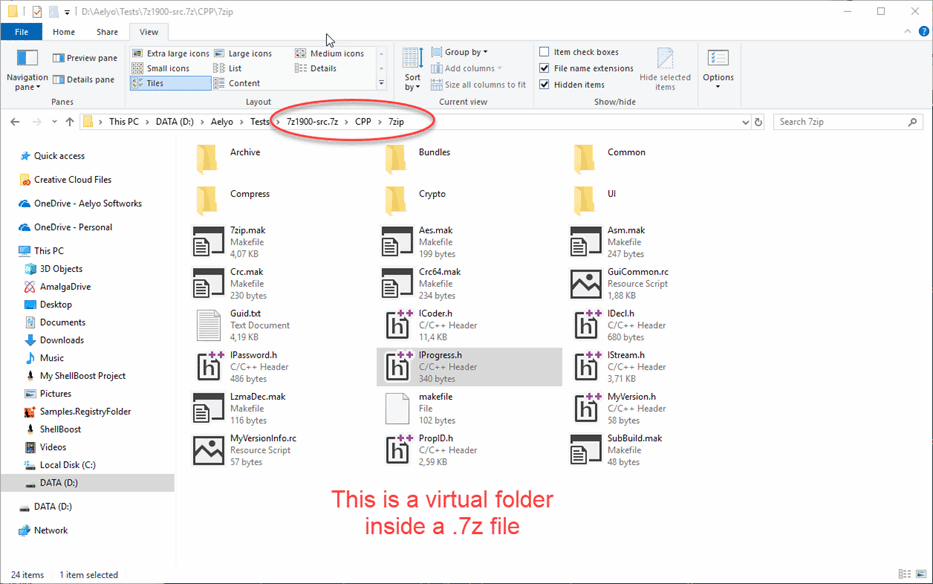
Physical Overview Folder Sample
This console application has a Shell folder that uses a physical folder (named "Root" and located in %appdata%) as the backend for all operations. This sample demonstrates the following features:
- Advanced Drag & drop. For example, the sample supports files dropped from Explorer, files in Outlook (e.g., messages, attachments), or images from Chrome and Firefox browsers, as well as other applications.
- Copy/Paste operations.
- IIdentityItem, IPreviewItem, and other IRelatedItem-derived interfaces.
- Common Dialog (Open, Save) operations. Note, however, that this depends heavily on the application that hosts the Common Dialog. For example, the sample supports the ability to save from Microsoft Word (or other Office apps) to the Namespace Extension but using the Save As Common Dialog does not work for other applications (such as Windows Notepad or Adobe Acrobat).
- Shell change notifications from other folders.
Web Folder Sample
This sample is composed of two projects:
- A self-sufficient ASP.NET MVC web server that exposes a custom REST/JSON API. The API looks like a "cloud drive" and exposes folders and items. Items have content, which can be downloaded or uploaded. This project is not strictly related to ShellBoost but is used for demonstration purposes.
- This WPF application has a Shell folder that connects to the web server and exposes the "cloud drive" as Shell folders and Shell items.
This sample can be found in the GitHub repository with CBFS Shell samples.
Web Server Sample
The MVC web server API is synthesized using a portion of its controller code and corresponding URLs:
[Route("api/drive")] // get root folder
public Item Get()

[Route("api/drive/{id}")] // get an item from the hierarchy
public Item Get(Guid id) => Drive.Root.GetItem(id);

[Route("api/drive/{id}/children")] // get an item's children
public IEnumerable<Item> GetChildren(Guid id)

[Route("api/drive/{id}/folders")] // get an item's child folders
public IEnumerable<Item> GetFolders(Guid id)

[Route("api/drive/{id}/items")] // get an item's child items
public IEnumerable<Item> GetItems(Guid id)

[Route("api/drive/{id}/content")] // get an item's content
[HttpGet]
public IHttpActionResult Download(Guid id, string contentETag = null)

[Route("api/drive")] // modify an item
[HttpPost]
public IHttpActionResult Update([FromBody] Item value)

[Route("api/drive/{id}")] // upload an item's content
[HttpPut]
public async Task<IHttpActionResult> Upload(Guid id)

[Route("api/drive/{id}")] // delete an item
[HttpDelete]
public bool Delete(Guid id)
The web server has no UI: it is an API-only site. To demonstrate the sample, you must first run this web server project. By default, it runs on http://localhost:60311/.
When you run the WPF application (once you have started the web server project), you will see the following:
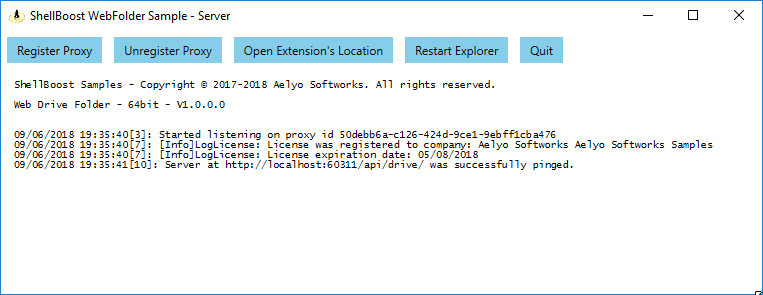
The first time you run it, click on "Register Proxy" to install the ShellBoost native proxy DLL and register it with the Shell. Then, "Open Extension's Location" should open a window on the "This PC" item. Next, you can navigate into the Samples.WebFolder virtual folder:
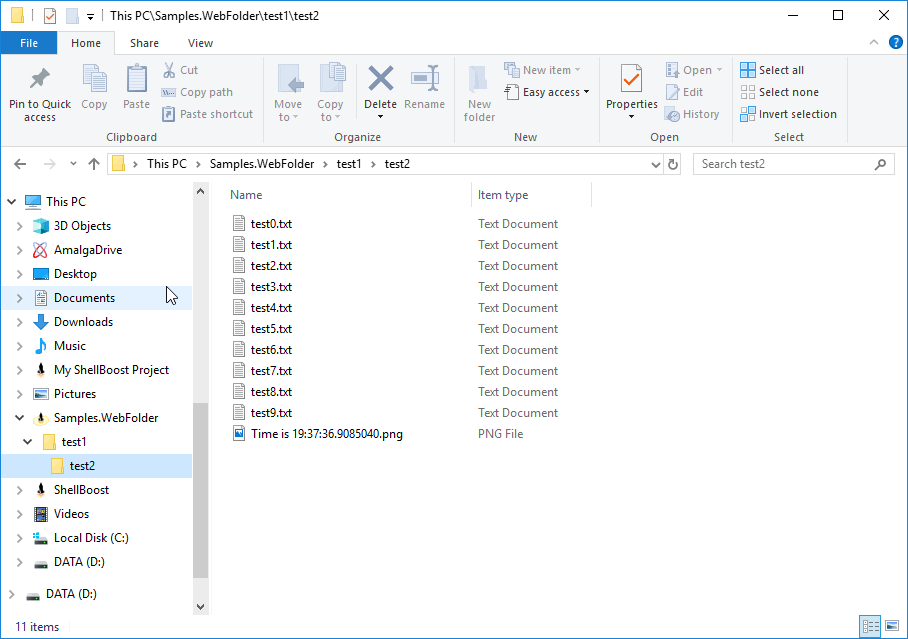
The folder hierarchy (test1/test2/TestN.txt, PNG, etc.) is hardcoded into the server for demonstration purposes.
All Shell items are virtual. You can see the server creates 10 text items and one dynamic PNG item. The name of the PNG matches the current (server) time. If you manually refresh the Explorer Window (F5), the time should change.
If you double click on the PNG file, you should see an image that was dynamically generated. Its content contains the time when it was generated on the server:
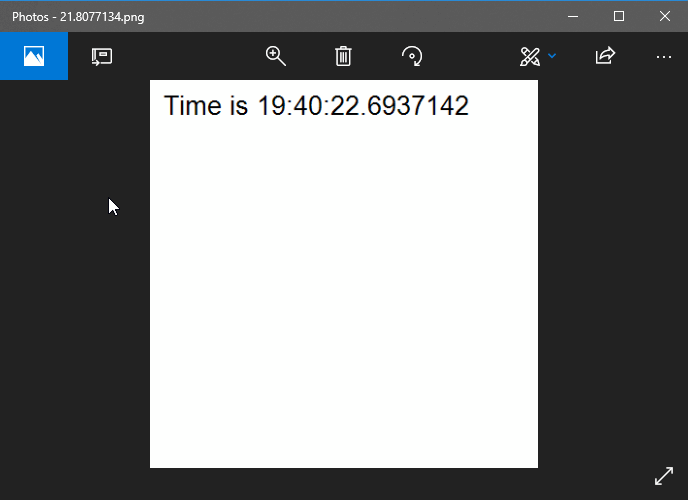
In this example, all items exist on the server, but we could have written a sample with an image generated locally as well.
Folder Service Sample
This is a console application in which a Shell folder demonstrates a Windows service written using ShellBoost. This sample is simple and quite similar to the Overview sample. However, it runs as a Windows service, in its own security context, instead of running in an end-user desktop context. The sample demonstrates ShellBoost's impersonation capabilities.
The code is the standard .NET code that was created using this article from MSDN: Walkthrough: Creating a Windows Service Application in the ComponentDesigner. The code was changed, however, to retarget the process to be a console application instead of Windows. This has allowed us to add some test code in the program's Main() method.
To run the service, don't forget to install it first. The project contains an "install.bat" file that you can run, under administrative privileges. Once installed, you may use the Windows Service Manager to start or stop it:
If you navigate to the "Samples.FolderService" folder, you should see something like this:
Following is the relevant code in RootFolder.cs:
public override IEnumerable<ShellItem>
EnumItems(SHCONTF options)
{
    yield return new SimpleItem(this, "Client
Principal Name: " + ShellContext.Current.ClientPrincipalName);
    yield return new SimpleItem(this, "Client
Process Id: " + ShellContext.Current.ClientProcessId);
    yield return new SimpleItem(this, "Client
Process: " +
Process.GetProcessById(ShellContext.Current.ClientProcessId)?.ProcessName);

    // if we impersonate, this will be the same as the
client principal name
    // otherwise it will be the identity that runs the
service process
    yield return new SimpleItem(this, "Server
Windows Identity: " + WindowsIdentity.GetCurrent()?.Name);
    yield return new SimpleItem(this, "Server
Process: " + Process.GetCurrentProcess().ProcessName);
}
Please see the Security Considerations chapter for more details on this sample.
Device Manager Folder Sample
This sample mimics the official Windows Device Manager application, while demonstrates the following:
- A .NET Core 3.1 console C# application.
- Usage of WinRT classes, such as the Windows.Devices.Enumeration.DeviceInformation.DeviceWatcher, through inclusion of the "Microsoft.Windows.SDK.Contracts" NuGet package.
- Icons can support small to large sizes (256 x 256).
- A ShellFolder and ShellItem namespace hierarchy built completely asynchronously, which is made possible thanks to the NotifyCreate, NotifyDelete, and NotifyUpdate methods.
- Just like the official Windows application, hidden devices can be shown or hidden.
Following are two screenshots of the Namespace Extension integrated with the Windows 10 Shell:
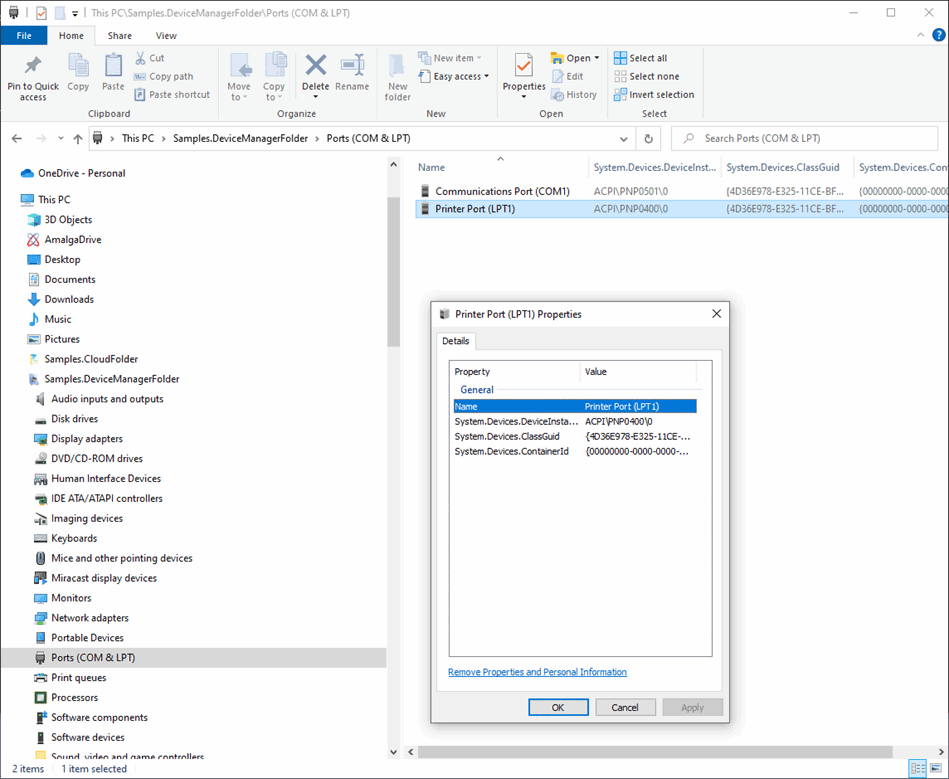

The following screenshot shows hidden devices. Hidden devices can be shown using the standard Explorer "Hidden items" checkbox:
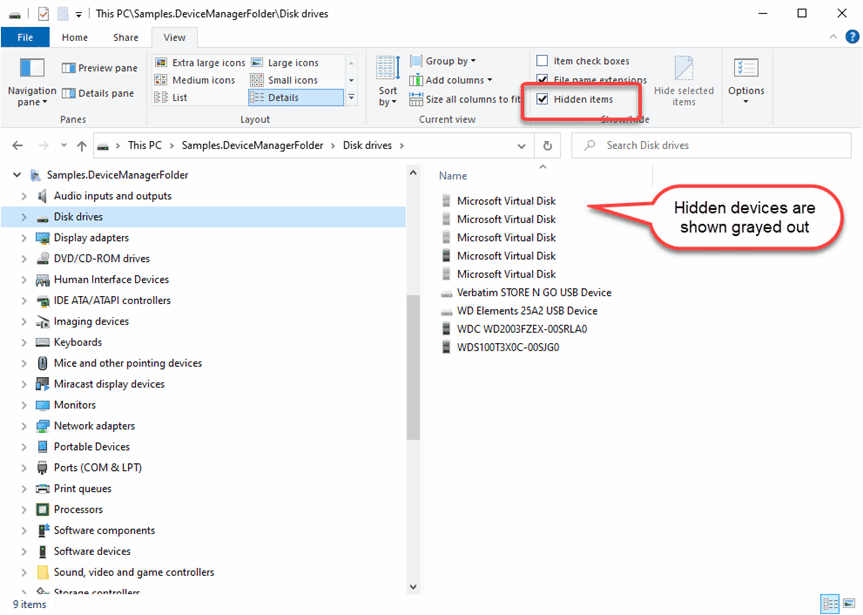
Mirror Sample
This .NET Core console application demonstrates a Namespace application mirroring a physical folder that is present on the disk. It's implemented in only a few lines of code.
The sample supports the Explorer "Hidden Items" command.
For simplicity, the sample does not support all classical folder features (e.g., delete, copy, auto update when the disk changes).
In the following screenshot, the Namespace Extension displays the content of the C:\ folder. The "Hidden items" command in the Explorer Command bar can be clicked to show hidden items:
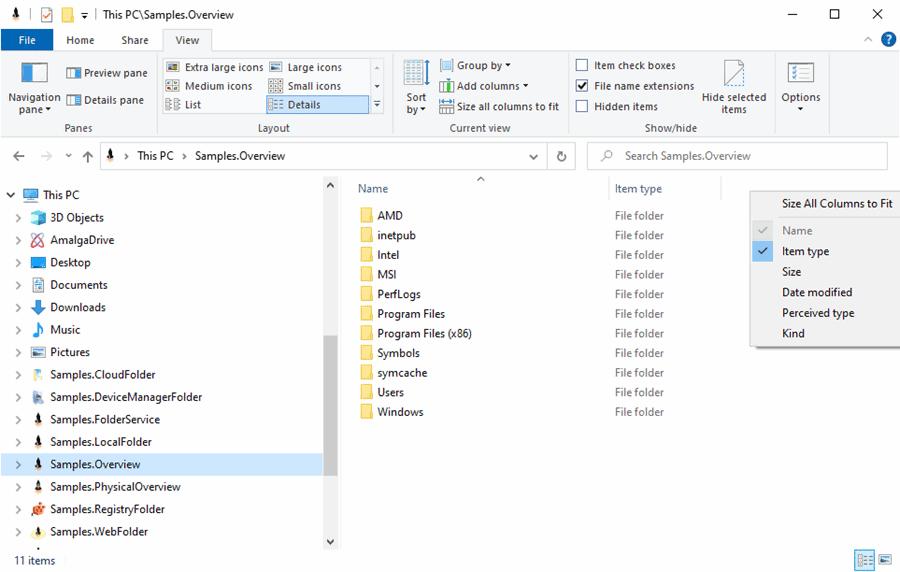
Constants
All constants are accessible through the callback.CBFSShell.Constants class.
Shell Folder Attributes |
||
| SFGAO_CANCOPY | 0x00000001 |
The specified items can be copied.
ShellItem property: CanCopy. Default for items: false. Default for folders: false. |
| SFGAO_CANMOVE | 0x00000002 |
The specified items can be moved.
ShellItem property: CanMove. Default for items: false. Default for folders: false. |
| SFGAO_CANLINK | 0x00000004 |
Shortcuts can be created for the specified items.
ShellItem property: CanLink. Default for items: true. Default for folders: true. If a namespace extension returns this attribute, a Create Shortcut entry with a default handler is added to the shortcut menu that is displayed during drag-and-drop operations. The extension can also implement its own handler for the link verb in place of the default. If the extension does so, it is responsible for creating the shortcut. A Create Shortcut item is also added to the Windows Explorer File menu and to normal shortcut menus. |
| SFGAO_STORAGE | 0x00000008 |
The specified items can be bound to an IStorage object.
Should not be changed if item content is used. Default for items: true. Default for folders: true. |
| SFGAO_CANRENAME | 0x00000010 |
The specified items can be renamed.
ShellItem property: CanRename. Default for items: false. Default for folders: false. |
| SFGAO_CANDELETE | 0x00000020 |
The specified items can be deleted.
ShellItem property: CanDelete. Default for items: false. Default for folders: false. |
| SFGAO_HASPROPSHEET | 0x00000040 |
The specified items have property sheets.
ShellItem property: HasPropertySheet. Default for items: true. Default for folders: true. |
| SFGAO_ISDROPTARGET | 0x00000100 |
The specified items are drop targets.
ShellItem property: IsDropTarget. Default for items: false. Default for folders: false. |
| SFGAO_PLACEHOLDER | 0x00000800 |
The specified items are not fully present and recalled on open or access.
|
| SFGAO_SYSTEM | 0x00001000 |
The specified items are system items.
Default for items: false. Default for folders: false. |
| SFGAO_ENCRYPTED | 0x00002000 |
The specified items are encrypted and might require special presentation.
Default for items: false. Default for folders: false. |
| SFGAO_ISSLOW | 0x00004000 |
Accessing the item (through IStream or other storage interfaces) is expected to be a slow operation.
Default for items: false. Default for folders: false. Applications should avoid accessing items flagged with SFGAO_ISSLOW. |
| SFGAO_GHOSTED | 0x00008000 |
The specified items are shown as dimmed and unavailable to the user.
Default for items: false. Default for folders: false. |
| SFGAO_LINK | 0x00010000 |
The specified items are shortcuts.
Default for items: false. Default for folders: false. |
| SFGAO_SHARE | 0x00020000 |
The specified objects are shared.
Default for items: false. Default for folders: false. |
| SFGAO_READONLY | 0x00040000 |
The specified items are read-only.
In the case of folders, this means that new items cannot be created in those folders. This should not be confused with the behavior specified by the file Read-Only attribute. Default for items: false. Default for folders: false. |
| SFGAO_HIDDEN | 0x00080000 |
The item is hidden and should not be displayed unless the Show hidden files and folders option is enabled in Folder Settings.
ShellItem property: IsHidden. Default for items: false. Default for folders: false. |
| SFGAO_NONENUMERATED | 0x00100000 |
The items are non-enumerated items and should be hidden.
Should not be changed. Default for items: false. Default for folders: false. |
| SFGAO_NEWCONTENT | 0x00200000 |
The items contain new content, as defined by the particular application.
Default for items: false. Default for folders: false. |
| SFGAO_STREAM | 0x00400000 |
Indicates that the item has a stream associated with it.
Should not be changed if item content is used. Default for items: true. Default for folders: true. |
| SFGAO_STORAGEANCESTOR | 0x00800000 |
Children of this item are accessible through IStream or IStorage. Those children are flagged with SFGAO_STORAGE or SFGAO_STREAM.
Should not be changed if item content is used. Default for items: false. Default for folders: true. |
| SFGAO_VALIDATE | 0x01000000 |
When specified as input, SFGAO_VALIDATE instructs the folder to validate that the items contained in a folder or Shell item array exist.
Should not be changed. Default for items: false. Default for folders: false. |
| SFGAO_REMOVABLE | 0x02000000 |
The specified items are on removable media or are themselves removable devices.
Default for items: false. Default for folders: false. |
| SFGAO_COMPRESSED | 0x04000000 |
The specified items are compressed.
Default for items: false. Default for folders: false. |
| SFGAO_BROWSABLE | 0x08000000 |
The specified items can be hosted inside a web browser or Explorer frame.
Default for items: false. Default for folders: true. To be used with non-folder items. |
| SFGAO_FILESYSANCESTOR | 0x10000000 |
The specified folders are either file system folders or contain at least one descendant (child, grandchild, or later) that is a file system (SFGAO_FILESYSTEM) folder.
Already handled for physical ShellFolders instances. Default for items: false. Default for folders: false. |
| SFGAO_FOLDER | 0x20000000 |
The specified items are folders.
Should not be changed. Default for items: false. Default for folders: true. |
| SFGAO_FILESYSTEM | 0x40000000 |
The specified folders or files are part of the file system (that is, they are files, directories, or root directories).
The parsed names of the items can be assumed to be valid Win32 file system paths. These paths can be either UNC or drive-letter based. Already handled for physical ShellFolders and ShellItems instances. Default for items: true (physical) or false (virtual). Default for folders: true (physical) or false (virtual). |
| SFGAO_HASSUBFOLDER | 0x80000000 |
The specified folders have subfolders.
The SFGAO_HASSUBFOLDER attribute is only advisory and might be returned by Shell folder implementations even if they do not contain subfolders. Note, however, that the converse - failing to return SFGAO_HASSUBFOLDER - definitively states that the folder objects do not have subfolders. Returning SFGAO_HASSUBFOLDER is recommended whenever a significant amount of time is required to determine whether any subfolders exist. For example, the Shell always returns SFGAO_HASSUBFOLDER when a folder is located on a network drive. Already handled, but may be changed if needed (when we are sure that the folder is empty). Default for items: false. Default for folders: true. |
Namespace Locations |
||
| NS_LOCATION_NONE |
No location.
Used for extensions that implement "file as folder" feature and that may appear anywhere within the Shell namespace. |
|
| NS_LOCATION_COMMONPLACES | CommonPlaces |
Add or Remove Programs Shell folder or Programs and Features (Windows 10 and later).
Corresponds to FOLDERID_ChangeRemovePrograms well-known ID. |
| NS_LOCATION_CONTROLPANEL | ControlPanel |
Control Panel folder.
Corresponds to FOLDERID_ControlPanelFolder well-known ID. |
| NS_LOCATION_DESKTOP | Desktop |
Desktop folder and Desktop itself.
Corresponds to FOLDERID_Desktop well-known ID. |
| NS_LOCATION_FONTS | FontsFolder |
Fonts folder.
Corresponds to FOLDERID_Fonts well-known ID. |
| NS_LOCATION_MYCOMPUTER | MyComputer |
My Computer Shell folder.
Corresponds to FOLDERID_ComputerFolder well-known ID. |
| NS_LOCATION_NETWORK_NEIGHBORHOOD | NetworkNeighborhood |
Network Shell folder.
Corresponds to FOLDERID_NetworkFolder well-known ID. |
| NS_LOCATION_ENTIRE_NETWORK | NetworkNeighborhood\\EntireNetwork |
Network Shortcuts folder.
Corresponds to FOLDERID_NetHood well-known ID. |
| NS_LOCATION_PRINTERS_AND_FAXES | PrintersAndFaxes |
Printers and Faxes folder or Devices and Printers (Windows 10 or later).
Corresponds to FOLDERID_PrintersFolder well-known ID. |
| NS_LOCATION_USERS_FILES | UsersFiles |
User's root folder.
Corresponds to FOLDERID_UsersFiles well-known ID. |
| NS_LOCATION_USERS_LIBRARIES | UsersLibraries |
Libraries folder.
Corresponds to FOLDERID_UsersLibraries well-known ID. |
Error Codes |
||
| CBFSSHELL_ERR_CANT_LOAD_PROXY | 20 |
Cannot load native proxy DLL.
The attempted location can be found in the error message. |
| CBFSSHELL_ERR_PROXY_VERSION_MISMATCH | 28 |
The major version of the proxy DLL doesn't match the major version of the .NET assembly.
|
| CBFSSHELL_ERR_NOT_INSTALLED | 55 |
Proxy DLL not installed properly.
|
| CBFSSHELL_ERR_INSTALL_FAILED | 56 |
Installation of the native proxy DLL failed.
The specific error code returned by the OS can be found in the error message. |
| CBFSSHELL_ERR_UNINSTALL_FAILED | 57 |
Uninstallation of the native proxy DLL failed.
The specific error code returned by the OS can be found in the error message. |
| CBFSSHELL_ERR_INIT_FAILED | 58 |
Initialization of the native proxy DLL failed.
The specific error code returned by the OS can be found in the error message. |
| CBFSSHELL_ERR_PROXY_NAME_MISMATCH | 59 |
The current license and the ID in the native proxy DLL name don't match.
|
| CBFSSHELL_ERR_CANT_WRITE_TO_REGISTRY | 60 |
Writing to the Windows registry failed.
|
| CBFSSHELL_ERR_ALREADY_STARTED | 61 |
This CBMenu instance has already been started.
|
| CBFSSHELL_ERR_MENU_ITEM_ALREADY_REG | 62 |
A menu item with the same verb is already registered.
|
| CBFSSHELL_ERR_MENU_ITEM_NOT_REG | 63 |
Menu items not registered.
|